Paradox Control Panel & Camera Setup
Prerequisites
-
A Patriot License with the Paradox Direct module included.
-
The Patriot Paradox Direct Task Component Installed
The Patriot Paradox Direct Task Component must be installed on each computer running an Paradox Direct Task. For Patriot 6.12.1.1 and onwards, use Patriot Paradox Direct Task Component V1
-
The Paradox Direct Client Files installed into:
The Client Folder of each workstation running the Patriot Client, that will view the Paradox Direct CCTV, needs to have the Paradox Direct client files manually copied in.
This folder is normally C:\Program Files\Patriot Systems\Patriot Client\
Download the Paradox Direct Client Files.
-
For video streaming/playback the Patriot VLC extension must be installed on each workstation
Setting up the Paradox Control Panel and Cameras
Please refer to your Paradox Control Panel manual for detailed information on installing a Paradox Control Panel with camera support and setup/registration of Paradox panels . Brief notes only on important setup for Patriot are provided in this section.
Compatible Control Panels
The following Paradox control panels are known to be compatible with Patriot's Paradox module.
Some compatible control panels may not support all feature of the Paradox module and camera features are optional: compatible control panels with no accessible cameras can still be monitored for alarms and controlled with this module.
- SP4000
- SP5500
- SP6000
- SP7000
- MG5000
- MG5050
- EVO192
- EVOHD
Network Setup
To use all feature of the Patriot's Paradox module your Paradox control panel clients must have their control panel and attached cameras accessible to your monitoring station over the internet. This means that the TCP/IP control port of the panel and the HTTP video streaming ports of all attached cameras must be forwarded through the client site's external firewall and open to inbound connections from your monitoring station's external IP address. Therefore both the client site and your monitoring station must possess static IP addresses for full service.
Setting up the Task
The Paradox Direct task can receive alarm events and video clips from registered Paradox control panels. For increased security registration is a manual process that must be performed once on each of your clients' compatible control panels. To register a panel you need to configure its IP Reporting settings with your Patriot Server's external IP address, UDP IP Port No. and password (always enter IP Profile 1 if prompted). The UDP IP Port that you choose must be correctly forwarded through your monitoring station's external firewall to allow inbound connections from remote control panels.
When setting up a backup server duplicate Paradox Direct task, all task settings should be identical except for task Description and Computer.
There is also a Paradox IPRS7 Task available. This task should no longer be used, and has been superseded by the Paradox Direct task, due to the limitation of the IPRS7 Task only supporting a single connection to a panel at a time.
Task Setup
Please read TASK SETTINGS for general information about adding tasks.
 Add a new task to the list in the Task Settings window. Double click on Paradox Direct in the drop down list in the details area of the window.
 Click the next button to continue. The Paradox Direct task settings form will appear.
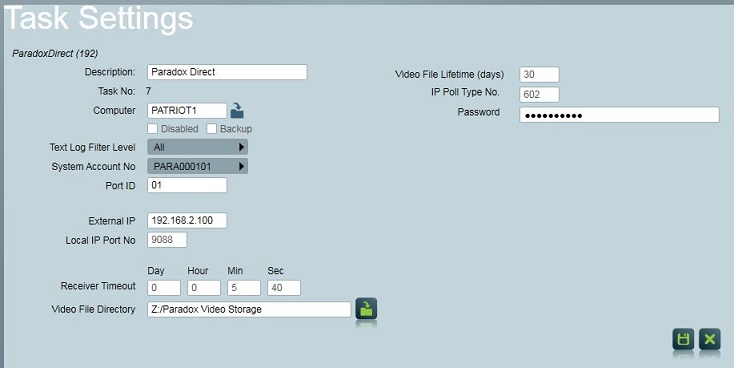
Task Settings
External IP Address is the LAN IP address of the Patriot Task server hosting the Paradox Direct task.
Local IP Port is the UDP/IP port on your Paradox Task server on which the task will listen for incoming alarm events from remote alarm panels. This UDP port must be forwarded through your external firewall.
Receiver Timeout is the length of time after which an alarm will generate if no periodic test or alarm signals are received from any registered control panels. To disable the timer, set the value to 0.
Video File Directory is a path to a writable file directory of the Patriot Task server hosting the Paradox Direct task where video event clips will be automatically downloaded to upon a video alarm event from any registered control panel. You must choose a valid path for this setting in order to view video event clips from your Patriot workstations.
Video File Lifetime (days) is the number of days to keep video alarm clips in the Video File Directory before automatic deletion.
IP Poll Type No. is the event type no. configured in your Paradox for the short-period test signal. This is usually 602.You can enter multiple ports in the IP Poll type No. field. they can be entered with a separating comma. e.g 800,803
Password is a strong password chosen by you which you will provide to your Paradox control panel clients to use when they register with your IP Reporting receiver task.
Patriot Client Setup
-
Open the Patriot client file of a compatible Paradox control panel client and go to the Zones Tab.
-
Set the Camera Type option to 'Paradox Direct'
-
Select each Zone which has a camera associated with it and tick "Camera Enabled".
-
Enter the Login & Password details for each camera.
-
Set the Http Port to the TCP port that each camera has been assigned at the client site. This TCP port must be forwarded through the external firewall at the client site so that it may receive inbound connections from workstations at your Patriot monitoring station.

A matching zone should be added to the Patriot client file for each camera enabled zone attached to a registered Paradox alarm panel. -
On the Client Event Types tab set the Event Template to the Contact ID or SIA template depending on the configuration of the client's Paradox control panel. Paradox control panels with camera support send a special event type (type no. 10) in addition to the standard Contact ID and SIA event types. This event type represents the "Video Available" signal which is sent by the panel directly after a video enabled zone activates. Usually a non-priority status type action plan should be assigned to this special event type (at either client or template level) as it does not represent an alarm signal in itself.
At this point you are ready to view live feeds and alarm video clips in response to alarm activations on camera enabled zones. If you need to be able to view on-demand live feeds from the client's cameras at any time, or if you need to remotely arm/disarm the control panel the following client setup is also required:
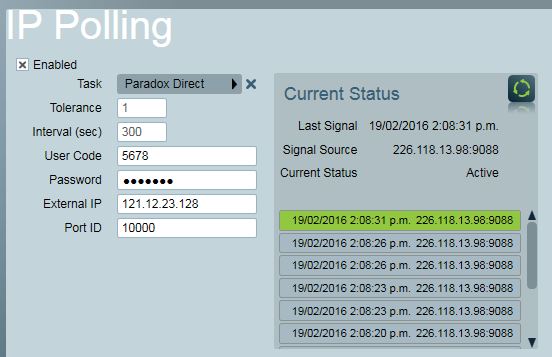
- Open the Patriot client file of a compatible Paradox control panel client and go to the Tests Tab.
- In the IP Polling section, check Enabled.
- With the Task selector, choose the Paradox Direct task setup earlier.
- Choose a polling Tolerance and Interval matching the periodic test signal configuration in the Paradox control panel.
- Enter the User Code and Password details for the Paradox control panel.
- Enter the External IP address and TCP port of the Paradox control panel. The TCP port must be forwarded through the external firewall at the client site so that it may receive inbound connections from workstations at your Patriot monitoring station.
Using the Cameras
-
The cameras can be live viewed directly by clicking on the camera icon next to the zone in the zone list on the Zones tab.
-
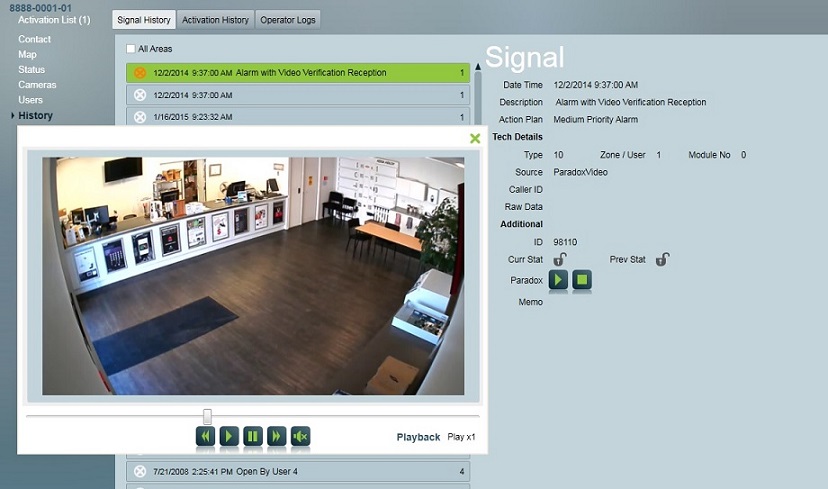
When responding to an activation from the client, a video event must have recently reported before this activation is treated as a video verification alarm. A video event is defined as an event reported from the DVR where video access makes sense (like a Motion Detection event, or the Input on the Camera has triggered). Some events from the DVR (generally system fault events) are not reported as video events. The source of the signal received generally indicates if the event is a video event or not. The video event must have reported within the time specified in the Time Range For Video Event setting (System Settings > System Wide Settings > Misc Settings > Camera Video Settings), from the time of the activation to be treated as a recent event. A Video Verification Alarm will display the Camera Button on the Activation tab (if multi screen support is enabled, the camera controls will be displayed immediately), clicking on the Camera button will take the operator directly to the camera associated with the Zone which has originated the activation. If multiple video events have recently been received, these will all be displayed on the camera window.
-
Playback of historic alarm events is possible from the Signal History area of the Patriot client file.
-
A list of installed camera zones can be requested from the site by clicking on the info button on Cameras tab.
Remote Arm and Disarm
Before you can remotely arm and disarm a compatible Paradox control panel from Patriot you must fully configure IP Polling on the Tests tab. Refer to Client Setup section above for more information.
An extra tab with the name Paradox Direct will be shown when viewing a client configured for IP Polling with the Paradox Direct task. This tab allows you to view the current status of all control panel areas and to remotely arm or disarm individual or multiple areas as required.
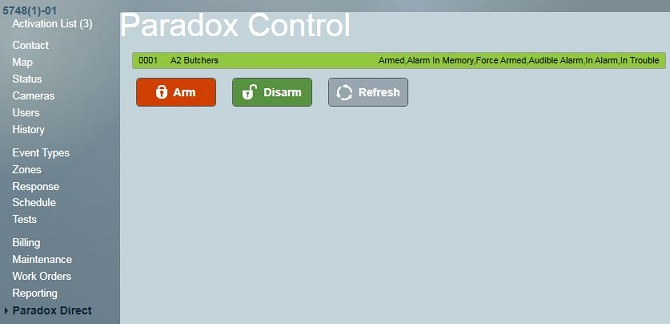
A list of all client areas is displayed in this tab. Panel areas should be set up matching client accounts, each on the corresponding Area number. For example to arm Panel Area 1, you need to have a Patriot client set up on Area 0001 ("Area" setting is found in the contact tab).
To arm or disarm a single area or multiple areas:
- Select the areas you wish to change from the list (single click, or shift-click for multiple)
- Click either the Arm or Disarm buttons.
Arming sends a "Standard Arm" command to the panels, so there may be a short delay period before the areas are fully armed. To get the current status of all the listed areas, click the Refresh button.
After a remote arm/disarm is performed a log note is appended to the client history recording the operator who triggered the arm or disarm.
7: Troubleshooting
-
When attempting to view camera footage you receive an error message regarding VLC for Windows installation.
Patriot requires components of VLC for Windows for camera footage playback. The required files can be obtained from Patriot Support and should be placed in the Patriot Client installation folder. Alternatively if a supported VLC for Windows version (v2.1.0 ) is already installed on a workstation then you can simply set the VLC Installation Folder path setting in your local Workstation Settings.