Mobotix Camera Setup
1: Prerequisites
- A Patriot License with the Mobotix Module
- Mobotix module requires files copied into the Patriot Client and installation folders (contact Patriot Support for a copy of these files).
2: Register ActiveX Component
The easiest way to download and install the ActiveX component required for viewing Mobotix cameras is to browse to this page on the Mobotix website with Microsoft Internet Explorer or another supported browser and then install the component at the prompt.
Alternatively the ActiveX component can be manually installed by downloading the component here and then open MxPEG_ActiveX.cab and extract the .ocx file into a directory. Open the Windows command prompt as an admin user and then register the ActiveX component with the following command
regsvr32 MxPEG_ActiveX_x86.ocx
3: Camera Setup
Please refer to your Mobotix camera manual for information about installing Mobotix cameras. Ensure that your Mobotix camera are accessable on the local LAN before attempting to connect remotely with Patriot.
Ensure you are able to connect to the camera via web interface by typing the camera IP into your web browser.
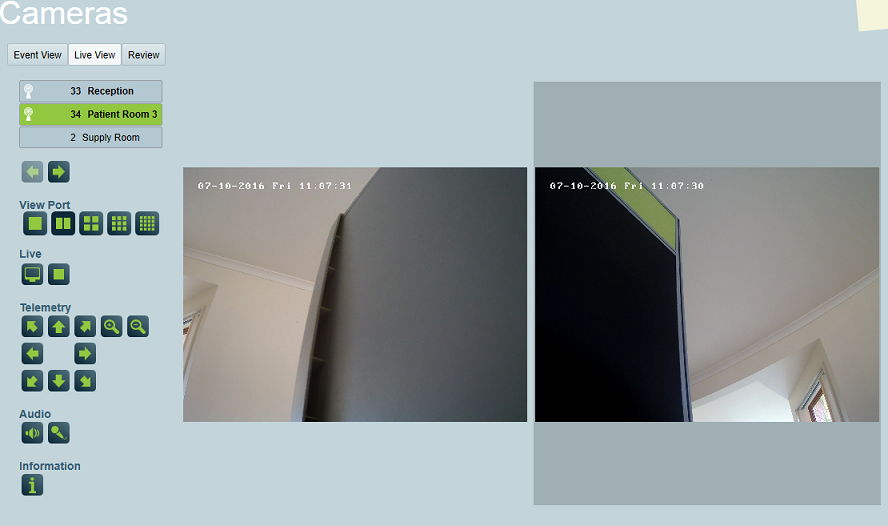
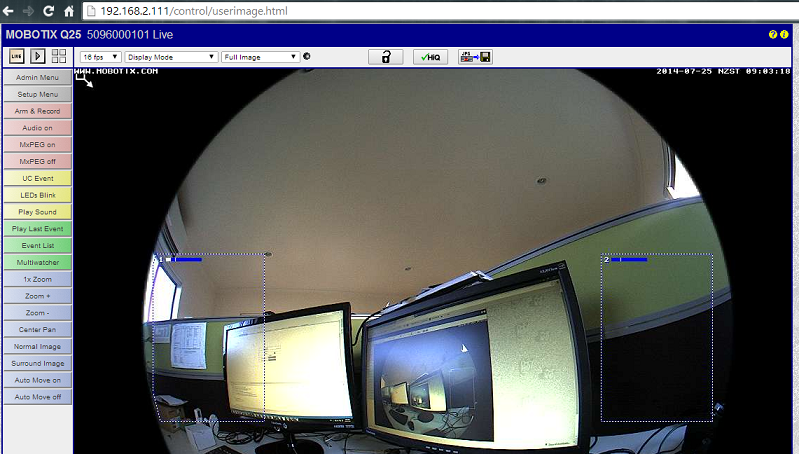 The Mobotix camera viewed from the web interface
Mobotix camera's stream video on port 80 by default. In order for Patriot to make a remote connection over the internet, this port must be forwarded through the external firewall.
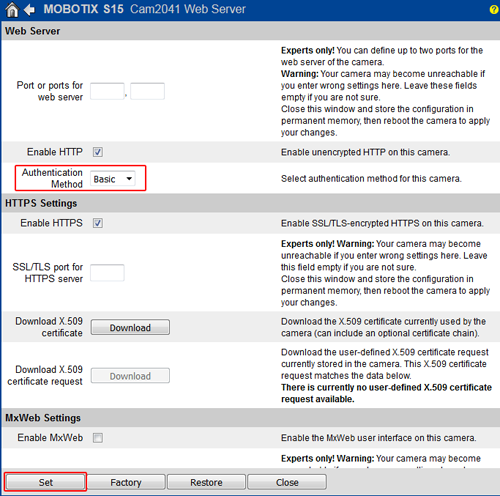
Supported authentication methods are Basic or Auto. Digest is not supported at present. Please make sure the Authentication Method is set to either Basic or Auto on the camera. You can find the settings at Admin Menu > Network Setup > Web Server.
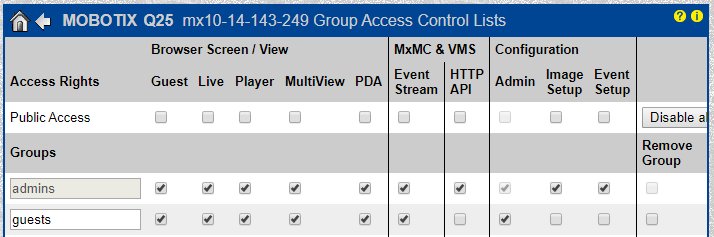
Please make sure proper access rights have been granted to the user group in Admin Menu > Security > Group Access Control Lists. Live is required to view the live feed. Player is required to view the event playback. Event Stream is required if you are using MobotixEventStream camera type.
4: Receiving Mobotix Camera Events
You must have a public static IP address to be able to receive Mobotix camera events.
Mobotix Setup
Mobotix cameras can be configured to send events (Image Analysis, Environment sensor, Signal Inputs etc.) via TCP/IP to your Patriot server. The range of event capabilities depends on the Mobotix camera model, and different models will have slightly different setup requirements - please refer to you camera's manual for detailed information. A basic setup guide including two Video Motion event regions and a Periodic Event (polling) is provided in Mobotix Event Setup.
Task Setup
Please read TASK SETTINGS for general information about adding tasks.
 Add a new task to the list in the Task Settings window. Double click on Mobotix in the drop down list in the details area of the window.
 Click the next button to continue. The Mobotix task settings form will appear.
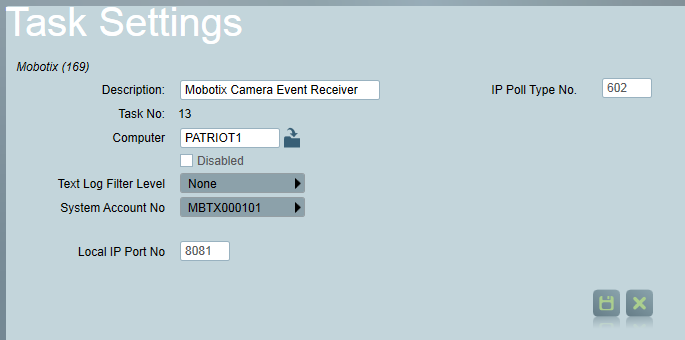
- Local IP Port No is the local TCP/IP port where the task will listen for incoming Mobotix events (this port must be forwarded through your external firewall)
- IP Poll Type No specifies the event code of the Periodic Event configured in your Mobotix client camera firmware. The task is designed to expect a polling event of this type from each connected camera within each 5 minute period.You can enter multiple ports in the IP Poll type No. field. they can be entered with a separating comma. e.g 800,803
4: Patriot Client Setup
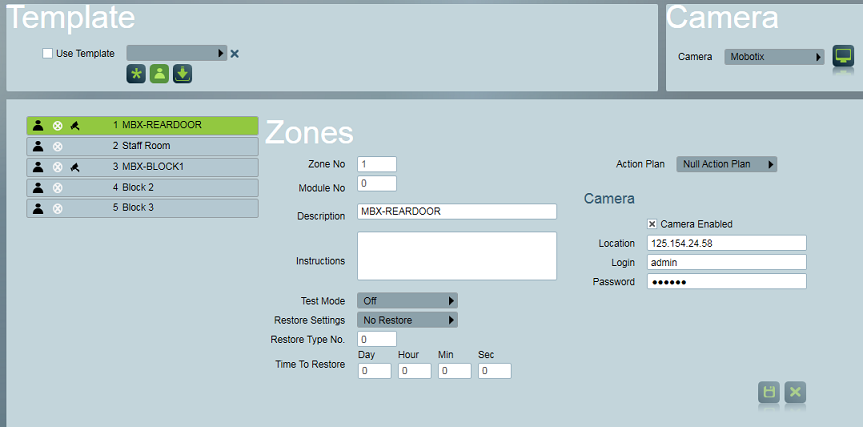
- In the Maintain Client Window, go to the Zones Tab.
- Select a Zone which will have a camera associated with it.
- Set the Camera Type option to Mobotix
- Description must match the camera/host name of the Mobotix camera e.g. mx10-14-143-249
- Tick enable Video.
- Enter the IP address of the Camera in the following format '123.25.55.55:80' . This must be a public static IP address if you are connecting over the internet
- Enter the login and password (if required).
Repeat this process and set up a zone for each camera at the site.
Dual Monitoring with an Alarm Panel
If you are monitoring the site in combination with a standard alarm panel, you will need to setup dual monitoring. In a dual monitoring scenario it is likely that you will get zone conflicts between the alarm panel zone list and the Mobotix camera listing. For this reason recommended practice is to setup a separate area account for the camera system. See the Dual Monitoring section of DVR monitoring for more details.
5: Operation: Using the Cameras
You can view Cameras from different screens within Patriot
- The camera can be viewed directly by clicking on the camera icon next to the zone, in the zone list.
- When an alarm is received for a site equipped with cameras and a zone with camera coverage has activated, a Camera Button will appear on the Activation tab (if multi screen support is enabled, the camera controls will be displayed immediately). Clicking on the Camera button will take the operator directly to the camera associated with the Zone which has originated the activation.
- Cameras can be viewed in the Maintain Client Window under the Cameras Tab
Operational Functions
- When responding to an activation, the camera display will be automatically put into Event view. The first connection shows the alarm event (beginning 10 seconds before the alarm) for the activated zone. The alarm event footage can be replayed easily by clicking on the play from time button. The second connection shows the live feed from the activated zone.
- When using the camera controls in anything other than single view (i.e. quad, nine etc), the camera controls on the left hand tool bar apply to the selected connection. The selected connection has a green border around it. You can change the selected connection by clicking on another connection. The camera control buttons will only be enabled if a camera (from the camera list) has been selected.
- A list of installed camera numbers can be requested from the site by clicking on the info button, from the Clients Camera tab.
Troubleshooting
If you get "Unable To Connect To Camera" errors when attempting to view an event, make sure that you have either Basic or Auto authentication mode selected for the camera.
- Log in to the web interface of the camera, by opening the camera address in a browser.
- Open the Admin Menu.
- Open Network Setup > Web Server
- Change Authentication mode to Basic
- Click on Set to apply changes. You might need to reboot the camera to make it effect.
If you get "Unable to connect to camera. The server committed a protocol violation. Section=ResponseHeader Detail=CR must be followed by LF" errors when attempting to view the camera live feed in Patriot, make sure the following is added to the Patriot Version 6 Client's configration file:
<system.net>
<settings>
<httpWebRequest useUnsafeHeaderParsing = "true"/>
</settings>
</system.net>