Onvif Camera Setup
Prerequisites
- A Patriot License with the Onvif Camera Module
- For video streaming/playback the Patriot VLC extension must be installed on each workstation.
Patriot Client Setup
- In the Maintain Client Window, go to the Zones Tab.
- Set the Camera Type option to Onvif.

- Select a Camera Stream. If "Substream" is selected, then Patriot will request the alternative stream from each Onvif camera.
- Select a Zone which will have a camera associated with it. Tick the Camera Enabled option.
note
Zone Numbers with Camera Enabled should be unique. You should not use the same zone number twice (with different module numbers) for two cameras, as this is likely to cause problems with camera selection.
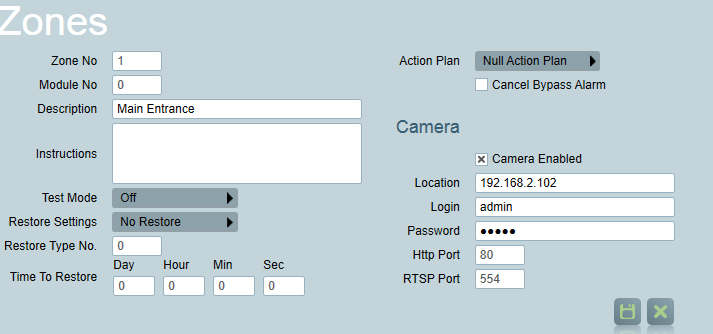
- Enter the IP address of the camera into the Location text box. This must be a public static IP address if you are connecting over the internet.
- Enter the login and password (if required).
- Enter the HTTP and RTSP port numbers. These ports must be correctly forwarded if you are connecting over the internet.
Dual Monitoring with an Alarm Panel
If you are monitoring a Onvif camera site in combination with a standard alarm panel, you will need to setup dual monitoring. In a dual monitoring scenario it is likely that you will get zone conflicts between the alarm panel zone list and your Onvif cameras. For this reason recommended practice is to setup a separate area account for the camera system. See the Dual Monitoring section of DVR monitoring for more details.
Operation: Using the Cameras
You can view Cameras from different screens within Patriot
- The cameras can be viewed directly by clicking on the camera icon next to the zone in the zone list.
- When an alarm is received for a site equipped with cameras, and a zone with camera coverage has activated, a Camera Button will appear on the Activation tab (if multi screen support is enabled, the camera controls will be displayed immediately), clicking on the Camera button will take the operator directly to the camera associated with the Zone which has originated the activation.
- Cameras can be viewed in the Maintain Client Window under the Cameras Tab
Operational Functions
- When using the camera controls in anything other than single view (i.e. quad, nine etc), the camera controls on the left hand tool bar apply to the selected connection. The selected connection has a green border around it. You can change the selected connection by clicking on another connection. The camera control buttons will only be enabled if a camera (from the camera list) has been selected.
- A summary of a camera's technical specification can be requested by clicking on the info button from the Clients Camera tab.