Videofied Camera Setup
The Videofied Task runs in conjunction with the Frontel software from RSI. This allows rapid response to alarms with one click viewing of video from the event.
Prerequisites
-
Patriot license with Videofied module registered
-
Frontel Server software installed on one server machine. This can be the Patriot server or on a separate server if required.
-
TCP Port 5432 allowed through firewall on Frontel server machine
-
Frontel Alarm Viewer software installed on each Patriot workstation that will be used for video monitoring.
Frontel Server Setup
Configure Frontel to send events to Patriot
In Frontel Config, select the GI tab.
Select the Patriot server from the list, or manually enter the server address. Select a free TCP port that the task will use, and click Define.

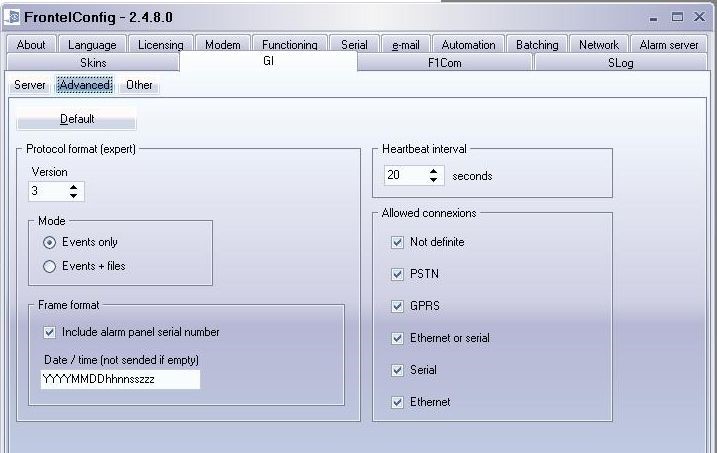
Select the Advanced tab, and set the following options.
Protocol Version: 3
Heartbeat Interval: 20 seconds
The other settings should be left using their defaults.
Update INI config file
Edit frontel.ini and look for the AlarmDispatchModeDB line.
If Patriot and Frontel are on separate servers, this line should be:
AlarmDispatchModeDB=1
If Patriot and Frontel are running on the same server, this line should be:
AlarmDispatchModeDB=0
Restart the Frontel services using the Frontel Services Manager to apply the updated configuration.
Patriot Workstation Setup
Once the Frontel Alarm Viewer is installed on each workstation, start it directly to test connectivity to the Frontel Server. When starting the alarm viewer, a list of all configured Frontel panels should be shown. If the list is not displayed correctly, double-check the connection details and firewalls. Using the server IP instead of the server name can also help.
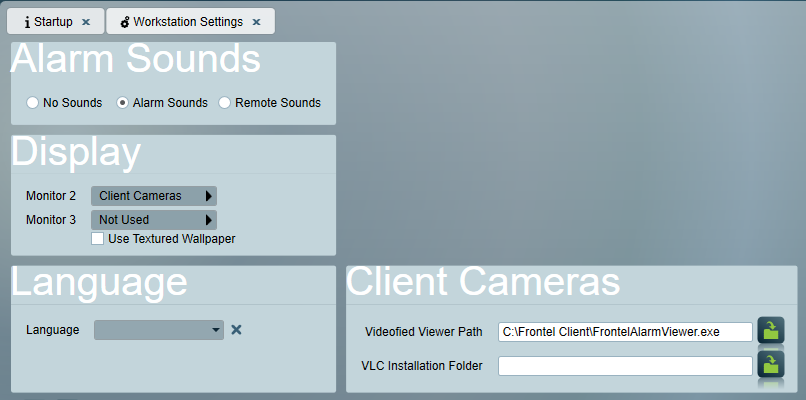
In Patriot, open Workstation Settings, under the System Menu, in System Settings.
Set the Videofied Viewer Path to match the Frontel Alarm Viewer install location.
Patriot Task Setup
Please read TASK SETTINGS for general information about adding tasks.
 Add a new task to the list in the Task Settings window. Double click on Videofied in the drop down list in the details area of the window.
 Click the next button to continue. The Videofied task settings form will appear.

Local IP Port No should match the Port number selected in the Frontel settings above.
Receiver Timeout should be a small amount longer than the heartbeat frequency selected in the Frontel settings.
Zones Use. Videofied uses two different numbering systems for inputs. This option controls which one Patriot uses for zone numbers - the Detector Number or the Device Number.
 Click on the diagnostics button and confirm that you see a TEST message sent within 20 seconds. If this TEST message is not received, double-check the Patriot task settings and the Frontel GI Config.
Videofied Client Setup
When creating a client to use Videofied monitoring, the Patriot Client ID should match the Videofied Site ID configured in the panel. The port ID should match the Port ID setting in the Videofied task.
Videofied clients should use the Videofied event type template. If required, this template can be downloaded from the Receivers And Format Templates page.
On the Zones tab, select Videofied as the Camera Type.
Camera Operation
When a Videofied event is received, a camera button will be shown on the activation. Clicking this button will open the Videofied Alarm Viewer and display the relevant alarm. When the operator is finished with the alarm, they should close the alarm viewer window.
Viewing cameras on demand is not possible using Videofied.