We.R Video Receiver (Optional Module)
The We.R Receiver task receives events from We.R devices. Video verification clips can also be played during an activation.
Your licence must include the We.R module to use these features.
1: Task Setup
Add a new Task into the system.
See Tasks for general task setup information.Select We.R as the task type.
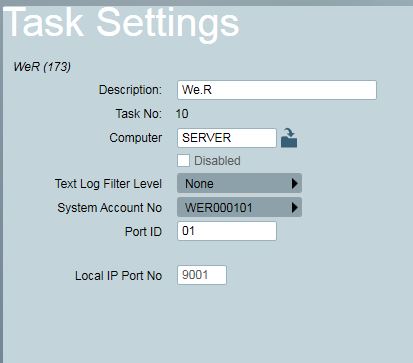
Local IP Port No. Select an unused TCP port on the server, which will be used for the incoming events. This port will need to be accessible from the We.R server, so firewalls and routers will need to be configured appropriately. Depending on your server setup, you may also need to add an HTTP Namespace Reservation on the selected port.
2: We.R / Camera Setup
Set up the We.R server to report events to Patriot on the selected Local IP Port above. Configuration of the We.R main server is outside of the scope of this document. For assistance with this, contact your We.R supplier.
For each We.R client that will be monitored, make a note of the Panel ID, as well as the Device ID of each relevant device (e.g. Motion Detector, Camera).
3: Patriot Client Setup
Set up a new client for each We.R unit. The Patriot client ID should match the We.R Panel ID. The area should be left as 0001, and the Port ID should match the task settings.
For each attached device (e.g. Camera, Motion Detector), set up a zone in Patriot. The Patriot zone # should match the device id in We.R.
The We.R event template can be downloaded from the Templates page. We.R clients should use this template for their event types.
If Video Verification is required, select the We.R camera type from the Zones tab. When an activation with video verification available is received, a camera button will appear on the activation allowing the verification video to be replayed. After the clip has completed, it can be replayed if required by clicking the replay button which appears over the video clip.