Dahua DVR-Camera Setup
Prerequisites
- A Patriot License with the Dahua Module
- The Dahua Client Files (x86 or x64 or both) installed into:
-
The Client Installation Folder of each workstation that will view Dahua CCTV.
For x86:
This folder is normally C:\Program Files (x86)\Patriot Systems\Patriot Version 6 Client\
For x64:
This folder is normally (x64) C:\Program Files (x86)\Patriot Systems\Patriot Version 6 Client\CameraViewer\x64
-
The Task Service installation folder for each service that will host a Dahua task.
For x86:
This folder is normally C:\Program Files (x86)\Patriot Systems\Patriot Task Service\
For x64:
N/A
Patriot supports both in-process (x86) and dedicated process (x64) camera viewing. Dedicated process (x64) is preferred due to x86 memory restrictions and isolation from other functions of the Patriot client. To switch between dedicated process x64 and in-process x86 mode check or uncheck "Use Dedicated Process" in the Patriot Client workstation settings. The Dahua task currently only supports the x86 client files.
Contact Patriot Support for these files.
Dahua Client Files Versions
- Latest version: 3.5.8
- Previous available version: 3.5.5
To find your current version check the File Version property of the "avnetsdk.dll" file.
Setting up the DVR and Cameras
Full DVR configuration is beyond the scope of this document. In this section DVR settings important to Patriot monitoring are covered only. Please refer to your Dahua DVR manual when configuring a new DVR installation.
See also
Essential DVR details
- DVR IP address and SDK Port number
- DVR Username and Password
- DVR system time and time zone must be set correctly, it is strongly recommended that the time server sync. feature (NTP) is enabled to ensure the system time is always correct. Incorrect system time may lead to Patriot not locating the correct event video clip during an alarm response.
Patriot Client Setup
- In the Maintain Client Window, go to the Zones Tab.
- Set the Camera Type option to Dahua.

-
Enter the IP address and the Port Number of the DVR into the Location text box, in the following format:
123.123.1.15:37777(<IP Address>:<Port>)This must be a public static IP address if you are connecting over the internet. If no IP Port is entered then Patriot will use the default port 37777.
-
Enter the login and password (if required).
-
Select a Camera Stream. If "Substream" is selected, then Patriot will request the camera's "Extra Stream #1" instead of the main live stream.
-
Override the Event Reporting setting if different to the task setting (see below).
-
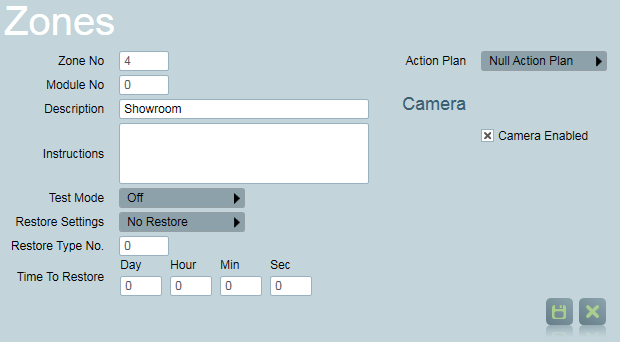
Select a Zone which will have a camera associated with it. The zone number must match the camera number on the DVR.
Zone Numbers with Camera Enabled should be unique. You should not use the same zone number twice (with different module numbers) for two cameras, as this is likely to cause problems with camera selection.

- Tick the Camera Enabled option.
- If the Dahua device is located in another timezone, then make sure that the timezone set in the device matches the timezone set in the Patriot client's City on the Contact tab.
Dual Monitoring with an Alarm Panel
If you are monitoring a Dahua DVR site in combination with a standard alarm panel, you will need to setup dual monitoring. In a dual monitoring scenario it is likely that you will get zone conflicts between the alarm panel zone list and the Dahua camera listing. For this reason recommended practice is to setup a separate area account for the camera system. See the Dual Monitoring section of DVR monitoring for more details.
Remote Arming/Disarming the DVR
Dahua DVR's and attached cameras which have alarm event reporting enabled are not normally configured with Set/Unset schedules. For this reason Patriot includes a remote Arming/Disarming feature which is designed to work in both Dual Monitoring and stand-alone Dahua DVR monitoring scenarios.
View the Remote Arming/Disarming a DVR document for further details.
Installing the Dahua event template
You can download the Dahua event types template from the Receivers And Format Templates page.
For instructions on how to import this template, see How To Import Templates.
Setting up the Task
The Dahua receiver task will only log alarm events to Patriot Dahua clients that have been configured and remotely armed as detailed in the previous section. Dahua clients that have Set (Closed) status at the time of Task start up are automatically armed by the task.
Task Setup
Please read TASK SETTINGS for general information about adding tasks.
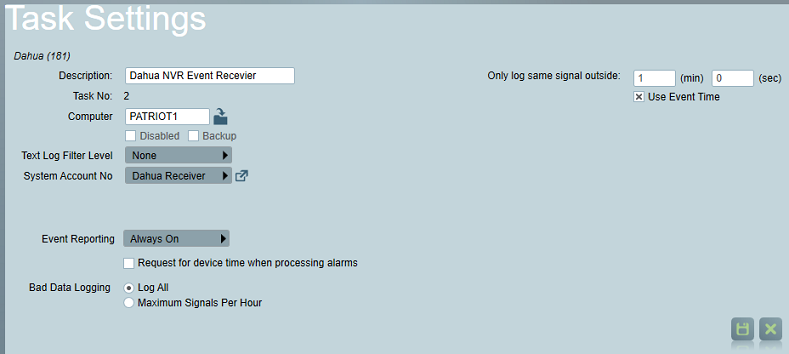
Add a new task to the list in the Task Settings window. Double click on Dahua in the drop down list in the details area of the window.
Click the next button to continue. The Dahua task settings form will appear.

Dahua Task Settings
-
The Only Log Same Signal outside (minutes):
This setting prevents repeated signals from cluttering the signal history. This is useful if a DVR sends the same signal repeatedly. You can set the number higher to stop the repeat signal from interfering. When monitoring for Motion Detection, a setting above 1 minute is recommended.
-
Event Reporting: Defines the default behaviour of connected DVR's regarding event reporting. This setting should be set to the behaviour you require for the majority of sites being monitored through this task. The option can be overridden on a per site basis (within the Patriot client) if required. Three options are available:
- Always On: for sites that should always report events.
- Armed On Status: for sites which should only report when the site is armed.
- Always Off: for sites that should never report events. This will help speed up the startup and shutdown time of the task.
-
Use Event Time:
If enabled, Patriot will use the time an event is received to locate the event video clip. This is the default and recommended behaviour as it works well regardless of whether your Dahua devices are configured for continuous or event driven video recording. If this option is disabled Patriot will return to its legacy behaviour for finding event clips: the newest video clip after the event was received is selected. This behaviour is not recommended because it does not work well with Dahua devices in continuous recording mode, and it is known to lead to performance problems when the system is under high load with many devices sending events simultaneously.
-
Request for device time when processing alarms: when enabled Patriot will request a timestamp from the device each time an event with an associated video recording is received. This timestamp can then be used by Patriot to locate the video recording.
Enabling this option can lead to performance problems when large numbers of Dahua devices are connected. By default this option is disabled; and it is generally not required provided that the following conditions are met:
- All your connected Dahua devices have the correct time set (time server sync. is recommended)
- Your Patriot server has the correct time set (time server sync. is recommended)
- If the Dahua device is located in another timezone from your Patriot server, then the device must have this timezone set and it must match the time zone configured in the Patriot client account.
-
Configure the reported events:
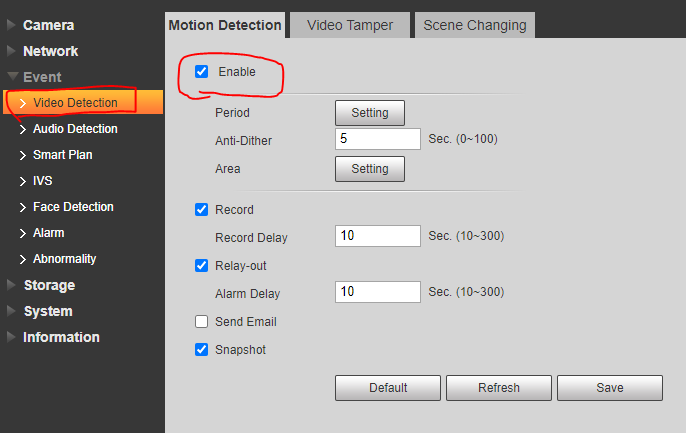
Its possible to control which events are enabled, and therefore reported to the monitoring center in the Camera and NVR settings.

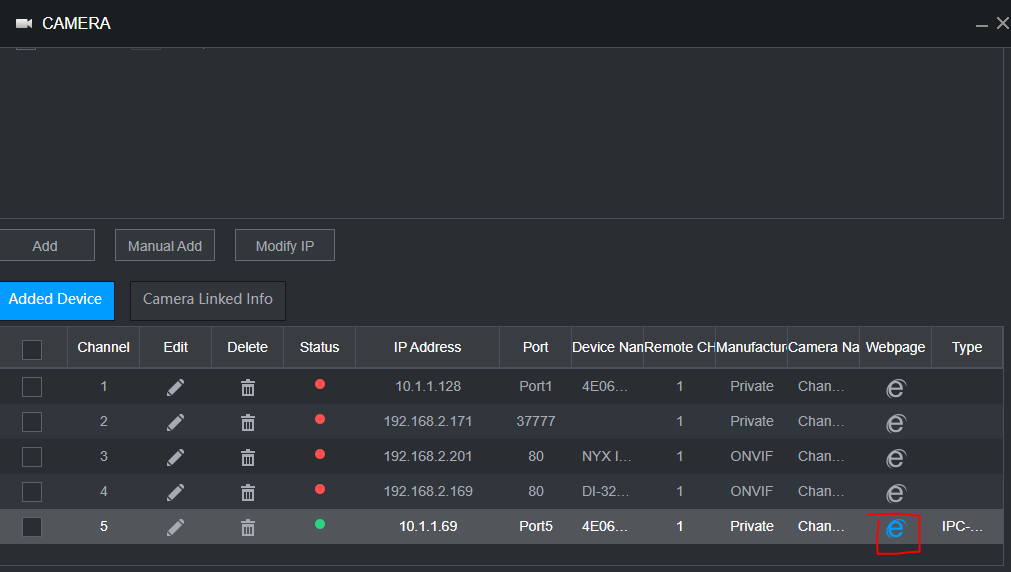
Dahua IP Camera Config The screenshot above is the web interface of an IP camera and shows an example of enabling the Motion detection event. Other events can be configured in a similar way. We are unsure if its possible to configure the events from the NVR UI, this may need to be configured on each camera individually. See the screenshot of the NVR's web interface below.

Dahua NVR Config
Operation: Using the Cameras
You can view Cameras from different screens within Patriot
- The camera can be viewed directly by clicking on the camera icon next to the zone, in the zone list.
- When an alarm is received for a site equipped with cameras, and a zone with camera coverage has activated, a Camera Button will appear on the Activation tab (if multi screen support is enabled, the camera controls will be displayed immediately), clicking on the Camera button will take the operator directly to the camera associated with the Zone which has originated the activation.
- Cameras can be viewed in the Maintain Client Window under the Cameras Tab
- Playback of historic alarm events is possible from the Signal History area of the Patriot client file.
Operational Functions
- When responding to an activation, the camera display will be automatically put into Event view. The first connection shows the alarm event (beginning 10 seconds before the alarm) for the activated zone. The alarm event footage can be replayed easily by clicking on the play from time button. The second connection shows the live feed from the activated zone.
- When using the camera controls in anything other than single view (i.e. quad, nine etc), the camera controls on the left hand tool bar apply to the selected connection. The selected connection has a green border around it. You can change the selected connection by clicking on another connection. The camera control buttons will only be enabled if a camera (from the camera list) has been selected.
- A list of installed camera numbers can be requested from the site by clicking on the info button, from in the Clients Camera tab.