UDP (IPE) Camera Setup
1: Prerequisites
-
A Patriot License with the UDP Camera Module
-
The UDP Camera Client Files installed into the Patriot V6 Client installation folder of each workstation that will view the UDP CCTV. This folder is normally C:\Program Files\Patriot Systems\Patriot Client\
Contact Patriot Support for a copy of these files.
-
For video streaming/playback the Patriot VLC extension must be installed on each workstation.
2: Setting up the UDP IPE Cameras
Full IP camera configuration is beyond the scope of this document. In this section camera settings important to Patriot monitoring are covered only. Please refer to your UDP IPE camera manual when configuring a new camera installation.
Essential Camera details
- Camera external IP address, RTSP Port number and HTTP Port number
- Camera Username and Password.
- RTSP must be enabled
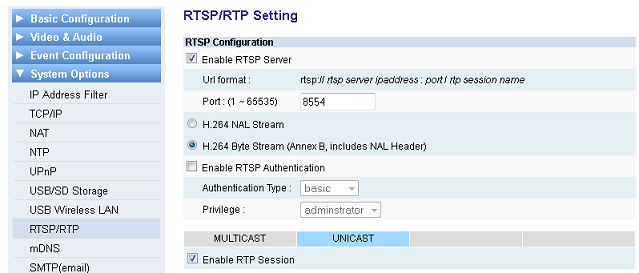
- Stream names of the first and second RTSP streams must be left as default ("firststream" and "secondstream" respectively)
Camera event specific details
In order to receiver events from a UDP IPE camera several configuration steps are required in the Event Configuration section of the camera's web interface.
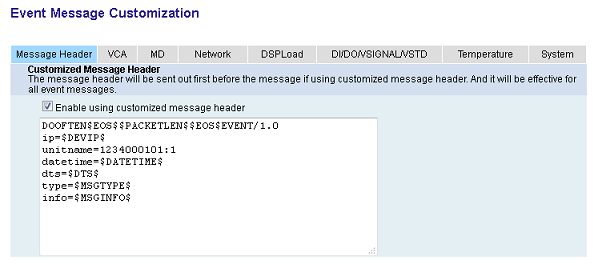
Event Configuration > TCP Push > Message Customization
Camera unitname must be set in the format "1234000101:4" (for a Client with Client ID 1234, Area 0001, Port 01 and a UDP IPE Camera on Zone 4).
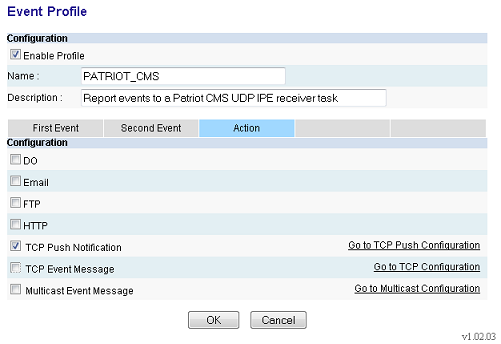
Event Configuration > Event Profile
An Event Profile must be created for Patriot which defines which camera events should be sent to the Patriot UDP IPE receiver task (section 4).
3: Patriot Client Setup
- In the Maintain Client Window, go to the Zones Tab.
- Set the Camera Type option to UDP IPE.

- Select a Camera Stream. If "Substream" is selected, then Patriot will request the alternative stream from each UDP IPE camera.
- Select a Zone which will have a camera associated with it. Tick the Camera Enabled option.
Zone Numbers with Camera Enabled should be unique. You should not use the same zone number twice (with different module numbers) for two cameras, as this is likely to cause problems with camera selection.
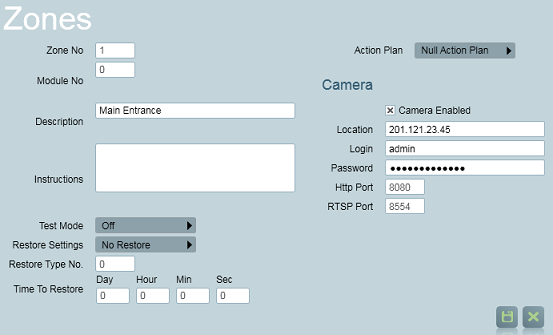
- Enter the IP address of the camera into the Location text box. This must be a public static IP address if you are connecting over the internet.
- Enter the login and password (if required).
- Enter the HTTP and RTSP port numbers. These ports must be correctly forwarded if you are connecting over the internet.
Dual Monitoring with an Alarm Panel
If you are monitoring a UDP IPE camera site in combination with a standard alarm panel, you will need to setup dual monitoring. In a dual monitoring scenario it is likely that you will get zone conflicts between the alarm panel zone list and your UDP IPE cameras. For this reason recommended practice is to setup a separate area account for the camera system. See the Dual Monitoring section of DVR monitoring for more details.
Remote Arming/Disarming the Cameras
UDP IPE cameras which have alarm event reporting enabled are not normally configured with Set/Unset schedules. For this reason Patriot includes a remote Arming/Disarming feature which is designed to work in both Dual Monitoring and stand-alone UDP IPE camera monitoring scenarios.
View the Remote Arming/Disarming a DVR document for further details.
Installing the UDP IPE event template
You can download the UDP IPE event types template from the Receivers And Format Templates page.
For instructions on how to import this template, see How To Import Templates.
4: Setting up the Task
The UDP IPE receiver task will only log alarm events to Patriot UDP IPE clients that have been configured and remotely armed as detailed in the previous sections. UDP IPE clients that have Set (Closed) status at the time of Task start up are automatically armed by the task.
Task Setup
Please read TASK SETTINGS for general information about adding tasks.
 Add a new task to the list in the Task Settings window. Double click on UDP IPE in the drop down list in the details area of the window.
 Click the next button to continue. The UDP IPE task settings form will appear.
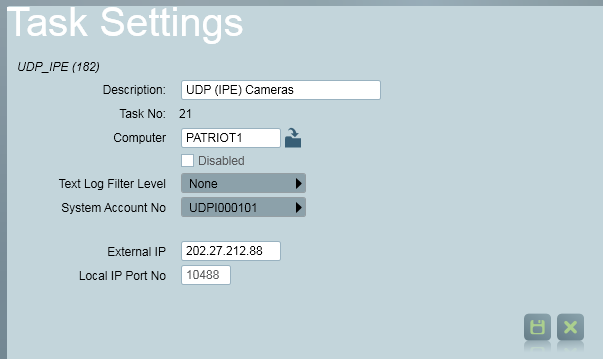
UDP IPE Task Settings
-
External IP: This is your Patriot Task server's external IP address.
-
Local IP Port No: This is the TCP/IP port that Patriot will use to listen for incoming UDP IPE camera connections.
To be able to receive events from remote cameras the task's Local IP Port must be forwarded through your firewall.
Operation: Using the Cameras
You can view Cameras from different screens within Patriot
- The cameras can be viewed directly by clicking on the camera icon next to the zone in the zone list.
- When an alarm is received for a site equipped with cameras, and a zone with camera coverage has activated, a Camera Button will appear on the Activation tab (if multi screen support is enabled, the camera controls will be displayed immediately), clicking on the Camera button will take the operator directly to the camera associated with the Zone which has originated the activation.
- Cameras can be viewed in the Maintain Client Window under the Cameras Tab
Operational Functions
- When using the camera controls in anything other than single view (i.e. quad, nine etc), the camera controls on the left hand tool bar apply to the selected connection. The selected connection has a green border around it. You can change the selected connection by clicking on another connection. The camera control buttons will only be enabled if a camera (from the camera list) has been selected.
- A summary of a camera's technical specification can be requested by clicking on the info button from the Clients Camera tab.