Mobotix Event Setup
Summary
In this document a basic Mobotix event setup is configured, step by step, for remote TCP/IP event reporting to Patriot. Two Video Motion Detection events and a Periodic Polling Event are added to an Action Group for reporting via an IP Notify Profile.
Setup
Add Events
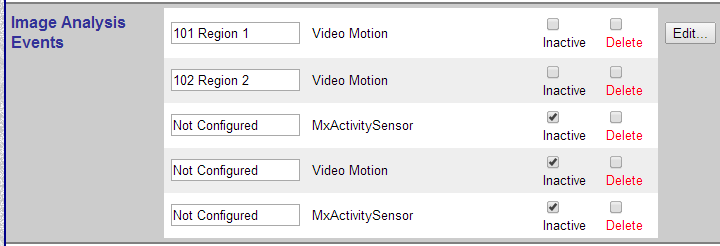
Open the Mobotix camera setup menu through the web interface. In the Event Control section open the Event Overview. Activate the events which you want to be transmitted to Patriot. Event names are important: the first three characters of an event name correspond to the Patriot Event Type number and therefore Event names must begin with a three digit number. The remainder of the event name (if any) will be displayed as the signal description within Patriot.
It is not usually recommended to include the comma character in an Event name as Mobotix uses this internally as a delimiter when transmitting multiple events in one signal. Using the comma character in an event name will cause multiple events to trigger in Patriot from a single Mobotix source event.

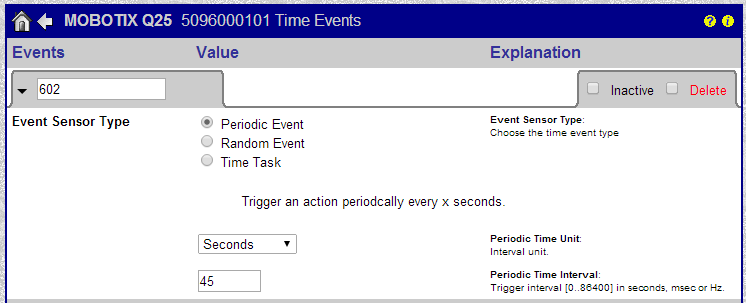
In addition to your alarm events, you should always activate a Periodic Event to server as Polling signal for Patriot to monitor the camera's connection status. The name of the Periodic Event must begin with a three digit code which matches the Patriot Mobotix Task's IP Poll Type No setting.
A Polling Failure activation will generate in Patriot if no event is received from a Mobotix camera in any given 5 minute interval. You should therefore configure your Periodic Event's Periodic Time interval to a value less than 5 minutes. Individual Mobotix Polling signals will not be logged to the Patriot database.
You can also use the Time Task option to report a regular poll. There have been reports that Periodic Event does not always work with Action Group Time Tables on some Mobotix firmwares. If you are using Time Tables and are experiencing problems then it is recommended that you switch to Time Task mode.

Add IP Notify Profile
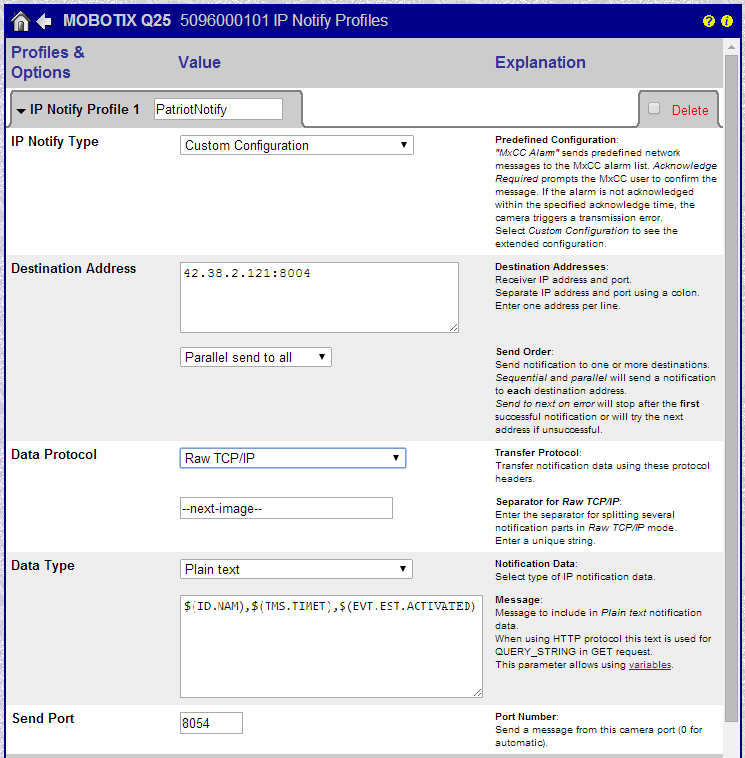
Add a new IP Notify Profile for Patriot from the Admin Menu of the Mobotix camera web interface. The IP Notify Profiles specifies the public TCP/IP address and port of your Patriot server along with raw signal format.
Enter the Computer's IP Address and Port Manually on the Destination Address
The correct Data Type Message for Patriot integration is as follows:
$(ID.NAM),$(TMS.TIMET),$(EVT.EST.ACTIVATED)
Optionally you can also specify the Patriot Client No. in the Message. E.g:
<1234BASE01>$(ID.NAM),$(TMS.TIMET),$(EVT.EST.ACTIVATED)
Specifying the Patriot client no. is required under some network architectures because if it is not specified then Patriot will use the IP or DNS name entered on the client camera zone to lookup which Patriot client triggered a particular event, but the IP client source address may not always match - e.g. if multiple internet connections are in use at the site.

Create an Action Group
Now that you have a set of events activated and an IP Notify Protocol configured, you just need to create an Action Group to encapsulate them. Action Groups are configured from the main Setup Menu of the Mobotix web interface.
If you wish to assign a Time Table to the action group (e.g. so that the camera on reports event outside of business hours) you will need to create two "Patriot Notify" Action Groups: one with a timetable selected to report the alarm events, and another without a timetable selected to report the polling signal.

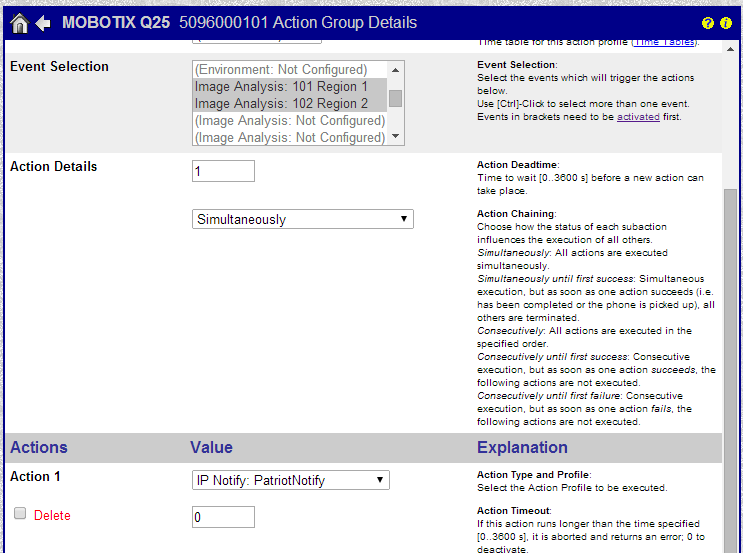
In the Event Selection section of the Action Group details, highlight the events which you want to report to Patriot. In the Actions section, specify the IP Notify profile which you created for remote TCP/IP communications to Patriot.
