Siemens (Vanderbilt) EDP Task Setup
The Siemens EDP task is no longer the preferred method of connecting to alarm panels that support the Siemens EDP protocol. Instead, if the alarm panel has support for FlexC then this should be used in combination with Patriot's FlexC receiver task. Alternatively a software receiver can also be supplied by Vanderbilt which emulates a Surgard receiver.
Patriot's Siemens EDP task adds native compatibility for Siemens panels using the EDP IP signalling format. Once installed, no external receiver software/hardware will be required to receive signalling from supported Siemens panels. This format is used by SPC intrusion panels with IP interfaces or with GSM modems using GPRS.
Prerequisites
- Patriot version 6.2 installed with build number later than 01.06.13.
- Siemens panels with Firmware version 2.3 and higher only are supported.
- Frame layout version two must be enabled within the supported Siemens panels.
- The Patriot Siemens EDP module must be registered to use this task.
- Secure LAN with internet access and correctly configured firewall.
Patriot's Siemens EDP task does not currently provide support for Video, Audio or Control commands via the EDP protocol.
Patriot Task Setup
Under System > Tasks > Task Settings, select the insert (+) button to add a new task. Select Siemens EDP from the drop-down, and click next.

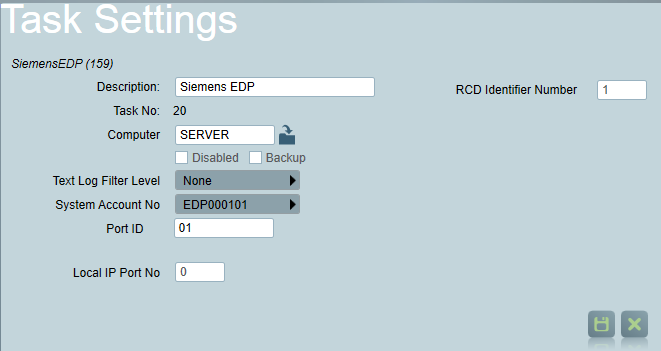
First set the general task information: Description, Computer, and Port ID to suit your system layout. See general task settings for more information. The Local IP Port No should be set to a free TCP port on the computer hosting the Siemens EDP task (in most configurations this will be your main Patriot server). Depending on your network setup, port forwarding may need to be configured with your network router to correctly forward signals to the Patriot task. The RCD Identifier Number will also need to be set in the task. This number is programmed into Siemens EDP devices and is used to identify your Patriot receiver task. This can be any number required, however a large number is recommended to avoid any clashes with existing panel configurations and for extra security.
Once the task is set up correctly and saved, Patriot will automatically begin listening for signals from Siemens EDP panels. This can be checked from the task diagnostics screen.
Panel configuration
There are several settings that need to be configured in each Siemens EDP panel before your Patriot task can begin decoding communications:
- The Frame Layout Version must be set to 2 in the panel settings.
- The panel must be configured to use TCP/IP as the transport mode.
- The panel must be configured to communicate to the Patriot server IP address, with the IP port and RCD Identifier matching the numbers configured in the task settings as detailed above.
- Make a note of the Panel ID as this number must correspond to the Client ID of a client account file setup within Patriot.
- Polling should be enabled, and an appropriate duration set.
- Encryption should be enabled. Make a note of the encryption key used as it will be needed during client account set up within Patriot.
The RCD Identifier is included in all signals from the panel. If Patriot receives a signal with an RCD Identifier that doesn't match the task setting value, it will ignore the data.
Patriot Client Setup
Before signals can be received from a panel, a client account must be created for it to log events against. The Panel ID is used as the Client ID within Patriot, and this is padded out to 10 digits with zeros. For example, a panel with ID 1234 would be logged against client ID 0000001234. The Siemens EDP protocol does not support partitions, all signalling is received on the default client account area: 0001. This area code must be set correctly for IP polling to operate. The Port ID should match the Port ID in the task settings as above. Once the client is created, it should be set up with the standard SIA template on the Event Types tab.
If you wish to enable IP Polling on a particular panel, select the Tests tab on the corresponding Patriot account. Please refer to the Client Tests Tab documentation for further information. If the panel is configured to encrypt data traffic, tick the Encrypted box and enter in the encryption key. This key should be entered as 32 hexadecimal digits, e.g. "0456A9BD..." etc.
Finally, save the client and begin testing. Details about the last received poll can be seen from the Poll Details section below the IP Polling settings, once the client changes are saved.
If Patriot receives a signal from a client who is not configured for IP Polling, the signal will be ignored. Also, if the client is configured to use encryption and a non-encrypted signal is received, this signal will be ignored as well.