Emizon
Emizon
Emizon
There are two tasks available - Emizon service and Emizon Serial. The first task Emizon service - communicates via IP to the Emizon servers and requires the Emizon module. It allows two way communication with panels through the Emizon servers and can control relays. This needs the Emizon module.
The second task - Emizon Serial, supports an Emizon receiver which emulates an Ademco receiver. This supports Contact ID and does not support sending commands back to the panel. It's freely available as its support for Emizon is more limited and does not need the Emizon module. Setting up the Emizon Serial task is similar to setting up the Ademco Serial task.
Emizon Service Setup (Emizon Task)
Prerequisites
-
The Emizon module must be registered and included in the licence.
-
A Customer form must be submitted to Emizon
-
Connection details (security key, customer number, etc.) these will be supplied by Emizon.
-
Port forwarding set up in router linking the external address (given to Emizon) through to the internal servers/pots used for Patriot monitoring. Note that the Emizon Patriot Task only listens on the specified port and does not make any outbound connections - you will need to set the firewall to allow incoming connections on this port. Firewall and port forwarding set up is beyond the scope of this document.
Emizon Task setup
Under System > Tasks > Task Settings, select the insert (+) button to add a new task. Select Emizon from the drop-down, and click next.
First set the general task information: Description, Computer, and Port ID to suit your system layout. See general task settings for more information. Fill in the details you received from Emizon and click the Save icon to start the task
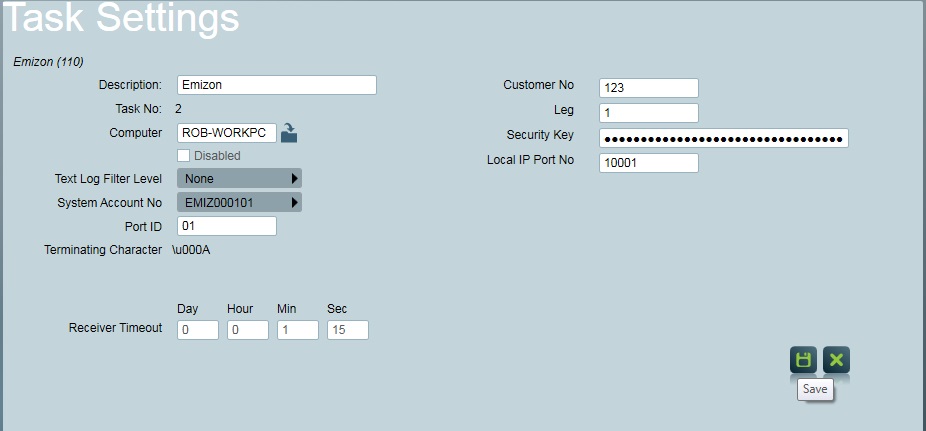
Check that the service connection opens and login is successful using the system account, signal browse list, or task diagnostics window. This may take up to 30 seconds.
You are now ready to add TCDs and begin monitoring. Repeat the task setup procedure for the second leg. Note that this can be set up on a different machine if required.
Emizon Client setup
Once the TCD number has been assigned to a client with Emizon, you can set up the client in Patriot and begin monitoring signals.
Import the 3 Emizon templates - SIA, CID and Fast Format. There are also Emizon specific event types that can be downloaded through the Receivers and Formats
Create a new client as you would normally do, setting the client number to the number provided by Emizon. It can be an EM Emizon number or an Installation ID. If it is an EM Emizon number then remove the EM and any leading zeros to get your appropriate Client ID. E.G. EM0014 should be created as client 14. If it is the Installation ID then convert it from Hexadecimal to Decimal to get the appropriate Client ID. E.G. 1453 should be created as client 5203.
Make sure that the port number matches the port id from the task setting, and that the area is left as 0001. Also set the type template to the Emizon template matching the format of the attached panel - Contact ID, Ademco Fast or SIA.
On the Tests tab of the client, enable IP Polling by checking the “Enabled” box. In the Task drop-down, select the Emizon task to use. The interval and tolerance are not used with Emizon.
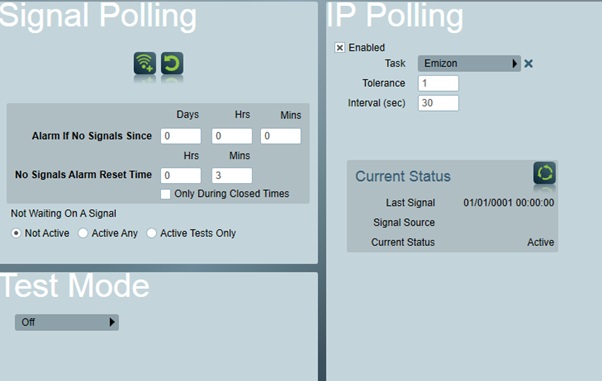
Once this has been done, a new tab will be created with the name of the Emizon task. When this tab is opened, the client details are automatically fetched from Emizon.
Associate the TCD number with the client and activate the channels.
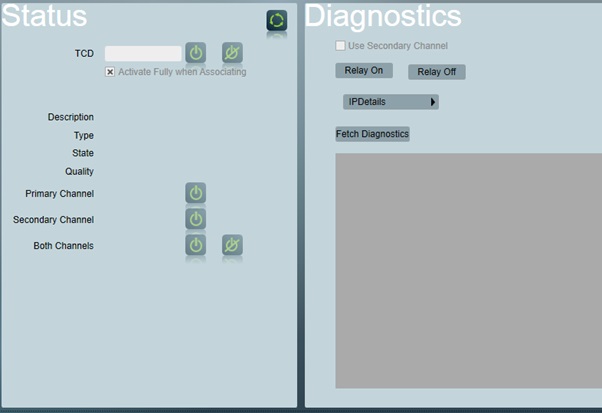
From the Emizon tab, you can perform all the maintenance tasks required, including “associating” the TCD with the installation, and “activating” the primary and secondary channels. The 'Activate Fully with Associate' switch allows you to associate and fully activate the client in one step. There are also several diagnostic options available to check on the client status: IP Details and GPRS Details fetch information about the primary and secondary paths, respectively. Input Status shows information about what the TCD is connected to, and the action state of its individual pins/channels.
Each pin may be one of:
- A Pos Applied normal alarm input
- R Pos Removed normal alarm input
- S Pos Applied Arm/Set input
- U Pos Removed Arm/Set input
- F Pos Applied BSIA Form175 ATSTEST input
- T Pos Removed BSIA Form175 ATSTEST input
- X Pin disabled
Firmware version shows which version of the TCD firmware is currently running, as well as which is installed for use after the next reboot. Extended Diagnostics contains in-depth information about the current state of the TCD. Poll will request the current state of the inputs on the TCD, showing the 'raw data' of the signals normally interpreted by Patriot. For each of these diagnostics, it is possible to send the command via the secondary channel. This could be useful if the IP link is broken but diagnostics are needed to figure out why.
The tick box controls which channel is used for all diagnostic commands. Each TCD board also contains relays which can be remotely controlled. The buttons allow the relay to be turned on or off as required. The secondary channel tickbox can also be used here if required.