ICT Setup
This document details the steps necessary to configure Patriot Software for the ICT PostX Module and Protege alarm panel. This document generally refers to PostX, but also refers to Protege in most cases as they both support the same protocol.
There is an alternative method of connecting Patriot to these alarm panels. ICT produces a software alarm receiver package that can handle communication with the remote alarm panels or modules, and connect to Patriot's ICT Receiver task via LAN or serial connection. This alternate method is now recommended for most users as it supports encryption between the panel and the receiver. As the task detailed below doesn't support encryption its use is no longer recommended.
Disclaimer
Patriot systems does not support alarm panels or receivers as such, nor does it provide Network troubleshooting support. Any problems or questions regarding the specifics of the ICT PostX Module programming and configuration should be directed to ICT
Patriot Task Setup
To use the PostX Module with Patriot Software, the following requirements must be met:
- The IP Receiver Module must be registered
- Patriot Version 5.2 or higher is required
- The build version of Patriot must be 270109 or later
From a Patriot Client, go to System > Tasks > Task Settings
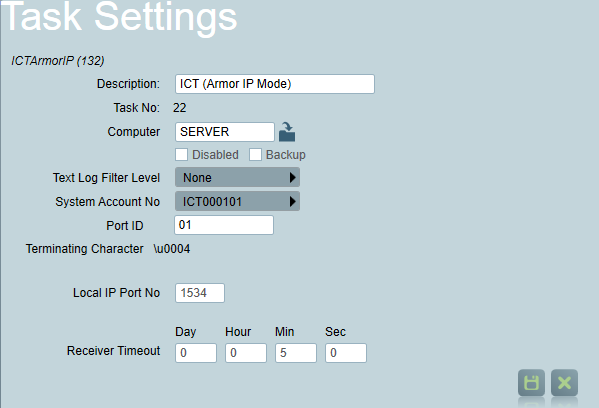
Insert a new Task into the list. If your PostX modules are running firmware prior to [App Version 1.04 b 407 r 8160] you should select the ICT(LS30) task, otherwise choose ICT(ArmorIP). See special note on PostX firmware below.
When the correct task has been chosen, click the save button, and the Task settings panel will open. Most fields should default to the correct values. Check the following settings:
Computer: (Set to the computer name of the Patriot Server running an instance of the Task Service where you want this Task to run)
Text Log Filter Level: None (unless troubleshooting)
Port ID: Enter the 2 digit port ID that signals received by this task will be logged against. Generally the default of 01 will be suitable unless this will conflict with an existing receiver.
System Account No: Account number of a Patriot client used by this task to log system events from the task.
Local IP Port No: (Should be set to a free port on the Patriot Server Machine - the default is 1426). This same port must be configured into each PostX module (along with the Patriot external IP Address)
Save the Task when the correct settings have been selected, the broken chain icon will notify you that no data has yet been received, if all is working correctly the icon will be replaced with a connected link when the first successful connection is made by an ICT IP unit.
All the PostX modules should be running firmware of [App Version 1.04 b 407 r 8160] or later. This firmware sends the correct polling signals to Patriot. If you are using PostX modules with an older firmware version, the polling signals sent may be in a different format. Patriot will log all of these polling signals as ContactID test signals, which will fill up your database with a large amount of unnecessary signals. To resolve this issue either upgrade the firmware on the PostX modules or switch to the ICT(LS30) Task which treats all polling signals and the 24hr tests as "polls" - it will not log them as signals. When operating the ICT(ArmorIP) Task (with PostX on correct firmware) periodic polls are not logged, and the 24hr test signal is treated as a regular signal and is logged.
Patriot Client Setup
Once your ICT Task is configured you next need to configure your Patriot, Clients individually for signal polling.
Open a Client corresponding to an ICT unit that requires active signal polling checks. Note: as all signals that will be received from PostX equipped panels will be sent in Contact ID, open the Event Types tab, and make sure that the default Contact ID template is selected and enabled. The PostX module sends a regular poll to Patriot to supervise the IP connection to the panel. The PostX module reports in ContactID so can support multiple areas, but the polling setup must be done on the area 0001 account. If you wish to enable IP Polling on a particular panel, select the Tests tab on the corresponding Patriot account. Please refer to the Client Tests Tab documentation for further information.
Repeat the above steps for all Alarm Clients using ICT PostX converters.
IP Receiver Task Operation
With the Task and the clients set up, Patriot will expect a regular poll from the panel. These polling signals will not be logged in Patriot, but if a poll is not received in time, a polling failure (note there is only one polling alarm signal logged, not a continual reminder as per no signals monitoring) signal will be logged against the relevant client. If the panel then re-establishes communication, a poll restore will be logged against this client. Any other signals sent by the panel will be logged as normal.
Troubleshooting
All polling signals are logged as signals and the Task Diagnostics and textlog shows any error message resulting from sending acknowledgements to polling signals from PostX.
Your PostX modules need to have their firmware updated. This will send the polling signal in the correct format.
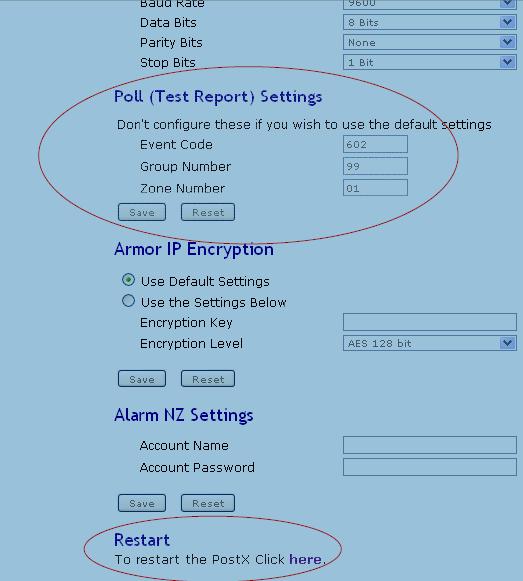
Poll signals appearing in Patriot signal Table:
When using PostX units with App Firmware revision 1.09 b 459 r 9163; polling signals are not being discarded by Patriot and are being inserted into the signal table. This is an abnormal situation with the polls being visible in the Patriot Browse Signals window.
This is caused by an incorrect default poll signal format from the PostX units in LS-30 mode. The polls should be being sent as type 602 Area 99 Zone 01
The PostX units can be forced to comply with this requirement by changing the optional Poll (Test Report) Settings in the Advanced Configuration page of the PostX Configuration Menu.
These values should be set as:
Event Code: 602
Group Number: 99
Zone Number: 01
After setting the values click the Save button and restart the PostX unit using the Restart link at the foot of the Advanced Setup page: