Tiandy N/DVR-Camera Setup
Prerequisites
-
A Patriot License with the Tiandy Module
-
The Tiandy Client Files installed into:
-
The Client Folder of each workstation that will view the Tiandy CCTV
This folder is normally C:\Program Files\Patriot Systems\Patriot V6 Client\Tiandy\
-
The Task Service installation folder if the Tiandy task is used to receive event information.
This folder is normally C:\Program Files\Patriot Systems\Patriot Task Service\Tiandy\
Contact Patriot Support for these files.
-
Setting up the DVR and Cameras
Full DVR configuration is beyond the scope of this document. In this section DVR settings important to Patriot monitoring are covered only. Please refer to your Tiandy DVR manual when configuring a new DVR installation.
See also
Record DVR details
-
DVR IP Address and Tiandy Data Port number (device must have a public static address). If no port specified then it will use 3000 by default.
-
DVR Username and Password
Configure IP Ports and Firewall
Patriot requires that the DVR's Data Port (default TCP port 3001) is correctly port forwarded through the external firewall to access media streams over the internet.
Setup Event Reporting
Most alarm events are generated at the camera level and can be configured from the Camera Settings section of your DVR.
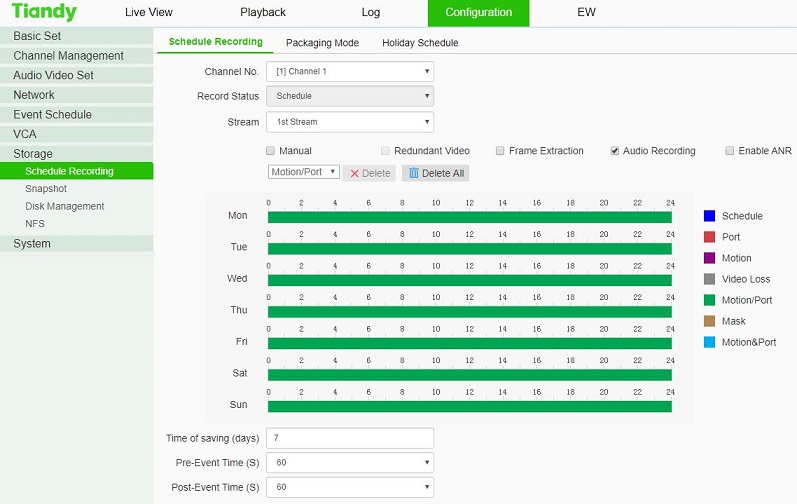
Record Schedule
A Record Schedule must be enabled and configured for each camera you intend to use with Patriot for alarm event playback. Note that alarm events will only be reported when the DVR is Armed. (See Remote Arming/Disarming the DVR.)
Pre and post alarm recording times are configurable in this section. For Patriot compatibility it is recommended to set pre-record time to 60 seconds or more.
Patriot Client Setup
-
Switch to the Zones Tab of a client.
-
Set the Camera Type option to Tiandy
-
Select a Camera Stream: Default (Stream 1) or Sub-stream (Stream 2). This setting will be used when viewing all attached Tiandy cameras.
-
Override the Event Reporting setting if different to the task setting (see below).
-
Check Poll Camera and set a polling interval (5 - 30 minutes is recommended).
-
Enter the camera address into the Location> field.
Enter it in the following format:
Using Default Port (3000) Custom Port (e.g. 8000) Using static IP Address 158.123.1.15 158.123.1.15:8000 -
Enter the login and password (if required).
-
Select a Zone which will have a camera associated with it. The zone number must match the channel number on the DVR. Zone Numbers used for cameras should be unique. Do not use the same zone number twice, with a different module number, for two cameras. This will give unpredictable results.
-
Check enable Video.
-
Switch to the Types Tab
-
Check Use Template and select the Tiandy Template
The port specified in the DVR location in Patriot is NOT the port that Tiandy SDK will actually use to connect to the DVR. Instead, Tiandy SDK will uses the specified port + 1. It means when you setup the firewall on the DVR side, the port you need to allow is Patriot specified port + 1. For example:
If the DVR Location is using port 8000 in Patriot, port 8001 will need to be allowed and forwarded to the DVR's Data Port on the firewall of the DVR side.
On the other hand, if you have setup the firewall to forward port 8000 to the DVR's Data Port, in Patriot you should use port 7999 in the DVR Location field.
This is the build-in behaviour of Tiandy SDK. It applies to Tiandy client files version 4.2 or earlier.
Dual Monitoring with an Alarm Panel
If you are monitoring a Tiandy DVR site in combination with a standard alarm panel, you will need to setup dual monitoring. In a dual monitoring scenario it is likely that you will get zone conflicts between the alarm panel zone list and the Tiandy camera listing. For this reason recommended practice is to setup a separate area account for the camera system. See the Dual Monitoring section of DVR monitoring for more details.
Automatic Remote Arming/Disarming the DVR
Tiandy devices which have alarm event reporting enabled are not normally configured using schedules within the device (frequent changes in the schedules often make this impractical). For this reason Patriot includes an automatic remote Arming/Disarming feature (additional to the manual Arm/Disarm action command) which is designed to work in dual monitoring scenarios.
View the Remote Arming/Disarming a DVR document for further details.
Camera Audio and Sound
To receive audio from a camera it must have a microphone and the camera must be configured to include audio in the media stream. To capture and receive audio for voice broadcast you must have a microphone device connected to your PC. Note that not support all IP cameras that have an audio output support voice broadcast via Tiandy. This a limitation of the Tiandy DVR system please check with your Tiandy distributor for a list of IP cameras that support voice broadcast.
Setting up the Task
The Tiandy receiver task will only log alarm events to Patriot clients that have been configured and remotely armed as detailed in the previous section. Clients that have Set (Closed) status at the time of Task start up are automatically armed by the Tiandy task.
Task Setup
Please read the Task Settings document for general information about adding tasks.
 Add a new task to the list in the Task Settings window. Double click on Tiandy in the drop down list in the details area of the window.
 Click the next button to continue. The Tiandy task settings form will appear.
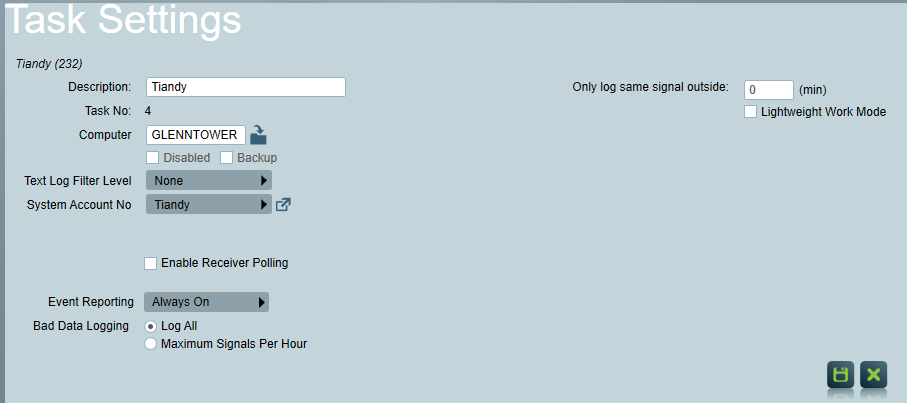
Task Settings
- The Only Log Same Signal outside: This setting prevents repeated signals from cluttering the signal history. This is useful if a DVR sends the same signal repeatedly -- movement on cameras can generate a lot of motion detection events, for example. You can set the number higher to reduce the amount of duplicated signals. When monitoring for Motion Detection, a setting above 1 minute is recommended.
- Enable Receiver Polling: This setting can be used as an extra protection against Tiandy task stopping to receive messages. When enabled, the Receiver Timeout setting can be entered. If the task fails to receive a message, e.g. an alarm or a login notification, within the Receiver Timeout setting, a Polling Failure (65021) signal will be logged to the task's system account.
- Event Reporting: Defines the default behaviour of connected DVR's regarding event reporting. This setting should be set to the behaviour you require for the majority of sites being monitored through this task. The option can be overridden on a per site basis (within the Patriot client) if required. Three options are available:
- Always On: for sites that should always report events.
- Armed On Status: for sites which should only report when the site is armed.
- Always Off: for sites that should never report events. This will help speed up the startup and shutdown time of the task.
On task startup, Patriot will connect to each Tiandy DVR that you have configured in the Zones Tab of Patriot clients. If succeeds, it will adjust the DVR's time to match the local time of each individual client.
Polling
When Poll Camera option is enabled in the client camera settings, the Tiandy task will periodically check the DVR, and will log a polling failure signal to the client if the DVR connection is disrupted. A poll restore signal will be logged when the connection restores.
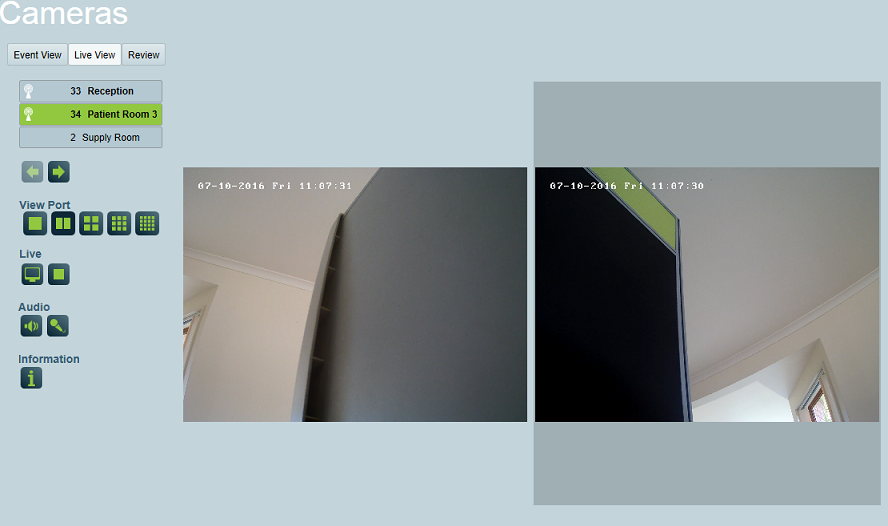
Operation: Using the Cameras
You can view Cameras from different screens within Patriot
- The camera can be viewed directly by clicking on the camera icon next to the zone, in the zone list.
- When responding to an activation from the client, a video event must have recently reported before this activation is treated as a video verification alarm. A video event is defined as an event reported from the DVR where video access makes sense (like a Motion Detection event, or the Input on the Camera has triggered). Some events from the DVR (generally system fault events) are not reported as video events. The source of the signal received generally indicates if the event is a video event or not. The video event must have reported within the time specified in the Time Range For Video Event setting (System Settings > System Wide Settings > Misc Settings > Camera Video Settings), from the time of the activation to be treated as a recent event. A Video Verification Alarm will display the Camera Button on the Activation tab (if multi screen support is enabled, the camera controls will be displayed immediately), clicking on the Camera button will take the operator directly to the camera associated with the Zone which has originated the activation. If multiple video events have recently been received, these will all be displayed on the camera window.
- As motion detection alarms from the DVR are not always reliable, using the alarm events from the dual monitored alarm panel can reduce false alarms. The recommended approach to setting this up is to configure the alarm events from the alarm panel to generate alarms in Patriot (ie priority action plan). Then configure the motion detection events from the DVR with non priority action plans. In this way a single motion detection event won't generate an alarm to the operator, but an alarm event from the panel and the DVR together, will generate an activation for the operator, and it will be treated as a video verification alarm.
- Cameras can be viewed in the Maintain Client Window under the Cameras Tab
- Playback of historic alarm events is possible from the Signal History area of the Patriot client file.
Operational Functions
- When responding to an activation, the camera display will be automatically put into Event view. The first connection shows the alarm event (beginning 10 seconds before the alarm) for the activated zone. The alarm event footage can be replayed easily by clicking on the play from time button. The second connection shows the live feed from the activated zone.
- When using the camera controls in anything other than single view (i.e. quad, nine etc), the camera controls on the left hand tool bar apply to the selected connection. The selected connection has a green border around it. You can change the selected connection by clicking on another connection. The camera control buttons will only be enabled if a camera (from the camera list) has been selected.
- PTZ controls are not currently supported for Tiandy cameras