Samsung NVR Setup
Patriot can live stream video and receive alarm and video alarm events from all Samsung NVR, DVR and IP cameras which support the SUNAPI (Samsung Unified API)
See also
Prerequisites
- A Patriot License with the Samsung Camera Module
- For video streaming/playback the Patriot VLC extension must be installed to the Patriot V6 Client installation folder. A copy of this extension can be downloaded here. If you don't pre-install the extension Patriot will prompt the operator to download the extension when first attempting to stream/playback video.
Setting up the NVR and Cameras
Full NVR configuration is beyond the scope of this document. In this section NVR settings important to Patriot monitoring are covered only. Please refer to your Samsung NVR manual when configuring a new NVR installation. Beware that your Samsung device must support the SUNAPI to be compatible with this module. If you are unsure whether your device supports SUNAPI, try opening the following link in a web browser (replace YOUR-DEVICE-IP with the IP address of your device):
http://YOUR-DEVICE-IP/stw-cgi/system.cgi?msubmenu=deviceinfo&action=view
If you get an error response it is likely your device does not support a compatible version of SUNAPI.
Record NVR details
-
NVR IP Address and HTTP Port number
-
NVR User name and Password
-
NVR RTSP Port
The NVR must be on a network with a public static address or a DDNS service.
Network Profiles
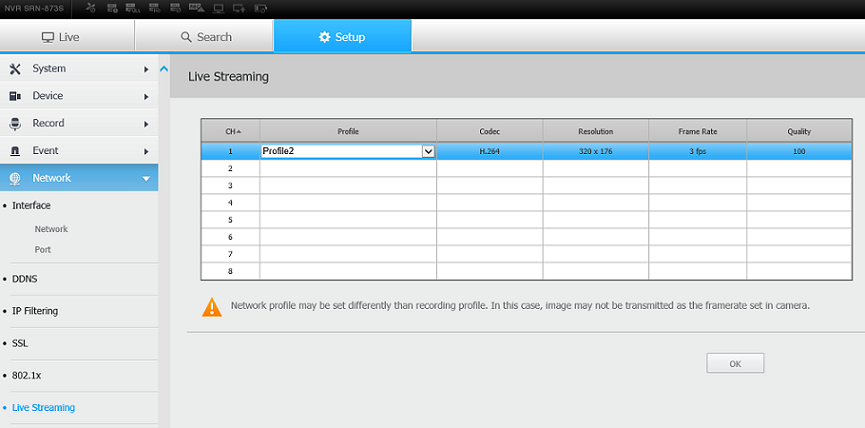
Samsung NVR split each camera channel into three configurable profiles: Live, Recording, and Network. Each of these profiles can be assigned a video stream profile setup in the camera. Samsung only makes the Network and Recording profiles available for software integrators like Patriot. The Live profile is only viewable locally on the NVR's video monitor. For this reason it is important that you set your Network profile - which Patriot uses for live streaming, to a suitable camera stream profile. Generally the Network stream should be set to a lower resolution and codec quality than the Live profile as it is accessed over the internet instead of a high speed LAN.

Video Profiles
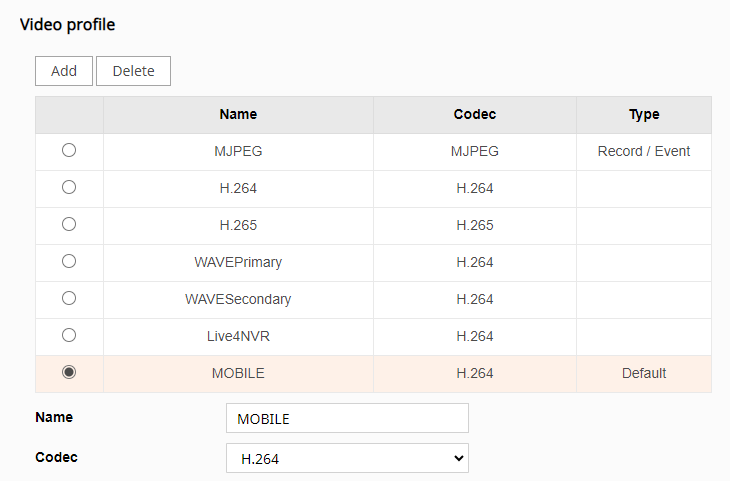
Samsung NVR has a configurable video profile setting which is supported by certain camera types (see image). If video profile is set to 0 in Patriot, it will fallback to 1. Patriot recommends using a video profile with H.264 or H.265 codec for best results.

Configure IP Ports and Firewall
Patriot requires that the NVR's HTTP Port and RTSP Port are both correctly port forwarded through the external firewall to access media streams over the internet.
Patriot Client Setup
- Switch to the Zones Tab of the client
- Set the Camera Type option to Samsung.

- Enter the NVR address into the location field followed by the http port in the following format 'https://123.25.55.55:80'.
- Enter the login and password details (if required).
- Enter the RTSP port.
- Select a Zone which will have a camera associated with it. The zone number must match the camera number on the NVR. Zone Numbers used for cameras should be unique. Do not use the same zone number twice, with a different module number, for two cameras. This will give unpredictable results.
- Tick enable video.
- On the Client Event Types tab select the Samsung NVR template. The default Samsung NVR template can be downloaded here.
Dual Monitoring with an Alarm Panel
If you are monitoring a Samsung camera site in combination with a standard alarm panel, you will need to setup dual monitoring. See the Dual Monitoring section of NVR monitoring for more details.
Remote Arming/Disarming the Cameras
Patriot does not currently support the remote arming/disarming of Samsung NVR. Configuring your Samsung NVR's cameras with arming schedules is recommended if you wish to use the alarm event reporting features.
Setting up the Task
Task Setup
Please read TASK SETTINGS for general information about adding tasks.
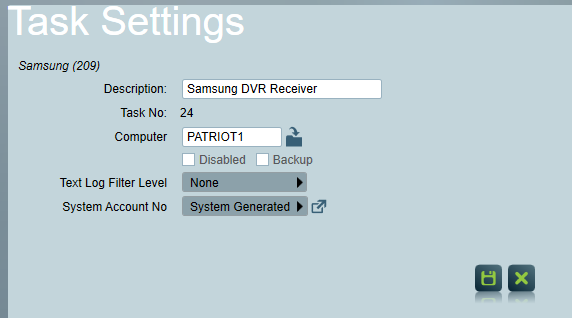
Add a new task to the list in the Task Settings window. Double click on Samsung in the drop down list in the details area of the window.
Click the next button to continue. The Samsung task settings form will appear.

On task startup Patriot will connect outwards to each client which you have selected as a Samsung NVR on the client Zones Tab. Patriot will connect using the HTTP connection and polling detailed specified in the Cameras section on the client Zones tab.
Operation: Using the Cameras
You can view Cameras from different screens within Patriot
- The cameras can be viewed directly by clicking on the camera icon next to the zone in the zone list.
- When an alarm is received for a site equipped with cameras, and a zone with camera coverage has activated, a Camera Button will appear on the Activation tab (if multi screen support is enabled, the camera controls will be displayed immediately), clicking on the Camera button will take the operator directly to the camera associated with the Zone which has originated the activation.
- Cameras can be viewed in the Maintain Client Window under the Cameras Tab
- Playback of historic alarm events is possible from the Signal History area of the Patriot client file.
Operational Functions
- When responding to an activation, the camera display will be automatically put into Event View. The first connection shows the alarm event for the activated zone. The alarm event footage can be replayed easily by clicking on the play from time button. The second connection shows the live feed from the activated zone.
- When using the camera controls in anything other than single view (i.e. quad, nine etc), the camera controls on the left hand tool bar apply to the selected connection. The selected connection has a green border around it. You can change the selected connection by clicking on another connection. The camera control buttons will only be enabled if a camera (from the camera list) has been selected.
- A summary of a camera's technical specification can be requested by clicking on the info button from the Clients Camera tab.