Avigilon (VideoIQ) Rialto Camera Setup
Prerequisites
-
A Patriot License with the Rialto Camera Module
-
The Rialto Camera module add on component installed on each Patriot workstation
Contact Patriot Support for a copy of the add on component installer.
Setting up the Rialto Cameras
Full Rialto unit configuration is beyond the scope of this document. In this section settings important to Patriot monitoring are covered only. Please refer to your Rialto manual when configuring a new camera installation.
See also
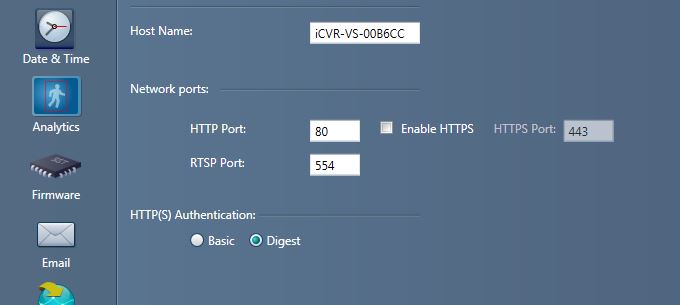
Essential Camera details
- Rialto unit external IP address and HTTP Port number.
- Username and Password.
- RTSP must be enabled and TCP port forwarded.
Camera event specific details
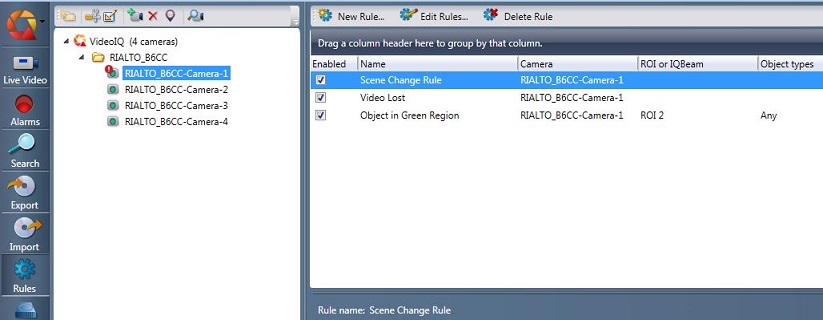
In order to receiver events from a Rialto unit you must first configure rules for each attached camera in the Rialto view software. Patriot translates the Activity type of each rule into an event type no. and logs events against the zone no. corresponding to the Rialto video channel no. See Task Setup section below for more information.
Patriot Client Setup
- In the Maintain Client Window, go to the Zones Tab.
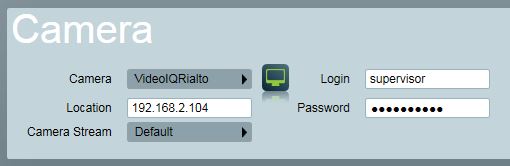
- Set the Camera Type option to Video IQ Rialto.
-
Enter the IP address of the camera into the Location text box. This must be a public static IP address if you are connecting over the internet.
If the device has a public static IP address or a fixed domain name, enter it in the following format: '158.123.1.15' or 'domainname.com'. If you are using a different HTTP port than the default 80, use this format: '158.123.1.15:8080' or 'domainname.com:8080'
-
Enter the login and password (if required).
-
Select a Camera Stream. If "Substream" is selected, then Patriot will request the alternative stream from each Rialto attached camera.
-
Select a Zone which will have a camera associated with it and check Camera Enabled.
Your Patriot zone no. should correspond to Rialto camera channel no. Most Rialto devices have 4 channels and should be configured as Zones 1 - 4 in Patriot. Module no. should be set to zero for each Rialto camera zone.
Dual Monitoring with an Alarm Panel
If you are monitoring a Rialto camera site in combination with a standard alarm panel, you will need to setup dual monitoring. See the Dual Monitoring section of DVR monitoring for more details.
Installing the Rialto event template
You can download the Rialto event types template from the Receivers And Format Templates page.
For instructions on how to import this template, see How To Import Templates.
Setting up the Task
Task Setup
Please read TASK SETTINGS for general information about adding tasks.
 Add a new task to the list in the Task Settings window. Double click on Video IQ Rialto in the drop down list in the details area of the window.
 Click the next button to continue. The Rialto task settings form will appear.
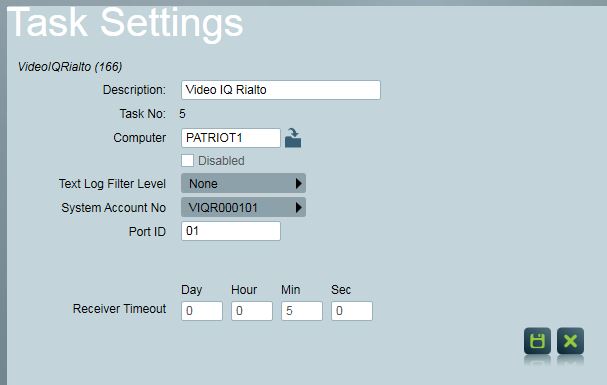
Rialto Task Settings
- Receiver Timeout: Create a receiver failure alarm if no connection can be established to any Rialto client for a period greater than this timeout.
To be able to receive events from remote Rialto clients the HTTP connection details loaded on the client zone tab must be correct and accessable (the HTTP Port must be forwarded through the client's firewall).
Operation: Using the Cameras
You can view Cameras from different screens within Patriot
- The cameras can be viewed directly by clicking on the camera icon next to the zone in the zone list.
- When an alarm is received for a site equipped with cameras, and a zone with camera coverage has activated, a Camera Button will appear on the Activation tab (if multi screen support is enabled, the camera controls will be displayed immediately), clicking on the Camera button will take the operator directly to the camera associated with the Zone which has originated the activation.
- Cameras can be viewed in the Maintain Client Window under the Cameras Tab
- Playback of historic alarm events is possible from the Signal History area of the Patriot client file.
Operational Functions
- When responding to an activation, the camera display will be automatically put into Event View. The first connection shows the alarm event for the activated zone. The alarm event footage can be replayed easily by clicking on the play from time button. The second connection shows the live feed from the activated zone.
- When using the camera controls in anything other than single view (i.e. quad, nine etc), the camera controls on the left hand tool bar apply to the selected connection. The selected connection has a green border around it. You can change the selected connection by clicking on another connection. The camera control buttons will only be enabled if a camera (from the camera list) has been selected.
- A summary of a camera's technical specification can be requested by clicking on the info button from the Clients Camera tab.