Dispatch Module
This is an optional module intended to make it easier to dispatch to external dispatch companies, individual patrols, and also includes added features for receiving dispatch requests from external sources.
The module contains the following features,
- Patrol Company Selection - Selection of Dispatch Patrol Company using location filtering.
- Individual Patrol Selection - Patrol selection using availability, location, client prioritisation, patrol job status.
- Manual Dispatch Jobs - recording of manual (eg by phone) dispatch jobs.
- Patrol Locations Map.
- Attend Dispatch Report.
- Manual Dispatch Requests - logging of dispatch requests from sources not using Patriot software.
This module can also be used in conjunction with one or more of the specific dispatch job interfaces, for example the Patrol Response module to provide both dispatch using the plink app, or the Web Dispatch Module to allow for sending of requests via email or SMS with web based feedback.
Requirements
- The Dispatch module must be registered.
Patrol Company Selection
Initial Setup
This feature allows the operator to select a suitable dispatch company to respond based on preconfigured location filtering.
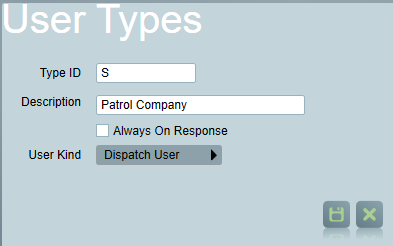
Open Maintenance > Users > User Types.

Create a new user type that will be listed for dispatch. Set their User Kind to Dispatch User. Users of this type will generally represent Patrol Companies.
Add a second new user type. Set their User Kind to Select Dispatch.
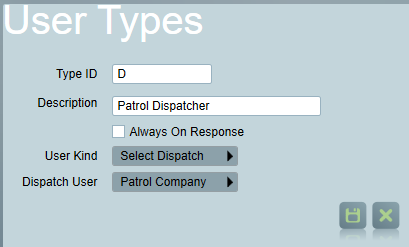
For Select Dispatch user types, a selector will appear below the User Kind option. Pick a user type that will be loaded for dispatch.
Open Maintenance > Users > User Maintenance. Assign the newly created Dispatch User type (in this example "Patrol Company") to a user.
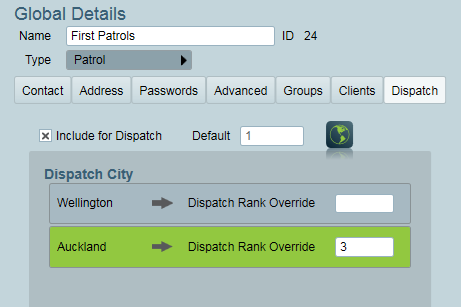
When editing a dispatch user from the User Maintenance window, a Dispatch tab is shown. This tab contains a list of cities that the user is able to be dispatched to. At first this is a blank list, so you will need to add cities to the list.
To assign all cities in a State, click on a city in the list, and then click the assign all button. This will assign all cities belonging to the same State as the currently selected city. If no city in the list is selected, then clicking the assign all button will assign all available cities.
To include a user for dispatch, you'll need to either add a city to the list or assign a default rank to the user by checking Include for Dispatch.
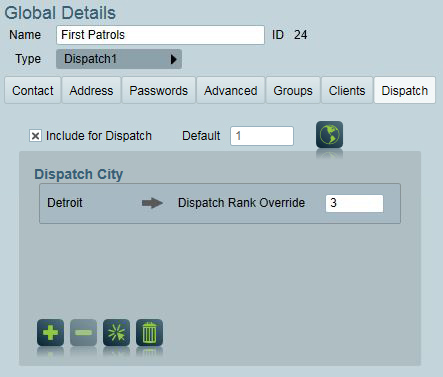
Enter a default Dispatch Ranking, and any rank overrides for particular cities if needed.
 Dispatch Coverage Map
You can view the selected users dispatch city coordinates by clicking on the Dispatch Coverage Map button. This displays the coordinates of each city assigned to the user.
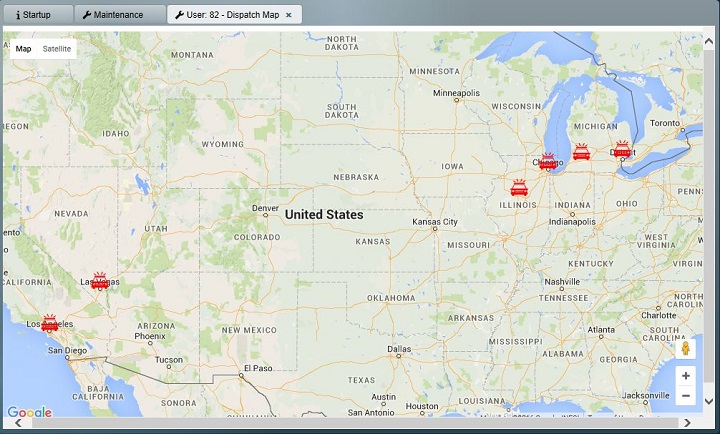
To set the coordinates for each city, you'll need to geocode the cities using the Utilities program. Open the Utilities program then navigate to System > Data Utilities > Geocode Addresses. Geocoding the cities will automatically assign the map coordinates by searching based on the location details.
To ensure the correct coordinates get displayed, it is important that each city name, address and details are correctly entered.
Dispatch Rankings
Dispatch users can be assigned to specific cities, and also given priority ranking according to the city that an alarm occurs in.
Enter a default dispatch ranking at the top, above the city list.
Ranking overrides can also be entered for each city. You can override the default rank for a particular city by adding it then entering a number into the Dispatch Rank Override. Set it to 0 to exclude the city for dispatch.
Valid Dispatch ranking values are as follows:
| Dispatch Rank | Description |
|---|---|
| 1-100 | 1 = Highest ranking 100 = Lowest ranking |
| 0 | Not dispatched |
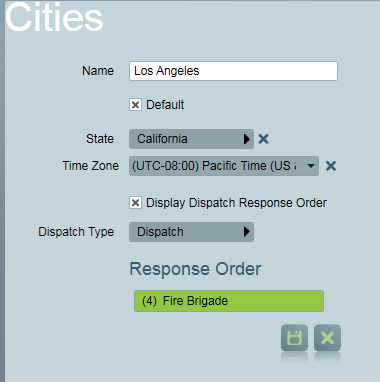
To be able to view a particular cities dispatch response order, so you can see how the city overrides affect the default order, open the city maintenance screen and check the Display Dispatch Response Order checkbox.
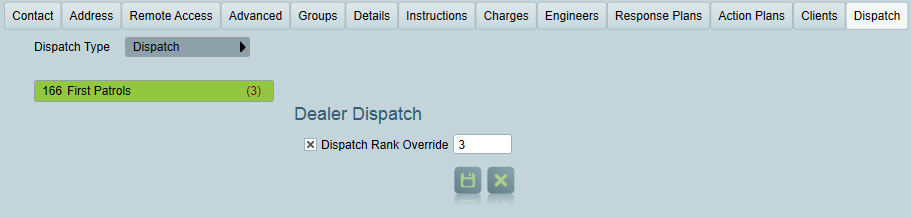
You can override the dispatch order at a client level from the Response Tab of a client or at a dealer level from the Dealer Maintenance. There is an extra tab control that displays dispatch rankings for the current user.
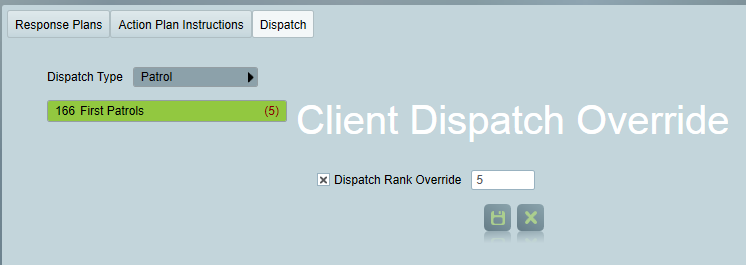
This tab displays a user type selector which filters the list to only show users of the selected type. Here you have the option to override the users rank. Patriot will follow this procedure to decide which rank to use.
- If rank is overridden at a Client level, use the client rank override.
- If not overridden at a Client level check Dealer Override, if rank is overridden use dealer rank override.
- If not overridden at a Dealer level check Cities Override, if rank is overridden use city rank override.
- If not overridden at a City level fallback to user default rank.
Response by User Type
You can set up a response plan that includes the new Dispatch user type.

Assign this response plan to action plans in the Response tab of a client.
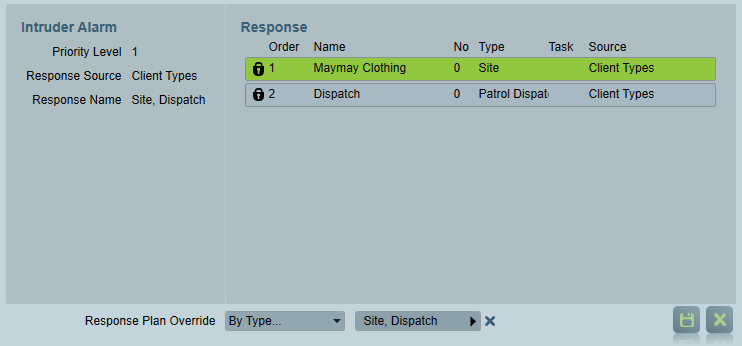
When using a By Type response plan, you do not need to assign any Dispatch or Select Dispatch users to the client in the Users Tab. You only need two things for a dispatch user to become available for a client:
- Select Dispatch user type included in the response plan
- Cities assigned to the dispatch users or default rank assigned to the dispatch users in User Maintenance.
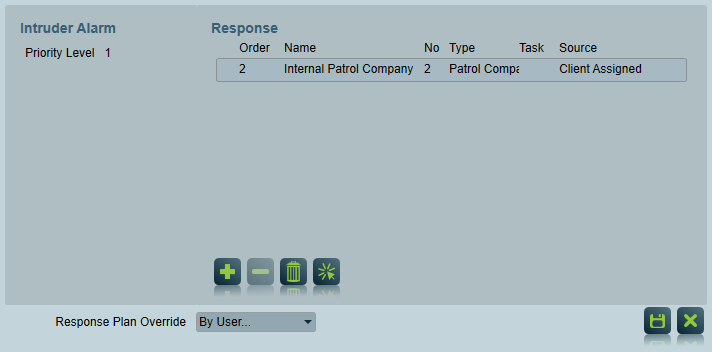
Response By User
For a more fine-grained approach, you can set up response plans that include specific users rather than user types. Note that if you use By User response plans, you need to assign a Select Dispatch user to the client, under the users tab.
Dispatching from the activation screen
Activations with Select Dispatch user types assigned to them will have an add dispatch button available.
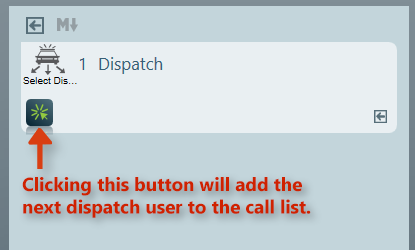
When you click the Add Dispatch button, it will insert the next dispatch user, based on their dispatch ranking for that city.
The dispatch users that are added will represent Patrol Companies. Each of these Patrol Company users will typically be configured with one form of dispatch response method. See Dispatch Job Interfaces.
Once all the available dispatch users have been added to the call list, the "add dispatch" button will disappear.
Individual Patrol Selection
Patrol company selection allows for dispatching to a patrol company that handles the process of individual patrol selection internally.
Where you only dispatch directly to individual patrols, or you require a mix of dispatching to patrol companies, and also individual patrols, the Select Patrol dispatch feature can be used.
The Select Patrol dispatch feature requires the dispatch module, and provides features for selecting patrols based on availability (patrol signed on for dispatch), location, client prioritisation, patrol job status.
As an example of how you would use a mix of patrol company dispatching and individual patrol dispatching, say you monitor across two different cities. City A and City B. For activations in City A you call an External Patrol Company by phone. For activations in City B, you send the job directly to one of your own patrols using the Plink app. The recommended setup for this scenario would be to create two users of type Dispatch User as explained above. The first user represents the External Patrol Company, and should be configured with Manual Dispatch. It should also have city rankings configured so it will appear for all activations in City A. The second user will represent the group of patrols that cover City B. This user should be configured as a Select Patrol Dispatch user, with all the available Patrols assigned to this user. It will also have city rankings configured so it will appear for all activations in City B.
Select Patrol Dispatch
It is recommended that you link all of your patrols to a Select Patrol Dispatch user which represents the parent patrol company (even if the parent company is your own company). This gives you the option to add the parent patrol company to your response plans instead choosing specific patrols for clients ahead of time - this means that the best situated patrol can be selected via a map during the activation response.
This option is typically enabled on your internal patrol company dispatch user. It allows you to dispatch a job directly to the best situated patrol belonging to the internal patrol company. Under some circumstances you may be able to enable this option on an external patrol company's dispatch user. To use this option you need to know the full contact details of individual patrols belonging to the patrol company and for the best experience it is suggested for the patrols to use the Patriot Plink app to receive dispatches. Manual Dispatch and Web Dispatch are also supported.
Patrol User Setup
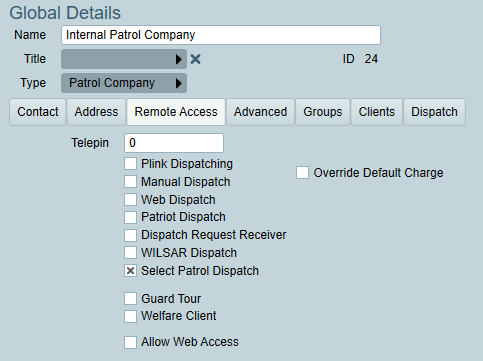
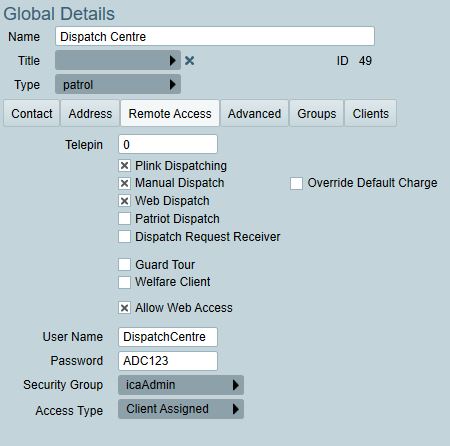
Each patrol belonging to your internal patrol company needs to be loaded as a standard Patriot user. On the remote access tab the internal patrol company must be selected.
Currently Select Patrol Dispatch option is supported by Plink Dispatching, Manual Dispatch and Web Dispatch.
If your internal patrols will use the Patriot Plink app to receive dispatches then the Plink Dispatching option should also be enabled.
If your internal patrols are not using the Patriot Plink app but receiving manual or web dispatches, the Manual Dispatch or Web Dispatch option should be enabled respectively.
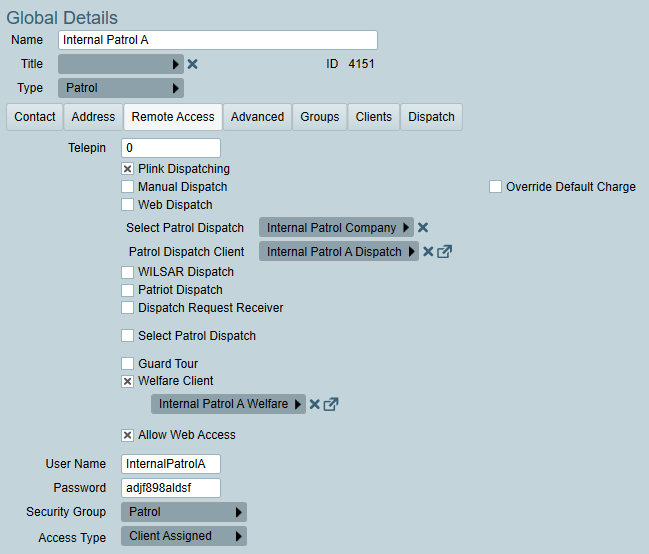
Select Patrol Dispatch: select the user representing the company the patrol belongs to.
Patrol Dispatch Client: select the client that the patrol's availability will be reported to. The Patrol Dispatch Client should use the Patrol Dispatch Availability template, available from the Patriot Templates Library. If the patrol is using Plink, the availability status will be reported by Plink and logged against this client. If the patrol is not using Plink you can update the availability status manually by logging a set or unset signal against this client. The set signal will mark the patrol as offline/unavailable, while the unset signal will mark the patrol as online/available.
If the patrol is using Plink, it is also recommended to enable Welfare Client option and select a client that the patrol's GPS location will be reported to. The Welfare Client should use the Patriot Patrol Welfare Checks - Plink template, available from the Patriot Templates Library. Patriot will use the location information logged by this client to display the patrol on the map. It's recommended to use a single client with different areas for the Patrol Dispatch Client and Welfare Client settings.
On the Dispatch tab you can now assign one or more Patrol Dispatch Groupings. These groupings can be used to filter patrols from the patrol selection map when responding to an activation. By default only patrols with a dispatch group matching those assigned to the client are displayed to the operator. Note that the client group type used for this purpose is configurable in Patriot's system wide settings.

Within the app, the Patrol user can now follow the standard registration process for Plink, using the monitoring station code and their ICA username/password, as described in the Plink documentation. Once the Patrol has logged in, they will have additional options available along the bottom of the app.
Some dispatch methods like Plink Dispatch require a Category to be selected. For how to configure a Work Order Category, please refer to Work Order Categories.
Patrol Response
Ensure that Plink Dispatching or another dispatch method is enabled for the all the patrol users that can respond to dispatch requests as covered above.
There are three typical patrol response plan setups,
- Individual Patrols assigned directly into response plans - used where small number of patrols available.
- Select Dispatch Patrol Response - recommended where larger number of patrols are used.
- Combination of Patrol Company Selection and Individual Patrol Selection - mix of contracted dispatch to third party patrol companies and internal patrol dispatch. See use of Select Dispatch Patrol below, and Patrol Company Selection above.
Individual Patrols assigned directly into response plans
In a simple situation where there are a small number of patrol users, individual patrol users can be assigned directly into the response plans of each client.
 The dispatch button can then be used to initiate the dispatch job.
Select Dispatch Patrol Response
With the Select Dispatch Patrol user on the response plan, this allows the operator to choose from all patrols assigned to this user. Each patrols location, priority, and availability are also displayed to assist with selection by the operator.
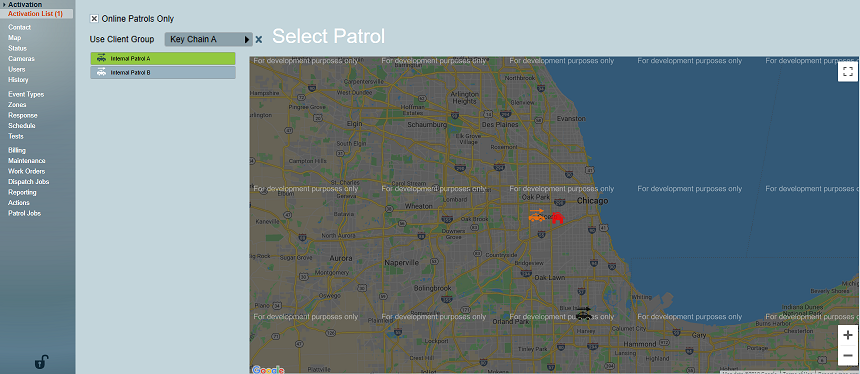
 Clicking on the Select Patrol button will open the Select Patrol view.
When your dispatch patrols have Welfare Client (location tracking), Patrol Dispatch Client (dispatch availability) and Plink Dispatching enabled it is easy to choose the best situated patrol to receive a dispatch. Patrols can be selected via a map directly from the activation response. Patrols that are not currently linked to a job are displayed in black. Patrols that already have dispatch job(s) assigned are shown in white and patrols assigned to the current job are displayed in orange. Note that the dispatch patrol selection tool does not automatically update patrol locations but there is a separate Patrol Location tool located in the main Monitoring menu that does automatically update patrol locations.
By default, only patrols who have indicated they are available are displayed, but unavailable patrols can be viewed if required and appropriate.
If your dispatch patrols are not using Plink app, they will not be able to report their location, thus will not be displayed on the map. But you can still select them from the list on the left.
Once a patrol user that supports a dispatch method (Plink, Web etc.) is added to the response plan, the operator now has the ability to dispatch activations to the patrol. When activation is dispatched a notification will be sent to the patrol, who can either accept or release the activation
When selecting a pending patrol response job, the Patrol will see details of the job, such as alarm details, site details, and instructions.
The patrol then has several options available during the response:
Accept: The patrol accepts the job, and will travel to site to respond to the alarm.
Release: The patrol is unable to respond to the alarm. This will notify the operator to re-assign the job to another patrol.
On Site: The patrol has arrived on site.
Left Site: The patrol has completed their response and has left the site. GPS location will be requested and transmitted if obtained with the report.
Add Note: Allows the patrol to enter additional response notes and observations. GPS location will be requested and transmitted if obtained with the report.
If the patrol does not respond to the dispatch request within the Acceptance Warning Time (set in the system wide response settings) then a warning note will be logged against the dispatch job and the operator will be notified.
All actions are transmitted back to the operator and recorded in the alarm response.
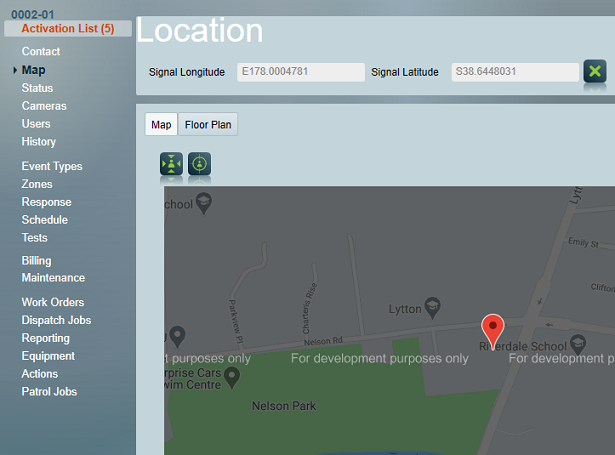
 Plink reports that contain a GPS location will show the "Open in map" button in the signal or note details.
Dispatch Job Interfaces
Patriot provides support to operators who need to track a status of the dispatch request. There are multiple methods of doing this:
- Manual dispatch is handled by operators, by contacting the patrol company (e.g. by making a phone call), and manually updating the dispatch status.
- Web dispatch sends dispatch information out by email or SMS (via modem or internet gateway), with an accompanying temporary link which the patrol can use to take action and add notes about the dispatch. (Requires both the Web Dispatch module and the Email or an SMS module.)
- Plink dispatching allows operators to send a dispatch request to patrols using the Plink smartphone app. Patrols can view dispatch details, add notes, attach photos and update the dispatch status through the smartphone app. (Requires the Patrol Response module).
- Patriot Dispatch enables the operator to send a dispatch via Patriot Dispatch Service. This is particularly useful when the external dispatch company is using Patriot Systems as their dispatch management system.
- WILSAR Dispatch enables the operator to send a dispatch request to Wilsons Security's WILSAR service.
- ECHO Dispatch enables the operator to send a dispatch request to the police via ECHO interface. Only available in UK.
See below image for an example of how to enable dispatching for a user:
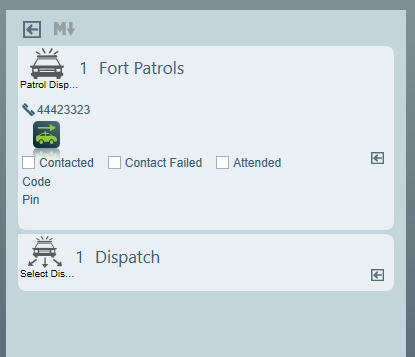
Once the options are enabled, additional buttons will be shown on the activation screen, within the call list:
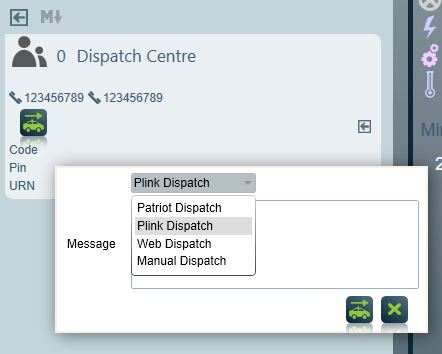
If you have a user on the call list with a dispatching option available, dispatch buttons will be shown on their contact card. If multiple dispatch options are available, pick the most suitable one. Enter any additional information you want to send to the patrol into the Message box on the dispatch form.
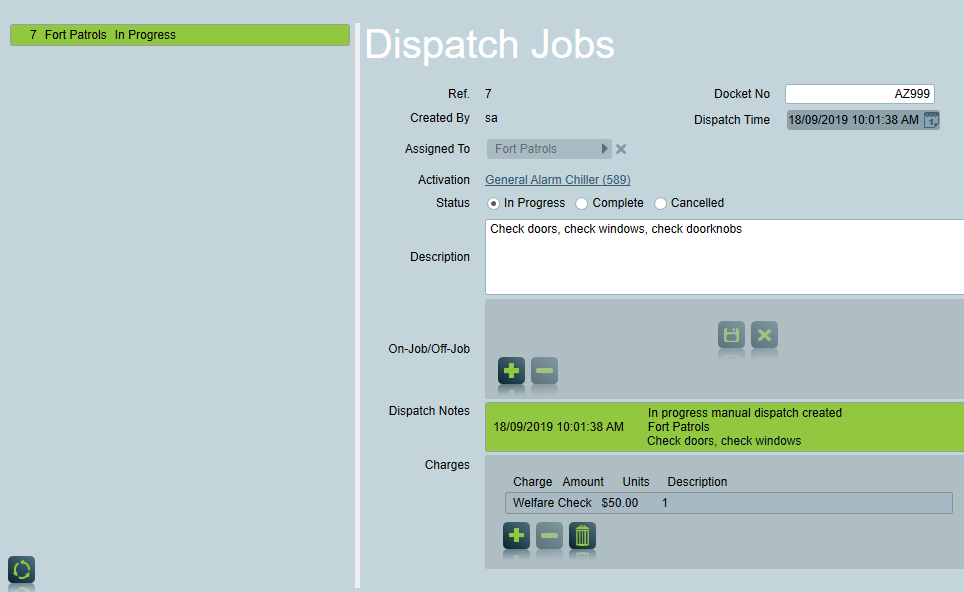
When the Dispatch Patrol button is clicked, a dispatch job will be automatically created to track the status and charges of the dispatch. This can be viewed either on the activation form, or on the Dispatch Jobs client tab.
If the patrol does not respond to the dispatch request within the Acceptance Warning Time (set in the system wide response settings) then a warning note will be logged against the dispatch job and the operator will be notified.
If completion time warning is enabled and the patrol does not complete the dispatch within the Completion Warning Time (set in the system wide response settings), when the activation is not completed, a warning note will be logged against the dispatch job and the operator will be notified. In the case where the activation has been completed by the operator, a new signal with an event type number of 65225 will be logged against the client. The ID of the dispatch is also included in the signal.
Work Order Categories Setup
Some dispatch methods may require a Category to be selected, more about Work Order Category can be found here.
Key Chain Setup
Key chains (groupings of client keys) can be setup and assigned to Patrol users and then used to filter client keys shown to the user on the Plink or Web dispatch response. More about client keys can be found here.
Dispatch Billing
Billing Customer: The customer who will be invoiced for the dispatch job.
Charge State: Allows manual review of dispatch jobs before they are invoiced. The 'Default Work Order Charge State' option in System Wide Settings sets the default status for new dispatch jobs.
Dispatch Charges
If a default charge has been setup in System Wide Settings > Billing > Default Dispatch Charge, then this charge will be added to the dispatch work order.
If an override default charge has been setup on the user (as shown on the above image), then this charge will be applied to the dispatch work order. You can also override dispatch charges by client, which can be setup on the Billing Tab of the client. The charges need to be setup as a Dispatch Type from the Master Charges page of Patriot.
It is also possible to automatically add charges to specific jobs via Master Charge Setup, using 'Auto-Assign'
Security rights that limit operator access, editing and viewing of the dispatch jobs can also be configured for both ICA and the Windows Client Patriot.
Automatic Dispatch
Using response plans and assignable tasks you can configure alarm signals to trigger Automatic Dispatch via Smartphone (Plink) notification, Email or SMS.
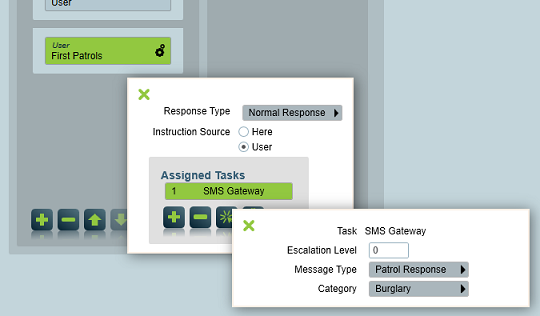
The Automatic Dispatch feature can:
- Send dispatch requests to one or multiple users
- Send dispatch requests via Plink App, Email or SMS.
- Automatically complete the associated activation when the dispatch job is completed.
More about Automatic Dispatch can be found here.
Dispatch Clients
Dispatch Jobs must be sent from a client's activation form. This activation can be generated from a signal logged to a monitored client in Patriot, or received from an external source requesting dispatch. This external dispatch request can be received from a Patriot to Patriot dispatch request or a manually entered dispatch request. A full monitoring client doesn't need to be used for an external dispatch request. A Dispatch Only client type can be used where additional details like site instructions are required, or where ad-hoc addresses are used Dispatch Address Only clients can be used. See Account Type.
Dispatch Validation
Patriot plugins are available that can validate dispatches have been handled in line with your company requirements. For example, you may want to check that the site was re-armed before the patrol left site. Contact Patriot Support for more information about dispatch validation plugins.