Internet Client Access (ICA) Customisation
Introduction
These instructions apply only to ICA available from Patriot Version 6.6.26 onwards.
ICA can be customised to use your company's own branding as well as that of your dealers.
Which set of branding to use can be configured based on the URL used to access the site.
This document will describe what can be configured and how to do so.
Installation Checks
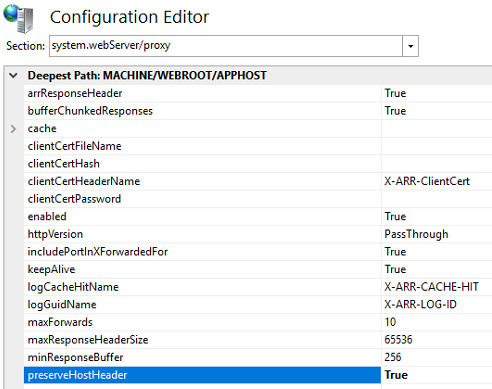
Before beginning ICA customisation, please ensure that the following step from the ICA Installation procedure was followed when ICA was installed:
Run IIS Manager. Select the server, then select Configuration Editor. Select the Webserver/proxy section. Find the key labelled "preserveHostHeader" and set it to True.
Setup
Create a folder named ICA_Customisations and a file named ICA_Customisations.xml in your Storage Directory. Any files placed in the ICA_Customisations folder will be publicly available via www.{yoururl}.com/customisations/{filepath} this is where any files used for customisation should be placed.
The ICA_Customisations.xml file defines what customisations to apply based on what URL is used to access ICA. Support for additional HostName customisations requires the Dealer Features module.
Example contents of ICA_Customisations.xml is as follows:
<?xml version="1.0"?>
<BrandingDefinitions>

  <BrandingDefinition HostName="ica.abcdealer.com">
    <FavIconUrl>abc/favicon.ico</FavIconUrl>
    <NavbarIconUrl>abc/brand.png</NavbarIconUrl>
    <LoginHeaderHtmlUrl>abc/login_header.html</LoginHeaderHtmlUrl>
    <LoginFooterHtmlUrl>abc/login_footer.html</LoginFooterHtmlUrl>
    <HeaderHtmlUrl>abc/header.html</HeaderHtmlUrl>
  </BrandingDefinition>

  <BrandingDefinition>
    <SiteName>Alarm Portal</SiteName>
    <FavIconUrl>favicon.ico</FavIconUrl>
    <NavbarIconUrl>brand.png</NavbarIconUrl>
    <LoginHeaderHtmlUrl>login_header.html</LoginHeaderHtmlUrl>
    <HeaderHtmlUrl>header.html</HeaderHtmlUrl>
  </BrandingDefinition>

</BrandingDefinitions>
The urls in the above definition (i.e "favicon.ico", "abc/favicon.ico", "header.html" etc.) should refer to files placed in the ICA_Customisations folder.
In the example above 2 sets of branding details are configured:
- The first set applies if someone accesses the website via ica.abcdealer.com
- The second set applies if accessed from any other domain.
As many BrandingDefinition blocks can be added as necessary.
In the above example SiteName is not specified in the top block. This will result in the sitename from the default block to be used (i.e. "Alarm Portal").
For the above example the file structure would be as follows:
<Storage_Directory> refers to your Local Storage Directory
\<Storage_Directory>
  ICA_Customisations.xml
  \ICA_Customisations
    favicon.ico
    brand.png
    login_header.html
    header.html
    \abc
        favicon.ico
        brand.png
        login_header.html
        login_footer.html
        header.html
Configuration Options
SiteName
Sets the name displayed in the browser's title bar:

FavIconUrl
Sets the icon displayed in the browser's title bar.
NavbarIconUrl
Sets the image which will be displayed in the top left of each page (once logged in):

LoginHeaderHtmlUrl & LoginFooterHtmlUrl
Sets a piece of partial html which will be displayed above (LoginHeaderHtmlUrl) or below (LoginFooterHtmlUrl) the login form.
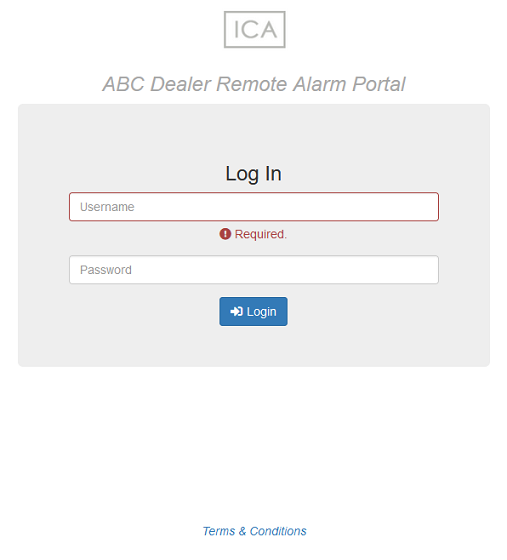
E.g. setting the LoginHeaderHtmlUrl to refer to an html file with the following content:
<style>
  #loginHeader {
    text-align: center;
  }
  #subHeader {
    color: darkgrey;
  }
</style>
<div id="loginHeader">
  <img src="customisations/abc/brand.png" style="width:100px;" />
  <h3 id="subHeader"><em>ABC Dealer Remote Alarm Portal</em></h3>
</div>
and the LoginFooterHtmlUrl to refer to an html file with the following content:
<style>
  #loginFooter {
    text-align: center;
  }
</style>
<div id="loginFooter">
  <em
    ><a href="https://abcsecurity.com/disclaimer.html"
      >Terms & Conditions</a
    ></em
  >
</div>
would result in the following login page:
HeaderHtmlUrl
This can refer to a piece of partial html which will be displayed above the navigation bar once a user is logged in.
Setting this to a url pointing to an html file with the following content:
<nav
  class="navbar
navbar-inverse"
>
  <div class="container-fluid">
    <div class="navbar-header">
      <a class="navbar-brand" href="https://www.abcdealer.com">ABC Dealer</a>
    </div>
    <div class="navbar-collapse collapse">
      <ul class="nav navbar-nav">
        <li><a href="https://www.abcdealer.com/products">Products</a></li>
        <li><a href="https://www.abcdealer.com/services">Services</a></li>
        <li><a href="https://www.abcdealer.com/about">About Us</a></li>
        <li><a href="https://www.abcdealer.com/contact">Contact</a></li>
        <li class="active">
          <a href="https://www.ica.abcdealer.com">Remote Alarm Portal</a>
        </li>
      </ul>
    </div>
  </div>
</nav>
Would result in the following page header:

Translation
All text on the Patriot ICA website can be translated in the same manner as the Patriot Windows Client. Please refer to the guide here for instructions on translating Patriot. Once your translation is complete, copy the langauge folder (e.g. German Language "de") into the Data Service installation folder, and then, in the same folder, edit the file locale-data\languages.json and add your new translation language abbreviation to the supported languages list:
["en", "en-NZ", "en-AU", "en-GB", "de"]
Now when an end-user refreshes or connects to the ICA website with their browser language set to one of your supported languages, the ICA web site will display your translated phrases in place of the default English.
Plink Translation
Plink translation files are stored in the ICA static sub-folder. This can be found in the Data Service installation folder (typically C:\Program Files (x86)\Patriot Systems\Patriot Data Service\ICA\static). There should only be a single translations file, named translations.json. See Plink Translation for more information on the structure of the translations file.