Excel Importer
Patriot allows large numbers of clients and related data to be imported using a combination of Microsoft Excel and Patriot's XML import capabilities. Patriot supports three data import merge strategies: Overwrite, Merge and Skip. The merge strategy that you choose controls how Patriot imports data that conflicts with existing data.
You can also export clients from Patriot to the same .xml file format used to import clients. i.e. clients may be exported and then re-imported in a "round-trip" fashion - but beware that Patriot does not export or import any historical log data (e.g. signal and activation history) associated with clients.
Using the Excel Spreadsheet
An excel spreadsheet can be used to enter data and prepare it for importing into Patriot. You can download an empty copy of this spreadsheet from the downloads section of the Patriot support website.
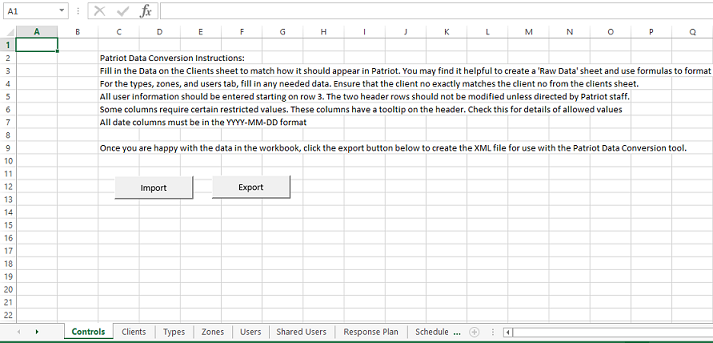
Data can be entered into the Excel spreadsheet manually, or automatically using a conversion tool. Please contact Patriot support for information about automatically populating the spreadsheet with a standard conversion tool. The spread sheet is split into several worksheets. The first worksheet, Control, contains instructions and buttons to use for import and export.
Importing Data
Import is used for loading Comma-Separated-Values (CSV) files. These are normally CSV files of account data that have been exported from Patriot. These CSV files should be placed in the same file folder as the spreadsheet, and must be in separate files, named to match up with the correct worksheet. Each worksheet consists of a set of columns, headed with a user friendly description of the column in row one and a machine readable column name in row two. Both of these header columns must be present for the import/export to work - do not delete these rows.
Manually Entering Data
Data can also be manually entered into the spreadsheet. When performing manual entry take note of the following,
Many fields have additional helpful comments. Look for a Red Triangle in top right corner of the column header to indicate a comment is available.
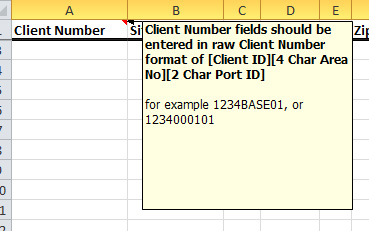
Client Numbers
Some columns expect a Client Number to be entered. In all cases this client number must be entered in raw format, not the display format seen with the Patriot client program. The raw Client Number format is defined as:
| Client ID | Area No | Port ID |
|---|---|---|
| 1-16 characters | 4 characters | 2 characters |
The [Client ID] part is commonly 4 digits, but can be anything from 1 to 16 characters. Examples of raw client numbers are for 1234BASE01, or 1234000101. Column which expect a client number will mention this in the column comment.
Multi-Area Clients
You can include multi area clients, and have the areas linked back to the base area. On the Clients tab, set the Base Account column to empty for the base area, and set to the raw client number of the base area for each of the other linked areas.

When linking areas to base, you should also define which field groups are linked, and which are overridden by the area. This can be done on the BaseOverrides tab. Enter a row per area which is linked to a base area, and specify True for False for each field group. Don't enter rows on this tab for base areas or area not linked to base areas. Only add one row for client area.

Billing Customers
Billing Customers can be entered on the Billing Customers worksheet. Each customer should have a unique Customer Reference to identify them during the import. Enter the matching Customer Reference on the Client Charges worksheet as well as for the Default Customer Ref field on the Clients worksheet as required.
User merging is supported for billing customers. To reference an existing customer in Patriot, simply enter them on the Billing Customers tab as normal, ensuring that their details match the existing customer. Then, enable user merging during import.
Installer Charges
Importing Installer Charges is supported by data import spreadsheet using the Installer Charges worksheet. This worksheet works differently from the others, because it uses the Installer's user ID as the primary reference for the imported data, rather than the Client Number as per the other worksheets. For this reason, it is only possible to import charges for Installers who already exist in Patriot (and therefore have a user ID). Importing a new Installer and charges in a single import is not supported.

Equipment
Installers can be assigned to equipment by entering their details on the Equipment Installers worksheet. Each Installer must have a unique Installer Reference to identify them during the import.
When entering equipment on the Equipment worksheet, enter the matching Installer Reference to link the equipment to the installer.
User merging is supported for equipment installers. To reference an existing installer in Patriot, simply enter them on the Equipment Installers tab as normal, ensuring that their details match the existing installer. Then, enable user merging during import.
Camera Types
If you want to import in the Camera Details then the 'Camera Type' must be entered. The Camera type will need to be a number that matches the correct type of camera the account will be monitoring. A list of camera type numbers and the corresponding camera type is listed below.
| Camera Type Id | Camera Type Description |
|---|---|
| 1 | (Not Used) |
| 2 | IP |
| 3 | Ozvision |
| 4 | Not Used |
| 5 | Adpro |
| 6 | Heitel |
| 7 | Camera SDK Plugin |
| 8 | Dedicated Micros |
| 9 | Videofied |
| 10 | Visonic |
| 11 | Adder |
| 12 | VideoIQCVR |
| 13 | AdProPlatinum |
| 14 | ONVIF |
| 15 | Milestone |
| 16 | Risco |
| 17 | Hikvision |
| 18 | VideoIQRialto |
| 19 | Mobotix |
| 20 | Bosch |
| 21 | Paradox |
| 22 | WeR |
| 23 | Dowshu |
| 24 | Dahua |
| 25 | UDP_IPN |
| 26 | Davantis |
| 27 | UDP_IPE |
| 28 | Virtual |
| 29 | Avigilon |
| 30 | ParadoxDirect |
| 31 | Standard Media |
| 32 | RTSP Camera |
| 33 | Risco VUPoint |
| 34 | Samsung Hanwha |
| 35 | Mobotix-EventStream |
| 36 | IDIS |
| 37 | Tiandy |
| 38 | Surgard Visual Verification |
| 39 | NX Witness |
Export
Once the spreadsheet has been filled with all the clients and their related data that you wish to import, select the Controls tab and click on the Export button. This will create an xml file in the same directory as the Excel spreadsheet. Depending on the size of the imported data set, this process may take some time. A progress bar is shown along the bottom of the screen for reference. A pop-up message will let you know that the conversion has completed.
Import Clients into Patriot
The resulting xml file created can now be imported into Patriot using the Data Merge feature.