Line Card Mappings
Task Port ID
Normally, any signals received through a task will be logged against clients using the Port ID specified in the task settings screen. For example if the Task has a Port ID of "01", signals will be logged to clients with a Port ID of "01".
With some receivers, it is possible to direct signals from different line cards to different Port IDs, rather than using a single fixed Port ID across the whole receiver.
Setup Line Card Mappings
-
Open the Task Settings screen (System > Tasks > Task Settings).
-
Select the task.
-
Enter a # symbol as the Port ID.
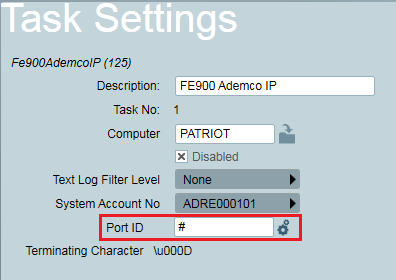
Enter a port ID of # to enable Line Card Mapping -
Left like this the task will extract the Port ID from the signal data received. Receivers generally send a Receiver number and a line card number. These numbers may or may not be programmable within the receiver itself. As the Port ID in Patriot is two characters, the task must choose 2 characters from these values to use as the Port ID.
-
For Ademco Receivers (and Receivers which emulate Ademco Receivers) the format only supports a single receiver characters and a single line card character. Patriot uses both these characters for the Port ID.
-
For Surgard Receivers (and Receivers which emulate Surgard Receivers) the format sends two receiver characters, and 1, 2, or 3 line card characters. As Patriot can only support 2 characters, it uses the 2 receiver characters. In the Surgard receiver, the receiver number can be configured per line card, so this must be set to the desired value for each line card.
-
Port mappings in software can also be configured (optional). These are setup by pressing the cog button which appears once a # has been entered into the Port ID field. By setting up Port Mappings within the software it allows for a standard configuration across different types of receivers. Removing the need to reprogram the receivers themselves if a line card becomes faulty and the lines need to be ported across onto another line card. Each mapping is a 2 character Line Card number, which will be directed to a corresponding 2 character Port ID.
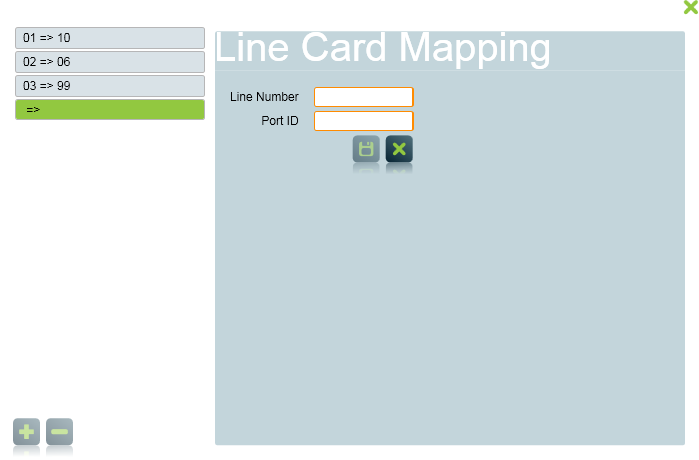
Inserting a new Line Card Mapping - Line Number: The 2 characters (sent from the receiver as part of the signal data) that Patriot would use for the Port ID, if no Port Mapping was defined. The Patriot task will recognize this number and use the mapping to convert it to the Port ID. * Port ID: Part of the client number. This determines which Patriot account the received signals will be logged under.
-
Once line card mapping is enabled for a task, the fixed port id mapping setting will be available. This setting will be used as the default port id if no port id mapping has been set for a linecard number. If this setting is not set, the extracted Port ID from the signal would be used instead. For DC09 signals, Risco and Morphean signals, if no linecard mapping is mapped to a port id and no fixed port id is specified, then a port id of '01' will be automatically assigned.
Port ID Mapping Mode
Some tasks support using receiver number and line number as the Port ID, such tasks will have the option to choose which way the Port ID should be mapped to.
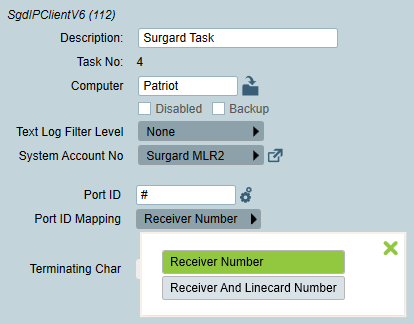
- Receiver Number: Use the 2 characters (sent from the receiver as part of the signal data) that represent the receiver number as the Port ID.
- Receiver And Linecard Number: Use the last character of the receiver number and the first character of the line number in the signal received as the Port ID.
Supported Tasks
The following tasks support Line Card Mappings:
- Ademco Receiver
- Permaconn
- Surgard
- FE 900
- Tecom
- Radionics
- CSL Dualcom
- DMP
- OH 2000
- Radionet Receiver Old
- RSM-02
- DC09
- Risco
- Morphean
The following tasks support Port ID Mapping Mode selection:
- Surgard
- FE 900 Surgard
- CSL Dualcom