Remote Device I/O (Auxiliary Control) Setup
This Task has been Deprecated due to the difficulty is sourcing suitable hardware. Please consider the use of the Serial Device IO Task as an alternative
The Remote Device I/O Task provides a versatile means of interfacing Patriot version 6+ software with a range of IP enabled I/O hardware. Patriot does not directly supply I/O hardware - please contact Patriot support for assistance choosing appropriate hardware. In a typical installation hardware with up to four 250VAC control relays and four optically isolated analog inputs will be recommended.
An example usage case of the Remote Device I/O module might be the addition of an electronic barrier arm or gate control signal to a Patriot Client response plan (i.e. an alarm panel's open signal may be configured to trigger the opening of a servo controlled barrier or gate).
Prerequisites
- Patriot version 6.2 installed
- The Patriot Remote I/O module must be registered to use this task.
- Secure LAN Network
IP traffic between Patriot and the compatible remote I/O hardware is unencrypted. A secure LAN is strongly recommended when using the Remote IO module to control mission critical equipment.
Hardware Configuration
Because of the risk of sparking and electric shock if high power electronics are incorrectly wired up to relays, only suitably qualified electricians should wire up I/O hardware.
Contact the Patriot sales team for information on sourcing recommended and supported remote I/O hardware manufacturers and devices. When your I/O hardware arrives, you will need to again contact Patriot sales and they will arrange a time with you and a Patriot engineer for the latest firmware to be downloaded onto your device. This is a simple process, all that is required is a Windows workstation with a spare USB port and Internet access.
Patriot Task Setup
Under System > Tasks > Task Settings, select the insert (+) button to add a new task. Select Remote Device IO from the drop-down, and click next.
The Remote Device I/O task currently supports exactly one device, if you need to connect to multiple remote devices, you will need to setup one task per device.
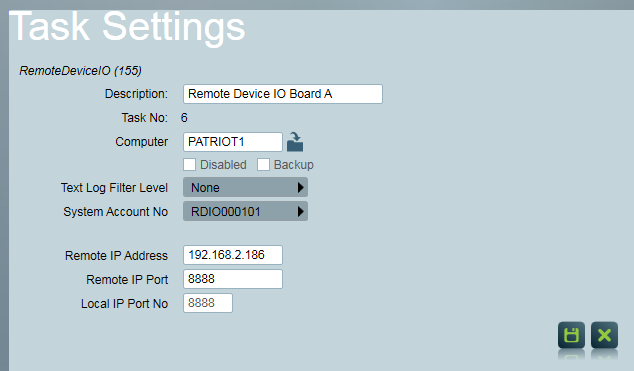
First set the general task information: Description, Computer, and Port ID to suit your system layout. See general task settings for more information.
Remote IP Address the IP Address programmed into the I/O board if known. If you are operating multiple Remote Device I/O task's (to control multiple I/O boards) then you must set the remote IP Address in each task. If you just have one I/O board and one task then this setting is optional; if left blank the task will UDP broadcast on your LAN for the single I/O board.
Remote IP Port only required if Remote IP Address is set. Patriot programs all I/O boards to use UDP port 8888 by default.
Local IP Port No should be set to a free UDP port on the computer hosting the Remote Device I/O task (in most configurations this will be your main Patriot server). Depending on your server setup, local firewall configuration may be required to allow incoming UDP connections on your chosen port.
Once the task is set up correctly and saved, Patriot will automatically begin listening for signals from your Remote I/O hardware device. This can be checked from the task diagnostics screen. When the Device successfully connects to the Patriot Task the task status icon will change from the Broken Chain to Linked Chain icon.

Patriot Client Setup
The Remote Device I/O module is an assigned task managed by Patriot client Response Plans. First assign an account User to the Response Plan which you want trigger the Remote Device I/O task. Double click the User to view Response Plan details, click the insert (+) button to assign a new task. Find the Remote Device I/O task (default name is 'Remote Device IO') in the pop-up list and double click to assign.
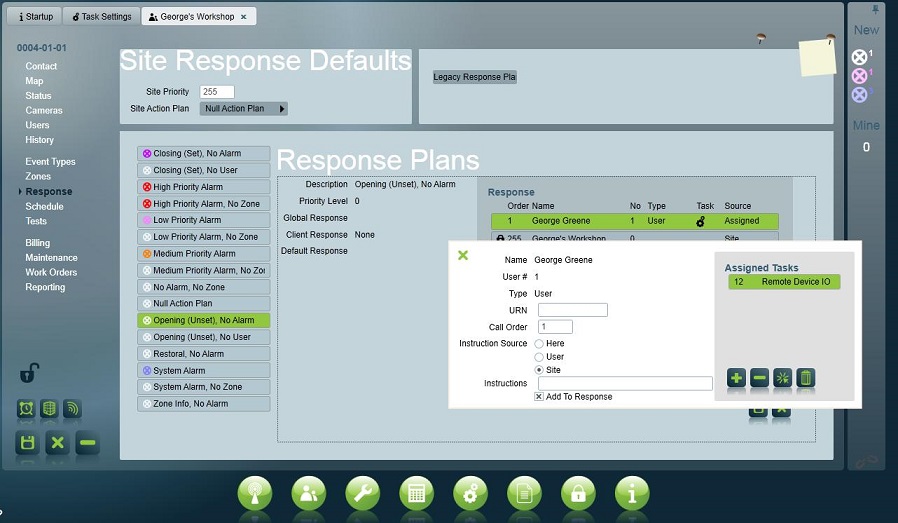
Once the Remote Device I/O task is assigned to a User you need to configure what action the task should take when the Response Plan is initiated by an event signal. Double click the Remote Device I/O entry in a User's assigned task list, and Patriot will show the task settings window. Make sure to save the response plan after making any changes.
Task Assignment Settings
When and what I/O commands are sent to your remote device hardware are configured on a per Response Plan basis. It is not recommended to assign multiple instances of the same Remote IO task in a single Response Plan, although this is possible, and there may be circumstances where this is desirable. As of Patriot v6.2 build 01.06.13 Analog Inputs are not supported, please contact sales@patriotsystems.com for further information.
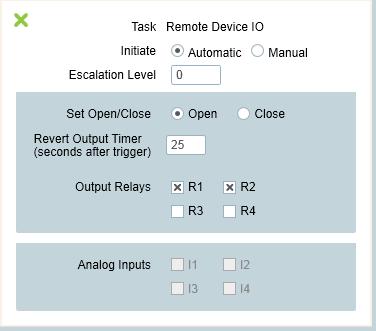
Initiate - this can be set to either Automatic or Manual. Automatic initiation will automatically send commands when a Response Plan is generated in response to an alarm signal event, and the Remote Device I/O task is amongst the assigned tasks in the plan. Manual initiation means that no commands will be sent to your remote I/O hardware by default. Instead the command needs to be manually sent with the Manual Messaging button from the Activation screen.
Escalation Level - this setting should always be left at the default value '0' unless you are operating the Remote Device I/O task in combination with the GSM task and the Advance Paging module is registered. See this document for information on messaging escalation.
Set Open/Close - this setting determines whether an open or close relay signal should be sent to your remote device.
The effect of an open or close signal will depend on equipment wiring and relay properties (Normally Open/ Normally Closed). Please consult with your installer.
Revert Output Timer - if a value greater than '0' is entered in this field, a revert signal will be sent after the Open/Close signal. The revert signal will be delayed by the value of this field in seconds.
Output Relays - which relays should be switched by the open/close and revert commands. Please consult with your installer for wiring details.
Analog Inputs - not currently implemented, please contact sales@patriotsystem.com for further information.
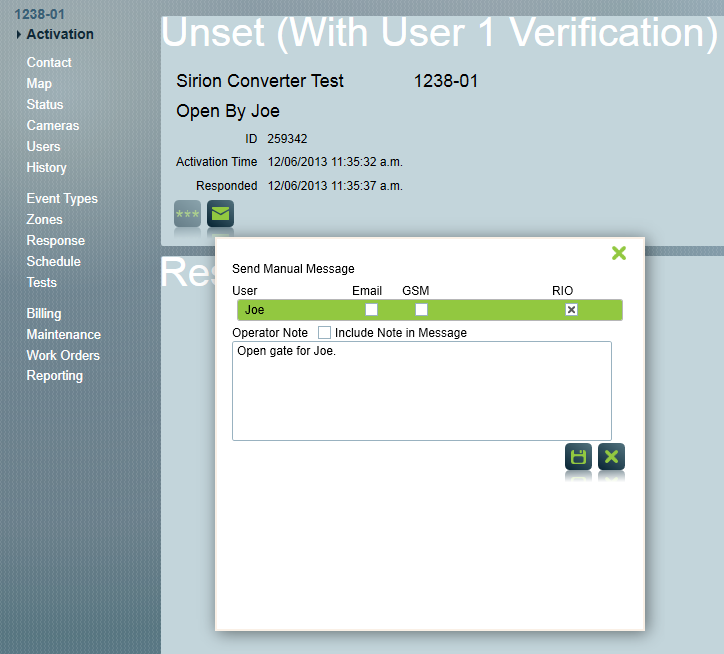
Manual Operation
As an alternative to operating the Remote I/O as an automated, event triggered auxiliary control system as described above, it is also possible to operate remote device hardware through the Remote Device I/O module in a completely manual, operator initiated manner. This can be achieved through the built in Patriot 6 Remote Control functionality. The remote control function allows an operator to add customised buttons to any Patriot client account, which can then be setup to send commands through a pre-configured Remote Device I/O task.