Zones Tab
The Zones tab displays alarm zone information for a client.

Adding a new Zone
 To add a zone record, click the Add button in the Zones area to display the Adding a Zone Record window.
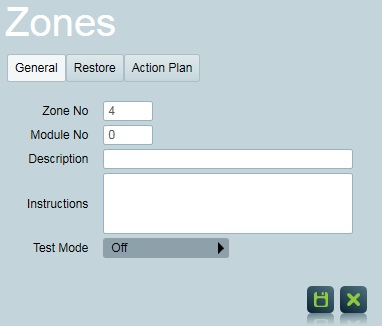
Enter a Zone No and description of that area. For example, zone no 1, the Workshop. In most cases no other information is required. See below for additional field descriptions.
Click Save once you have entered the zone information.
Zone Settings
Module Number
For most sites, this is not required and can be set to 0. However, in some cases, the zone number by itself may not be enough to uniquely identify the zone event or action needed. In these cases, the source signal format might generate a module number as well. Multiple zones can be set up with the same zone number, but with differing module numbers. For the zone information to be loaded and processed, both the zone and module number must match what is transmitted in the signal.
If the source format does not support transmitting a module no. itself, then Patriot will load the module automatically to match the module no. set on the event type*. A separate zone list can then be created with the specific zone needs for the type.
For example, an AC failure signal might normally generate a system alarm on a site. However if it is in a high security zone, it should be treated as a medium priority alarm. Simply setting the zone action plan to medium priority alarm would affect all types, not just the AC failure. You can solve this problem by expanding the event type using a module no. A separate zone list can then be created with the module set to match the AC failure event type's module no. Now when you assign the Medium Priority Alarm action plan to the zone, it will only trigger when the expected event type/zone combination occurs.
The other zones may also need to be duplicated and configured for the correct AC failure response as well, depending on the source format. See Event Types tab and Contact ID Expanded for more information.
Zones assigned to templates - template zones - have two extra settings relating to module no. These are the option to Merge Client Zone Description, which when enabled, gives you the option of specifying a Zone No Redirect. Refer to Contact ID Expanded for a description of these settings.
*The event types tab also gives you the option of setting Alarm Interpreter to "Contact ID Expanded" which will automatically "expand" all event types (including those that don't have a module no. set - the event type no. is simply used instead).
Instructions
The zone instructions applies to the Site user type only (unless the legacy "AllowExtendedUserInstructions" option is enabled in the Data Service configuration). You must ensure 'Event' is checked from the instruction source of the site user. The Event specific instruction source is made up of Zone, Event Type, Client Action Plan Instructions, Dealer Action Plan Instructions and Global Action Plan Instructions.
Test Mode
The test mode option allows the selected zone for this client to be disarmed for testing. See Test Mode, in Basic Client Maintenance.
Restore Settings
Used if you want automated alarm handling settings to apply only to specific zones. As only one restore type number can be set, it is recommended that this option is only used for Zones with a module number that applies only to specific event types (for example when using "Contact ID Expanded" signal interpretation). See Module Number section above for more information.
Action Plan
Checking the Set Action Plan for all events of this zone option allows a single action plan to be assigned at the zone level, which takes precedence over all event type action plan assignments. The only time this would be recommended practice would be when using a format like Contact ID Expanded, with the Module number set. When an action plan is assigned to a zone, any signal type received from the zone will trigger the same zone assigned action plan. See Action Plans for more information including best practices.
Generally more useful are Action Plan Overrides, where specific action plans can be overridden at zone level.
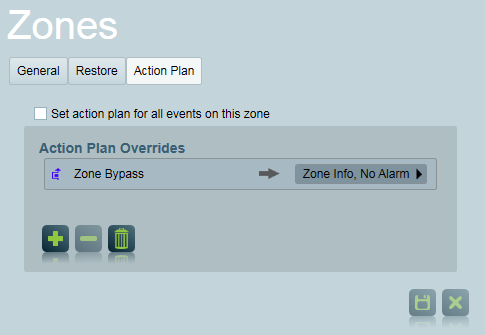
This can be useful to escalate a particular zone to a higher priority, or cancelling alarms for certain action plans. See Zone Action Plan Case Studies for examples.
Zone Location
The physical location of the zone can also be setup and displayed on the site layout during an activation. See Floorplan in Map Tab.
Zones can also have a geofence assigned to it. Setting this up will vary depending on if you are using the Patriot client or ICA.
Viewing and Editing geofences requires the security right Edit Client > Zones Tab Displayed > ZoneList > Geofence set to view or edit respectively.
We recommend using ICA for setting up geofences as this has an interactive map to set the locations.
- ICA
- Client
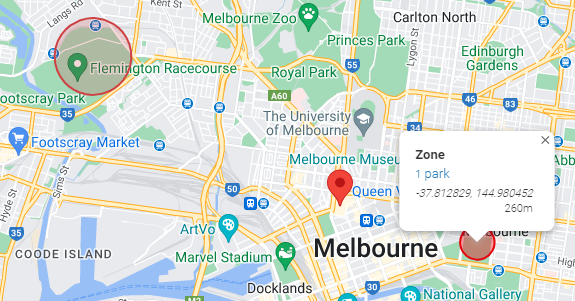
Editing geofences in ICA makes use of the interactive google map.
You can either enter GPS coordinates in the Latitude and Longitude text boxes or double click on the location on the map to set the location.
Enter the radius in metres or click and drag one of the edge points of the red circle on the map. (if your radius is 0, dragging from the centre point will set the radius)
To move a geofence, you may either click on the new centre point, or drag the centre point to the new location.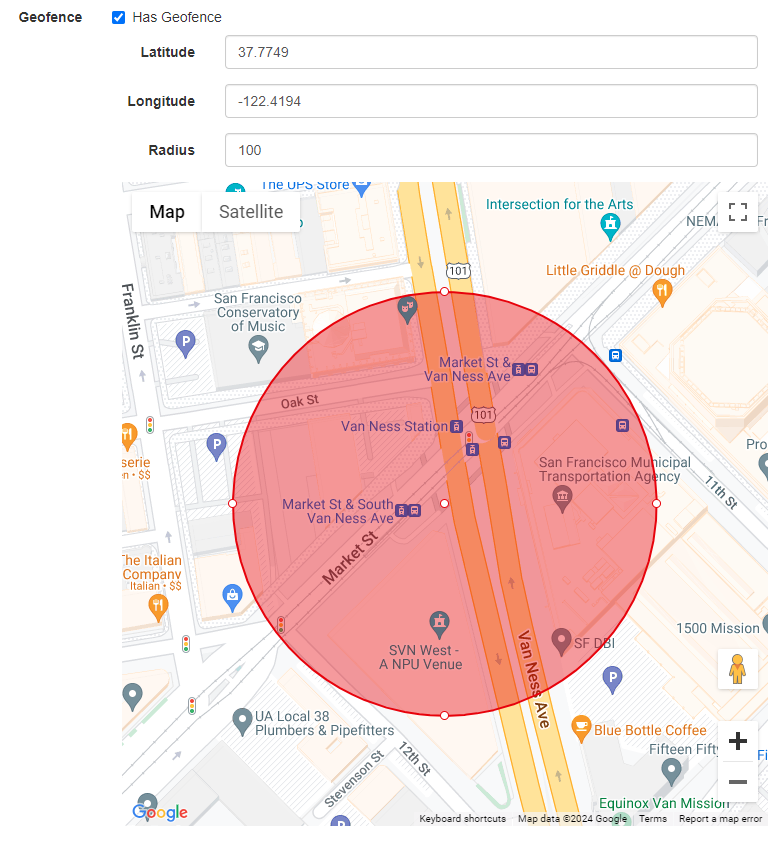
Editing geofences in the Patriot client does not have map controls.
Latitude, Longitude and radius may be entered into the text boxes.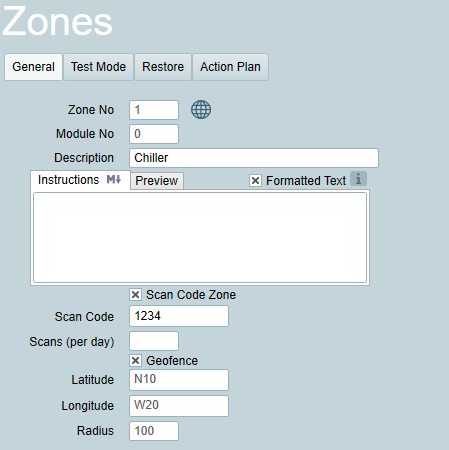
Due to the limitation of GPS tracking, geofences with small radius' may be unreliable and may not register when the patrol is in the area.
Once set geofences can be viewed from the map tab of the client, this requires full map mode.
In ICA, selecting the zone will display more information about the geofence.
Changing a Zone Record
To change a zone record, simply select it from the list in the Zone window, make any changes as necessary and click the Save button.
Deleting a Zone Record
 To delete a zone record, select it in the Zone Area and click the Delete button. A message appears asking you to confirm whether you are sure you want to delete the highlighted record. Click Yes to delete. Click No to cancel the command.
Copying Zone Information
 Instead of repetitively inserting new zone information, you can copy it from existing clients using the Copy From command.
Click the Copy From button to display the Copy Zones From form. Click the ellipsis button at the end of the Copy From field to bring up the Browse the Client File window. Select the client from whose file you want to copy the dispatch records from, and click the Select button. The Copy From window appears with the selected client's number in the Copy From field. Click Save. The zone records are then copied into the clients Zone list.
If any existing zone records are present, a message warning that you Can only copy if no entries exist are displayed. Click OK. The warning message together with the Copy From window disappears.
Template
The Template Selector directs the program to a template or another client where relevant Zones have already been set up and can be reused for the currently selected client. The Template Selector is preferable to copying Zones for two main reasons:
- If the data changes in the template file, the information is automatically updated for all clients (if the Copy command was used, however, the information would have to be updated for each and every client).
- Using the template saves disk space, by reducing database size.
To activate this feature click the Use Template check box, then select an appropriate client number by clicking the Template Selector. This displays the Template PopUp. Locate the Client/Template whose types you wish to use e.g. CID1-01 Contact ID Template, and double click to select the template.
The client's number will then appear in the Template Selector. The Templates Zones will be displayed in the zones list, with the template indicator icon.
If the Use Template box is checked for a particular client the program will refer to the Template number for event interpretation whenever it receives signals for that client. Template chaining will also occur with zone templates for up to two additional chained templates (as per event type templates). So if the zone isn't found directly on the client, then the selected template will be searched, and if its not found there, then the zone template's template will also be searched.
Zones added from the Client override those referenced from a Template.
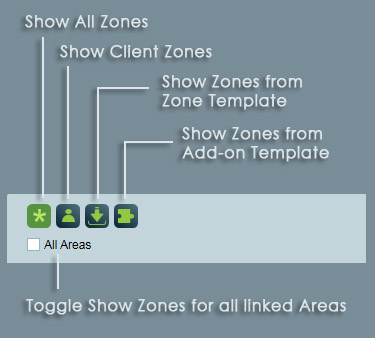
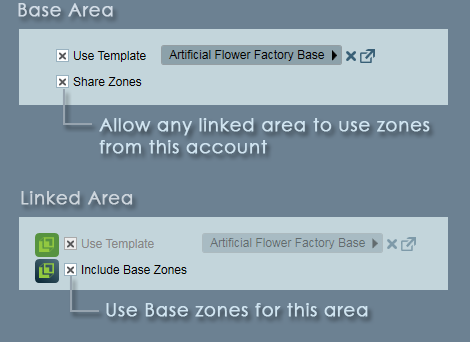
Share Zones: This is an option which applies to multi-area accounts. If this option is enabled on a base account, the base zones can also be applied to any linked areas. You can also override the zone sharing for a particular area, by opening the zones tab for that area account and un-checking the box for Include Base Zones.
You can choose to display the Zones directly on a client or imported from a template, by using the 4 buttons below the Template selector: