Users Tab
The Users tab of a client displays information on the users loaded onto the panel or contact details for after hours callouts.
- Share Users: (Shown only on Base Account.) If enabled, users assigned to the Base Account can be shared with any other linked areas.
- Include Base Users: (Shown only on Linked Areas.) If enabled, any users assigned to the Base Account will also be available on this area. Turn this option off if you need a different user list for this area.
- Global users: If the Global Users option is checked, when clicking the add button in the response plans area (see Response Tab), the client's available users AND the users from the template who have a call order above 0 will be shown.
- Show on call list: If the Show On Call List option is checked, when an alarm is triggered which uses the After Hours Call list as the Client Response (see Action Plans), the users in the selected templates call list will be displayed on the client's activation dispatch screen as well.

Assigning a User
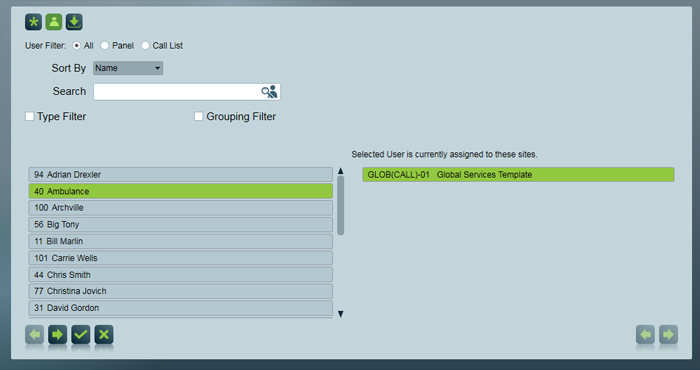
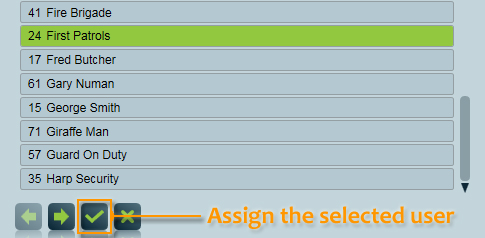
 To assign a user record, click the Assign/Edit Users button on the Users tab of a client record to display the Browse Users window.
Browse Users
The Browse Users area shows all users in the system. A User in Patriot 6 is an all-encompassing term that includes keyholders who can open and close a site, people who will be called to respond to an alarm, and people who receive notifications or reports. Some examples:
- Daily users of the system
- Installers
- Technicians
- Security Patrols
- Police, Ambulance and Fire services
User details should only need to be entered into the system once, and then this same user can be assigned to many different client sites.
This is an important database design feature that ensures changes to User details (e.g. phone number or email address) only need to be updated in one place. Changes will automatically appear wherever that user is assigned throughout the database.
The right hand list on this screen shows a list of the clients/sites that the user has been assigned to.
Adding a New User
A user can be added from the Users Tab by clicking the Add button at the bottom of the Users window. Fill in the boxes to the right of the User list and click the Save button.
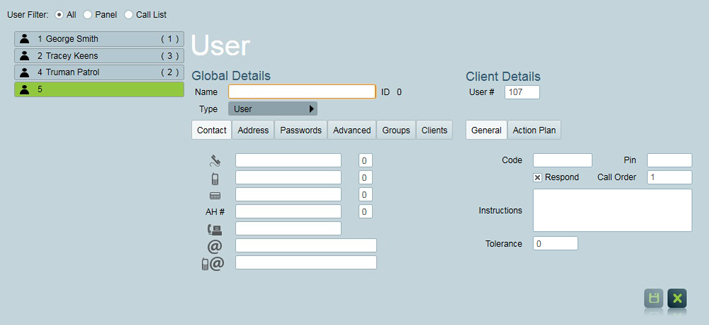
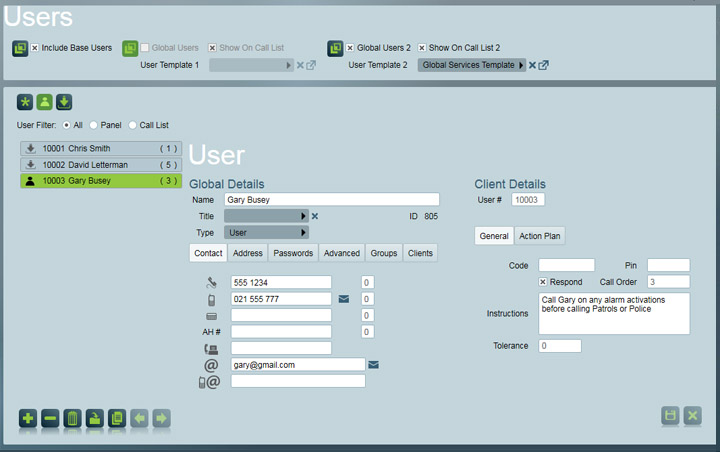
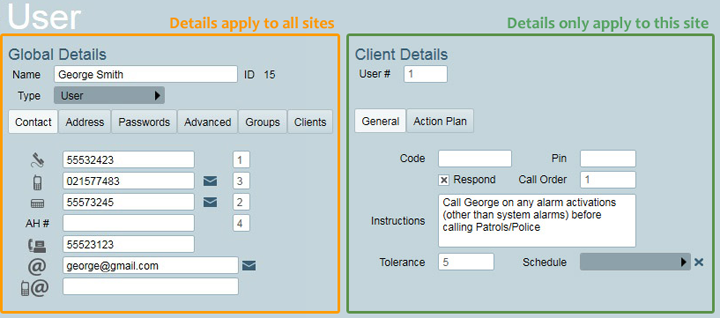
Global Details
In the Global Details area you will enter general information about a user that is not specific to a particular site. The area contains five tabs and a Type dropdown list where the type of User can be selected.
The User ID is system generated and is a unique number for this user throughout the system.
-
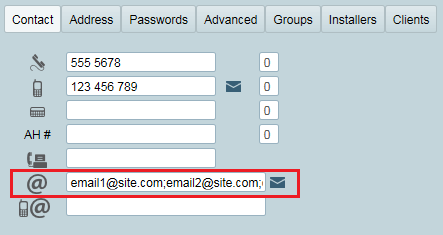
Contact - Stores the user's contact phone numbers and personal identification number, email and , and the type of user they are.
If you want a user's reports and notifications to be sent to multiple email addresses, you can enter each address separated by a semicolon.
Contact information tab -
Address - User's postal address
-
Passwords - ICA and Telephony access passwords.
-
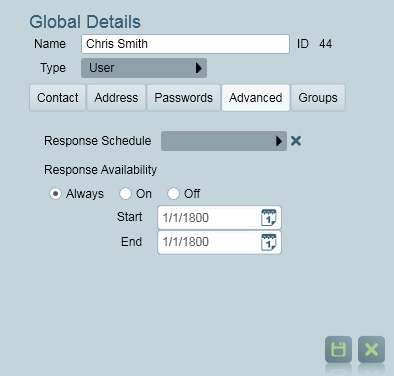
Advanced - Contains information about the users response plan filtering. For more information, see Schedule Availability.
-
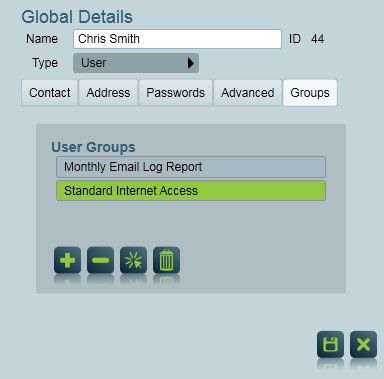
Groups - allows the user to be assigned or unassigned to any of the available user groups. For more information, see User Groupings.
-
Installers - Additional information for installer users.
-
Clients - Displays a list of clients to which the user is assigned.
Client Details
In the Client details area you will enter information about the user that is site specific including user numbers, call order and site specific instructions
- The User # must match the Users Panel ID so the correct User name shows up when the site is armed or disarmed. When Patriot receives and arm or disarm then Patriot uses the "User #" to determine which user has opened or closed the site.
- The Code field is used to store User Voice Codes, or a code which ties this user to this client.
- The Pin field is used by some central stations to store the users Panel Keypad number for opening and closing the system.
- Call Order defines the users default place in any response plan they are assigned to. It should be used to signify to the operator the order of people to call in an activation. Users with a call order of 0 won't appear on the call list.
- Instructions becomes the default dispatch instructions when this user is assigned in a response plan.
- Tolerance (min) - sets the amount of time (in minutes) this user can access this site out of hours before an Unset out-of-hours Alarm is triggered. It also applies to Close During alarms, allowing an unscheduled early closing for the time specified. There is also an option to apply a time schedule to this tolerance if required. Legacy support for user tolerance time slots can be enabled (System Settings > Response Settings), but these should be avoided as they are deprecated. See Auto Status Monitoring for further information.
- Action Plan - allows any of the available Action Plans to be assigned to a User. Once an Action Plan has been assigned to the user, a task can then be assigned to the selected Action Plan.
Once all the details about the new user have been entered, click the Save button to insert the new user into the Patriot 6 database. This new User will now show up in the assigned users list of the selected client, and also in the Browse Users list. The new user can now be assigned to other sites.
Assigning a User to a site
- Navigate to the Browse Users screen from the Users Tab of your selected client.
- Highlight the user to be assigned
- Click the Select button.

The User will now appear in the User list for the selected client.
Site specific client details can now be added to the User.
Fields in the Global Details area are common to all sites that this User has been assigned to. Fields in the Client Details area are site specific.
The User No. should coincide with user numbers sent from the alarm panel; that is if the signal format contains user numbers and user numbers have been programmed in the panel. In a live monitoring station User number lists would normally be obtained from the installers. If User numbers are being used and have been correctly entered Patriot 6 is able to keep a log history of the actual Users who Open and Close a Client Site. This log history is a useful management tool that may be requested by Clients.
There may be cases where a person is to be on the response list for a particular site but they are not a User in the Alarm System Panel. In these cases simply give the User a high User number outside the range of valid alarm panel users (e.g. user numbers from 10 000 upwards). Up to 65 000 Users can be entered for each site.
Changing a User Record
To change a user record, simply select the record in the User area of the Users Tab and make the required changes. Click the Save button.
If you make changes to the Global Details area of a User this will affect all sites this User is assigned to.
Advanced Tab
Here you can change the dates and times that a user will be available in the response. See Schedule Availability for information on these features.
Groups Tab
User groupings are assigned on the groups tab. A typical use for this is to allow setting up 1 report that will go to all users in the group. See the User Groupings document for more information.
De-Assigning a User Record

To delete a user record, select the required record in the User window and click the Delete button.
This will only unassign the user from that site. If you wish to completely remove the user from the Patriot 6 database you can do this through the User Maintenance screen (Maintenance > Users > User Maintenance). Select the user in the list, and click the Delete button.
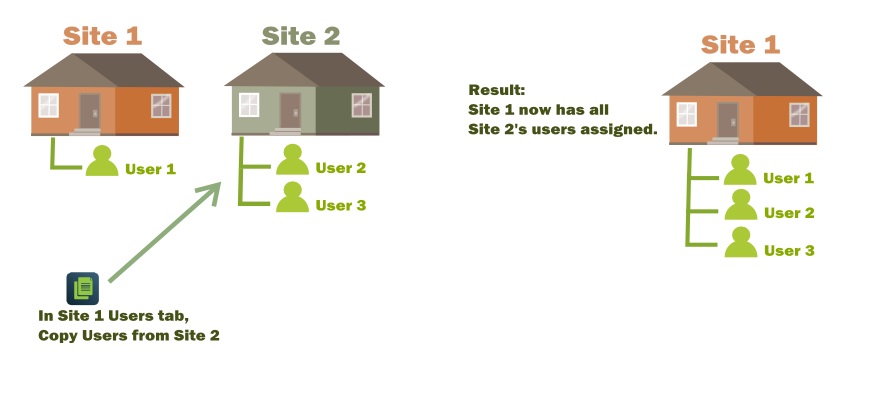
Copying User Information
Instead of repetitively inserting new user information, you can copy them from existing clients using the Copy From command.

- Click the Copy button to open the Copy Users form.
- Select the client that you want to copy all users from.
- Click Save.
All user records from the selected site are copied into the current client. This includes details such as Code, Password, and Instructions.
If any existing user records are present, a message warning that you 'Can only copy if no entries exist' will be displayed. Click OK. The warning message together with the Copy From window disappears.
Searching for a User
Use the Search and Clear buttons in the same way they are used in the Client Search popup in order to find a user.