Auto Dialler
Patriot is able to connect with your phone system and auto dial phone numbers from within Patriot by the click of a button. Once configured this system will connect a call between a local operator's extension (configured on a per Patriot workstation basis) and an external client number stored in Patriot's database. Some auto dialler modules also support additional features like call hangup, and call popping.
Patriot supports multiple forms of communication with your phone system.
- Bria SIP Client - Patriot communications with any SIP compliant phone system, using the Bria SIP Client.
- Click To Dial - Auto dial using windows Click To Dial functionality.
- TAPI Interface - this universal interface is supported by many different phone systems.
- Asterisk - Patriot can communicate directly with an Asterisk PBX
- Avaya - Patriot can communicate directly with Avaya Communication Manager
- Desktop API - allows custom integration with patriot auto dialler.
Each interface is documented below.
Bria SIP Client
The Bria Autodial module is required to use these features.
The Bria SIP Client softphone must be installed on each workstation requiring auto dial functionality.
The windows hosts file will need to be manually edited to include this line;
127.0.0.1 cpclientapi.softphone.com
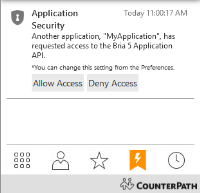
There are no configuration settings required in Patriot. When Patriot first attempts to connect to Bria (first time starting up with module registered), there should be a notification in Bria that needs to be accepted. Bring the Bria client to the foreground and click Notifications on the resource panel. Notifications only appears when you have a notification.
Click Allow Access.

Auto dialling should now work from Patriot. This process will not work if the workstation doesn't have internet access.
The Bria auto dialler module also supports call hangup and call popping functionality within Patriot as detailed below.
Click To Dial
The Click To Dial module is required to use these features. A compatible softphone application is also required on each workstation. This should be tested to ensure it is compatible (see next paragraph on setting default program) with Windows Click To Dial before purchasing the Patriot Click To Dial module.
The Click To Dial module integrates with Windows built in support for Click To Dial using the TEL protocol. A suitable softphone client (eg SIP Client) must be installed on each workstation, and configured as the default program to use for the TEL protocol. This setup varies depending on your version of windows, but is generally performed from Control Panel > Default Programs > Associate a file type or protocol with a program > Choose default apps by protocol. From this list you should see the TEL protocol, and ensure your preferred softphone client is selected as the default program. If you can't see your program in the list of options for the default program, this generally means the program doesn't support Click To Dial.
There is no configuration required within Patriot for Click To Dial.
Patriot has tested the following softphone clients for Click To Dial compatibility:
- Zoiper (full version)
- Bria
The Click To Dial module only supports outbound dialling. There is no support for call hangup functionality, or call popping.
TAPI Interface
This functionality requires the TAPI module to be registered.
Patriot can auto dial numbers through any phone system which supports the TAPI interface. The TAPI client (TSP) must first be installed on each workstation that requires the auto dialler. Installation of this client is outside the scope of this document - you should consult your phone system supplier for further details.
The TAPI auto dialler module also supports call hangup and call popping functionality within Patriot.
Before using TAPI, ensure you can detect the modem from Control Panel > Phone and Modems > Modems. If it is not listed under modems, then you'll need to add a new one. Click on the modem and select properties. Under the 'Modem' tab, ensure 'wait for dial tone before dialling' is unchecked. It would be good to set the modem to factory default before using it in Patriot. You can configure the modem by connecting to it using Putty, and entering in the following AT commands:
| Command | Description |
|---|---|
AT&F | Load factory profile |
AT&W0 | Save active profile |
ATDT (Your Number) | Dial the specified number |
ATH0 | Hang up |
Configuring TAPI for Patriot
Once the TAPI client is installed, and the TAPI module has been registered, setting up Patriot workstations with autodialler functionality is simple.
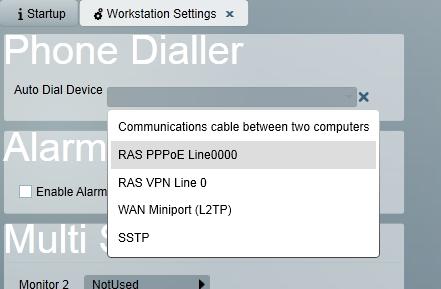
On each workstation where the auto dialler function is required: System > System Settings > Workstation Settings. You will see the Phone Dialler section, with a selector for Auto Dial Device.

If the TAPI client has been successfully installed on this workstation, you will be able to see an entry for it in the list of devices. Select this item, and save the workstation settings.
Asterisk Interface
Patriot can auto dial numbers through any Asterisk-based PBX (including Trixbox, Elastix, etc). The Telephony task (a stripped down version of the task featured in Patriot's Telephony module) first needs to be configured to handle communication with Asterisk. Before you can use Asterisk Auto dialler module, you need to obtain a new Patriot registration, and an Asterisk PBX needs to be setup and operational. The setup of a local Asterisk PBX on a Linux machine is covered in some detail in the Telephony Setup document.
The asterisk auto dialler module also supports call hangup functionality, but doesn't support call popping.
Configuring Asterisk
If your company already has an operational Asterisk PBX phone system, setting up the Patriot's Asterisk autodialler is straight forward, but you will need access to Asterisk's AMI manager configuration file. This file is stored in the /etc/asterisk directory in the Asterisk machine's file system. It can be edited with a text editor program by a linux user with administrator rights, or edited with your choice of graphical Asterisk configuration software.
Edit "manager.conf"
If "manger_custom.conf" exists in /etc/asterisk or is referenced by "manager.conf" then edit manger_custom.conf instead
Scroll down to section [asteriskpbx]. This section contains the configuration for the AMI user login asteriskpbx. Change default secret to new password. Change permit to the IP address of the Patriot server (or the Patriot machine running the telephony task).
If the section starting [asteriskpbx] does not exist, create one. It should look like this when complete:
[asteriskpbx]
secret=<password>
deny=0.0.0.0/0.0.0.0
permit=<Patriot Server IP>/255.255.255.0
read=system,call,log,verbose,command,agent,user
write=system,call,log,verbose,command,agent,user,originate
Once these changes have been made, you will need to restart the Asterisk PBX in the usual way for the new settings to take effect.
Configuring Telephony task
System > Tasks > Task Settings
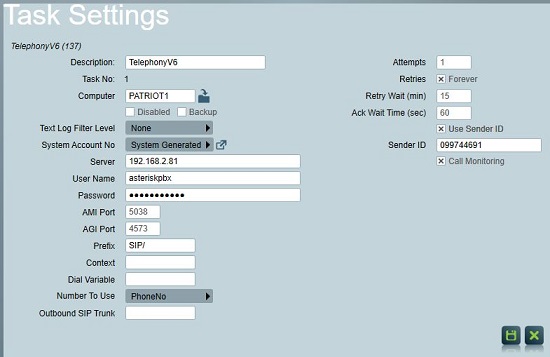
Add a new Telephony task and configure the following settings:
Server this is the IP address or hostname of your Asterisk PBX
AMI Port this is the TCP server port used for AMI on your PBX (default is 5038)
Username and Password which are your AMI user credentials (see above section Configuring Asterisk for Patriot)
Use Sender ID and Sender ID if enabled Patriot will attempt to tag outbound calls with the specified Caller ID (if dialling externally you must have permission to use the specified number otherwise it will be overridden by your VOIP provider).
The Call Monitoring setting must be enabled if you wish to use the Call Popping feature to display caller ID and perform client searches.
Not all task settings are relevant to the Asterisk Autodialler; the AGI Port, and Outbound SIP Trunk settings are specific to automated calling and the larger Telephony module, and can be left as default or blank.
The Dial Variable setting can also usually be left blank when using a standard Asterisk installation.
Context is the calling context Patriot will originate calls from. Depending on your PBX setup you maybe able to leave blank, enter a custom context or enter a default context like from-internal

Avaya Interface
This functionality requires the Avaya Auto Dial module.
Avaya does not provide any feedback on when a call has started/ended, so Patriot will always display the call / hang up buttons. Call popping is not supported by the Avaya auto dialler module.
Avaya Requirements
- Avaya Communication Manager
- Avaya Application Enablement Services, connected to Communication Manager
- Telephony Web Service enabled in Avaya AE Services (requires the Avaya TSAPI basic user licence)
The configuration of Avaya is beyond the scope of this document, consult your phone provider for more information on enabling the required services.
Configuring Avaya in Patriot
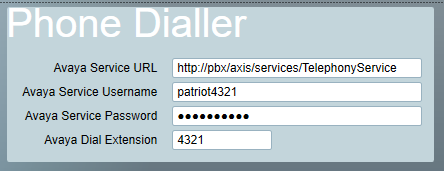
On each workstation where the auto dialler function is required: System > System Settings > Workstation Settings. You will see the Phone Dialler section:

The Service URL should match the configuration of the Telephony Web Service. Ensure you enter the full path to the telephony service, typically http://<pbx IP/name>/axis/services/TelephonyService.
The Username/password fields should match a configured user in the PBX.
The extension should indicate which phone will be used to make the outbound calls.
Save the workstation settings once this information has been entered.
Desktop API
This functionality requires the Desktop API Dialler module.
The Desktop API Dialler allows custom integration with Patriot's autodial features. API documentation is available here.
Autodialler Setup
Once you have an autodialler setup you will be able to connect calls by simply clicking on the Auto Dial icon next to any of the phone numbers stored in Patriot.
Some phone systems allow you to configure the TAPI client (TSP) software to ring a local extension to indicate when a call is ready for an operator's attention (this functionally is the default when using Patriot's Asterisk autodialler interface). Patriot allows you to configure this local extension on a per workstation basis on the System > System Settings > Workstation Settings Panel.
Because the majority of PABX installations use an outside line prefix to distinguish between internal and external calls and this prefix (dial out key) varies across installations, to complete your autodialler setup you need to set this key in Patriot's System Wide Settings panel (System > System Settings > System Wide Settings). A second field is provided on this panel to set the prefix to be dialled when making a call to a number stored in one of Patriot's Mobile No fields. Normally this field should be set to the same prefix as the outside line prefix."
Call Popping
When an inbound call is received, the call information will display in the bottom left of the Patriot Client window. This will show the call status and the incoming Caller ID. Call Popping allows the operator to end a phone call or search clients with users containing the inbound Caller ID information using the clients search window.
There is an operator setting Enable Call Popping which automatically performs the search without needing to press the Call Popping Search button.
See Default Search Settings section in System Wide Settings can be used to configure user fields searched against the incoming Caller ID.
Troubleshooting
Patriot will log any auto-dial failure messages into the event viewer on the workstation that is being used. Check the event viewer for any error details.