Preset Reporting
You can find existing saved preset reports in the Reports > Preset Reports menu
Reports can be setup with the Report Wizard, saved as presets report, and then run when required with a single click of a button. Preset reports can also be scheduled to run automatically at a preset time interval. If you have the email module reports can also be email to a user, or to a specified email address. .
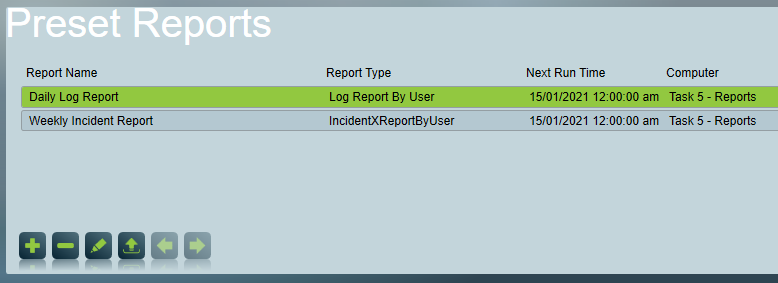

To create a new preset report, click the Insert button. The Report Wizard will appear to guide you through to setup a new report.

To delete an existing preset report, select the report you would like to delete and click the Delete button. You will be asked if you wish to delete the selected preset report. This is because once you confirm the deletion it is not possible to recover the preset report.

To edit an existing preset report, select the report you would like to edit and click Edit button. Changing the report type of a saved preset report is not possible.

To run an existing preset report manually, select the report you would like to run manually and click the Run Report Manually button.
Run Report Manually
To setup a manual preset report select Manual.
Uncheck the Print Preview check box and set Output Type to the desired document format.
Setting Output Type to an Email type for a report by user will not show Email and Email Message fields as the report will be sent to the email address defined in the user record. See Reports By User for more information.
Click the Next button and then name and save the report in final wizard step.
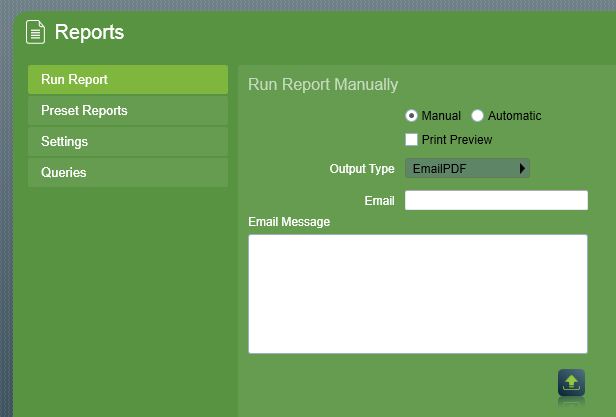
The report will now appear in the list of Preset Reports and you can run this at any time using the Run Report Manually button.
Run a Report Automatically in Simple Schedule Mode
To setup a simple preset scheduled report select Automatic and set the Output Type. Print Preview is disabled for automatic reports.
Click the Next button to schedule and save the report in final wizard step and select Simple schedule mode. The Scheduled Preset Report is run by a configured reports task. More on setting up report task in the "Creating a task for Running Preset Reports" section.
A legacy option is also possible by checking the Run From Client (Legacy) checkbox to have the report be run on a workstation. This option has several additional requirements, more on setting these up in the last section.
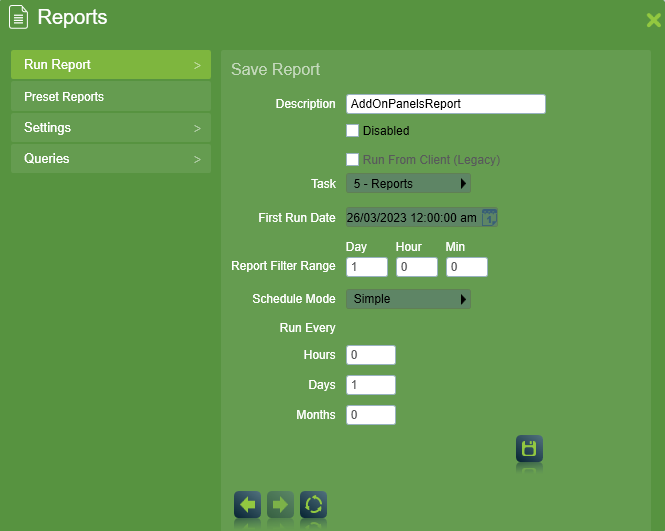
Scheduled Preset Report Settings run by a task
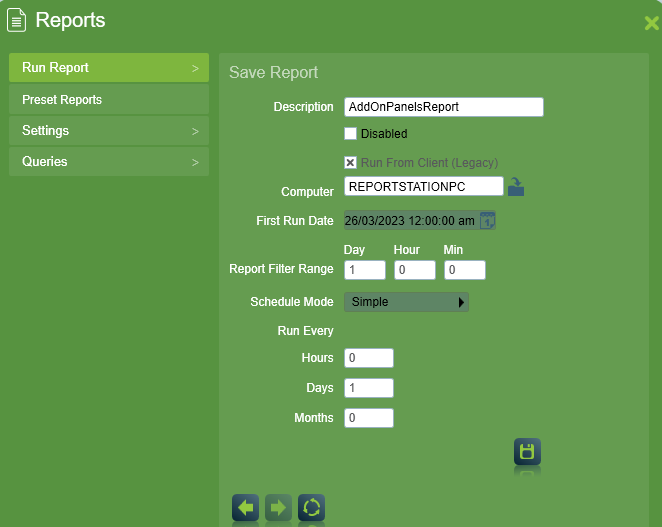
Scheduled Preset Report Settings run from client
Enter a descriptive name for the new report in the Description field.
When running a report normally, the Task dropdown list specifies which task to use for generating reports.
Schedule First Run Date and use number of Days/Months to set the interval of the automatic report (i.e. a report run with days set to 7, will run once a week, with a report range of 7 days).
Some reports provide filter to set Start Date and End Date for the time frame of the report data. For automatic scheduled reports, Start Date and End Date are computed by the Run Date, Days, and Month. E.g. setting up a daily log report (Days set to 1, Month set to 0) with first run date on 01/02/2012 10:00:00 a.m. will override Start Date to 31/01/2012 10:00:00 a.m. and End Date to 01/02/2012 10:00:00 a.m.
At the time the preset report is scheduled to run the computer set to run the report must have Patriot Client Program running.
With the legacy option "Run From Client" selected, the Computer field specifies the name of the computer that will run the report, by default this will be the current computer.
Temporarily disabling automatic reports is possible by selecting the 'Disabled' checkbox.
Run a Report Automatically in Cron Schedule Mode
A Cron Schedule Report can be configured in a similar way as a simple preset report, but by selecting the Cron Schedule Mode. This mode includes a Cron Expression field for entering customized scheduling options.
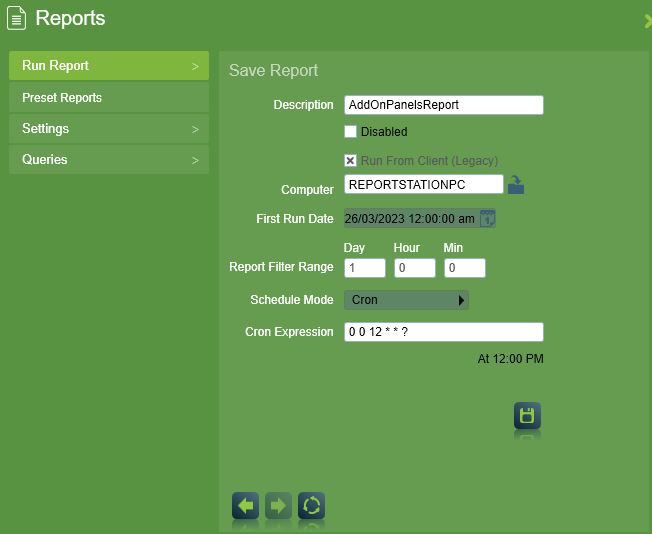
Scheduled Preset Report Settings in Cron Schedule Mode
The example image above demonstrates that the Cron expression 0 0 12 \* \* ? is set to run the report at 12 PM (noon) daily.
The Cron expression syntax uses five fields separated by spaces, representing (in order) minutes, hours, days of the month, months, and days of the week. The values of each field can be a single value, a list of values separated by commas, a range of values separated by a hyphen, or a combination of these.
Here are some examples of commonly used Cron expressions and their meanings.
| Cron Expression | Meaning |
|---|---|
0 0 */6 ? * * | Run every 6 hours |
0 0 0 * * ? | Run at midnight every day |
0 0 1 * * ? | Run at 1am every day |
0 0 2 1 * ? | Run at 2am on the first day of the month |
0 0 3 15 * ? | Run at 3am on the 15th day of the month |
0 0 4 1,15 * ? | Run at 4am on the 1st and 15th days of the month |
0 0 5 ? * MON | Run at 5am every Monday |
0 0 18 ? * MON-FRI | Run at 6pm every weekday (Monday to Friday) |
0 0 19 1 JAN ? | Run at 7pm on the first day of January |
0 0 20 ? * FRI#1 | Run at 8pm on the first Friday of the month |
0 0 21 ? * SUN#2 | Run at 9pm on the second Sunday of the month |
0 0 22 L * ? | Run at 10pm on the last day of the month |
0 0 9 ? * FRIL | Run at 9am on the last weekday of the month |
0 0 0 1 */3 ? | Run at 12am on the first day of every 3 months |
Preset reports can only run at most once per hour, so the expression like : * * * ? * * (run every second) will be ignored and the interval is set to 1 hour.
For easy generation of cron intervals using UI you can use some of these services: CronMaker and Cron expression generator - Quartz.
For more information, please refer to the official quartz documentation for details. https://www.quartz-scheduler.net/documentation/quartz-3.x/tutorial/crontriggers.html
Creating a task for Running Preset Reports
A Report Task can be added or configured in the same way as the other tasks, but set the task type to "Reports"
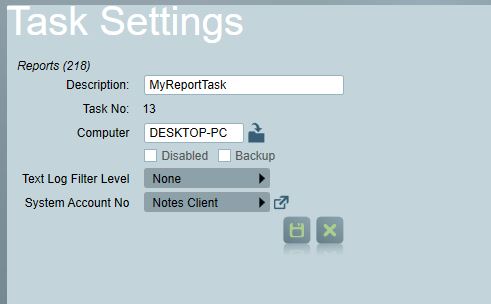
Task settings panel for the Reports Task
Enter a Description of the task.
Select the Computer that this task is to be run on. By default, it is the name of this computer.
Backup: Check this box if you wish this task to be defined as a backup task. This will prevent the backup tasks showing in a faulted state when the primary task service is running.
Enter a System Account No. This is the account number which the status of the Reports task will be logged against. For the Reports task you should use the default Notes Client: NOTE000101.
Creating a special Patriot account for Legacy Preset Reports
Preset Reports run using the Run From Client (Legacy) option have two important points that are required for them to be sent out at the scheduled time:
- Computer name: Preset reports are intended to be sent out from a particular computer. This will usually be the server, or a workstation dedicated for reports.
- Time to run: The Patriot Client must be running at the time the report is due to go out.
If the preset reports will be sent out from a workstation that is often unattended, it is best to have this logged in as an operator that only has access to reports, and has all auto-logout or inactivity logout options disabled. This is especially important if you have the UL module registered on your licence, or if all your operators are configured to automatically logout after a certain time.
Follow the steps below to create a dedicated account for Preset Reporting.
Add a Security Group for reporting:
-
From the menu, select Security > Operators > Security Groups.
-
Insert a new Security Group.
-
Change the group type to Background Reports.
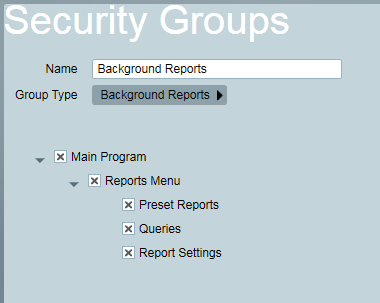
Security Groups with a group type of Background Reports are only able to access reports. -
Save the new group.
Add an operator for reporting:
-
From the menu, select Security > Operators > Operators.
-
Insert a new operator, and enter a username and password.
-
Assign the new Background Reports Security Group created above.
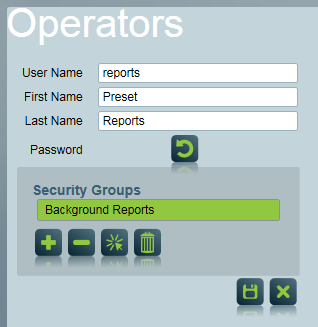
Operator with the Background Reports security group assigned to it. -
Save the new operator.
Now this newly created operator can be used to log into Patriot on the server or workstation which is used for sending out preset reports. Automatic logout will be disabled for this operator. Only reports can be viewed - maintenance or monitoring cannot be performed by a background reports user.