GraphQL Reports
A GraphQL Report is a report that uses a GraphQL query to form the basis for the data in the report. This allows any data from any related tables in the database to be reported on. It also allows the report output to be configured as required. The report can be printed or exported to Word, Excel, or PDF formats.
Writing a GraphQL query
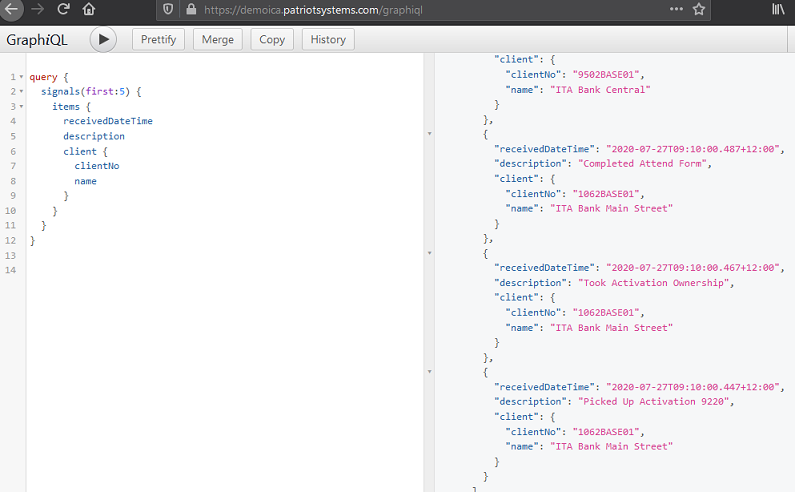
Information about the GraphQL query format can be found on the official GraphQL website | Start by writing the query that will retrieve the data. This can easily be done via GraphiQL, available as part of Patriot ICA. Open https://[server]/graphiql, e.g. https://demoica.patriotsystems.com/graphiql
This allows you to immediately see that your query is valid and that it returns the results you expect.
Report Data sets
Once the structure of the query is in place, use the @dataset directive to specify which sections of the query should be included in the report.
query {
  signals(first: 5, sortOrder: ID) {
    items @dataset(name: "signals") {
      receivedDateTime
      description
      client {
        clientNo
        name
      }
    }
  }
}
Multiple @dataset directives can be used in order to pull out all required information.
Query Variables
It is possible to accept query variables into your query, which can then have their values selected at runtime. This allows greater flexibility when running the report.
The following query arguments are supported. Note that the name and type must both match for the argument to be used.
-
$startDateand$endDateType:
DateTime. Allows specifying a date range which this report will cover. Note that both $startDate and $endDate must be specified. -
$firstClientand$lastClientType:
String. Allows specifying a client range which this report will cover. Note that both $firstClient and $lastClient must be specified. -
$clientGroupingIDsType:
Int[]. Allows specifying a client grouping filter by including a list of client grouping ID's to filter on clients with matching client groupings. -
$userIdType:
Int. Allows specifying a user which this report is being run for. Only available on GraphQL By-User reports. You need to implement the user filter in the query like the example query below. Otherwise, the by-user will default to showing all clients regardless of user id specified. Reports that do not have the user id filter cannot be run as a by-user report.
Example query with variables:
query ($startDate: DateTime, $endDate: DateTime, $userId: Int) {
  signals(
    sortOrder: ID
    filter: { from: $startDate, to: $endDate }
    hasAssignedUserID: $userId
  ) {
    items @dataset(name: "signals") {
      receivedDateTime
      description
      client {
        clientNo
        name
      }
    }
  }
}
Importing the Query
When you have finished writing the query, save it as a local text file.
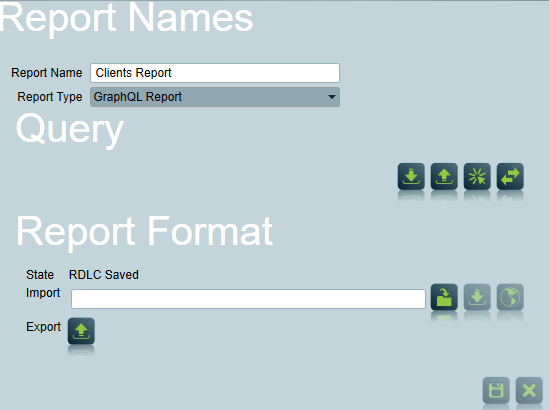
Open Reports > Settings > Report Names.
Add a new report, and select 'GraphQL report' Import the query definition from the saved query text file.
Creating the report layout
The RDLC report format must be configured to match the selected query.

Use this button to generate a default RDLC layout using the 2008 schema for the imported query. This will create a report with a basic layout, removing any existing layout. This option should be used after changing the query if the layout has not yet been customised.

Use this button to button to update the data sets in the existing RDLC layout without modifying the layout itself. This option should be used whenever the query is changed and you are using a custom layout. The custom layout can then be exported and updated to match the new query.
Beware that this function is designed for use with RDLC layouts using the 2008 schema. If your custom layout uses a newer schema version then some manual changes may be required to sync. your RDLC with your query. This is known to be required for subreport parameters which are defined differently in newer schema versions.
Once the report format has been created, it can be further customised as described in Custom Report Layouts.
Accessing nested data
RDLC has some limitations around accessing nested data. Accessing individual nested records is possible (e.g. a list of clients where each has an address field), but to access a nested collection (e.g. a list of clients where each client has a list of zones), you will need to use a subreport (see below)
The default RDLC created by Patriot includes a helper function to assist in safely accessing this nested data.
For example, given this query, where each activation includes the client address field:
query {
  activations(first: 5, sortOrder: ID) {
    items @dataset(name: "activations") {
      client {
        name
        address {
          city {
            name
          }
        }
      }
    }
  }
}
The client name on each activation can be accessed via
=Code.TryGetValue(Fields!client.Value, { "name" })
The city name of each client can be accessed via
=Code.TryGetValue(Fields!client.Value, { "address", "city", "name" })
Displaying images
Some fields include secure URL links to image data which can be displayed in your report. For these links to work you must have Patriot ICA setup and your ICA Address set in the system wide settings
To add an image to your report, using the following settings:
- Image Source: External
- Use this field: Set this to an expression that loads a query field with a URL to an image file. E.g.
=Code.TryGetValue(Fields!attachedImage.Value, { "absoluteUrl" }).
Some fields contain raw image content in Base64 encoding. These fields can be used to display images without Patriot ICA setup. These fields have largely been deprecated due to high server memory usage when used with large image files. But Base64 image content is still available for the Installer->ReportingLogo field (a small logo image) and for more fields by enabling the Flags->LegacyGraphQLBase64FileContent option in the Data Service configuration file. Note that this legacy option should only be used as a short term solution until you have converted your custom report images over to using secure ICA links. The legacy option will be removed in the next Patriot major version update.
To add an image to your report using Base64 image content use the following settings:
- Image Source: Database
- Use this field: Set this to the expression
System.Convert.FromBase64String(Fields!logo.Value). Update the field to match your query field. - Use this MIME type: Set this to the image type field, e.g.
Fields!logoType.Value.
Displaying Date/Time values in Local Client Time
Patriot internally stores date/time values in server time (the time zone of the Patriot server). If you wish to display these values in local client time you will need to fetch the client's time zone in your GraphQL query:
query {
  activations(first: 5, sortOrder: ID) {
    items @dataset(name: "activations") {
      description
      createdDateTime
      respondedDateTime
      completedDateTime
      client {
        name
        address {
          city {
            timeZone
          }
        }
      }
    }
  }
}
Then, in your RDLC use the client's time zone identifier to convert the date/time fields into local client time:
System.TimeZoneInfo.ConvertTimeBySystemTimeZoneId(
  Field!createdDateTime.Value,
  Code.TryGetValue(Fields!client.Value, { "address", "city", "timeZone" }))
Sub-Reports
If you cannot load all the required data in a single query (or if you want to access nested collections of data), then a subreport can be used.
Write an additional query to load the additional data. This should accept variables for the data to load (e.g. the client number or other key information).
Import the query into the Patriot Report settings as above, using the Sub-Query field, and then generate the Sub-report Format RDLC in the same way as for the main report.
Now, edit the main RDLC file and add a subreport element to the report in the desired location. Edit the properties of the subreport with the following details:
- On the General tab, enter "SubReport" under "Use this report as a subreport"
- On the Parameters tab, add in any required variables that your sub-query needs.
Example
The following example fetches a list of clients, and then a list of signals for each client.
query mainQuery {
  clients(first: 50) {
    items @dataset(name: "clients") {
      name
      externalRefNo
    }
  }
}
query subQuery($clientRef: Int!) {
  signals(
    first: 50
    sortOrder: ID
    clientFilter: { externalRefNos: [$clientRef] }
  ) {
    items @dataset(name: "signals") {
      receivedDateTime
      description
    }
  }
}
In the main report, the SubReport section would need to pass through externalRefNo as the parameter to the subreport.
If the sub-report query returns no data, then the subreport will be hidden from the main report. If you don't want this behaviour, add an additional data set that will always include data.
Running the Report
The report can now be run from the Reports menu. Simply select the report you created. If the report specifies variables you will be prompted to provide the values. The report can then be previewed or saved directly to disk. If the email module is registered, then the results can be immediately emailed. The report can also be set up to run automatically or saved for future manual runs, in the same manner as other reports. Consult the Reporting documentation for more details on this process.