Microsoft Entra Single Sign On
Patriot supports Single Sign On (SSO) by linking to Microsoft Entra (formerly Azure Active Directory). Company staff can log in to both ICA and the Patriot client using their existing organisational Microsoft accounts. Automatic provisioning is used to synchronise user details from Entra to Patriot, allowing users to be managed centrally in Entra.
Prerequisites
- Patriot version 6.11.38.1 or later.
- The Azure SSO Module must be registered in your Patriot license
- Patriot ICA must be configured.
- Access to the Azure Portal, with suitable access permissions.
- Suitable Microsoft Entra licensing to use SSO + Provisioning. Consult with Azure for their licensing requirements.
- A suitable Windows Server machine to run the On-Premises Connectivity Agent. This agent service connects Azure to Patriot and provisions/synchronises users.
Microsoft Entra SSO is designed to be used by internal company staff (e.g. monitoring operators, technicians etc.), as all users must be registered within your company Microsoft Entra ID organisation.
External users such as customers and bureaus/dealers can still use Patriots standard ICA logins with a username/password.
Microsoft Entra Configuration
Configuration in Microsoft Entra is required, to link Patriot to Entra.
Create Application
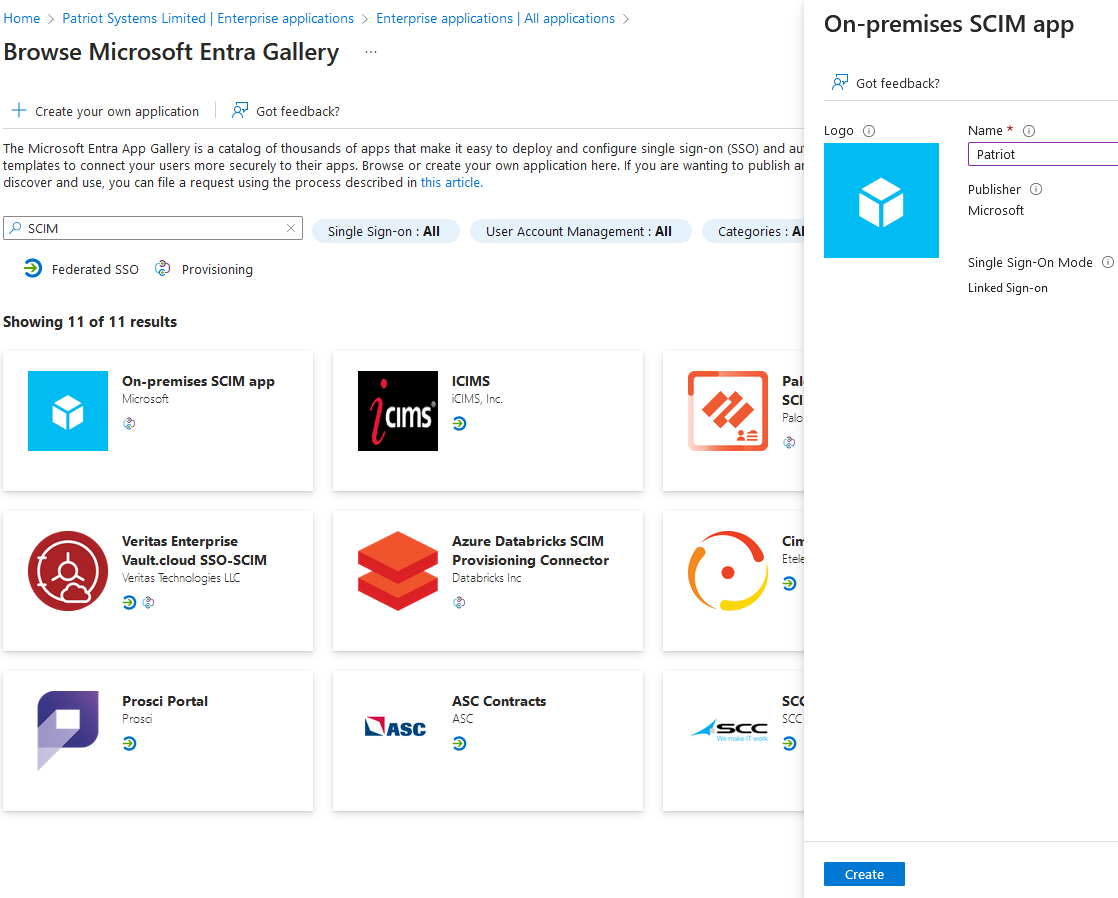
In the Azure Portal, navigate to Microsoft Entra ID and then select Enterprise Applications.
Register a new enterprise application and select the Microsoft On-premises SCIM app type in the gallery. Give the new application an appropriate user-facing name and create it.
Configure App Registration Details
Return back to the Microsoft Entra ID root page, select App Registrations, and then select your newly created application.
Configuration of the App Registration is required on the following tabs:
Overview Tab
Make note of the Application (client) ID and Directory (tenant) ID values.
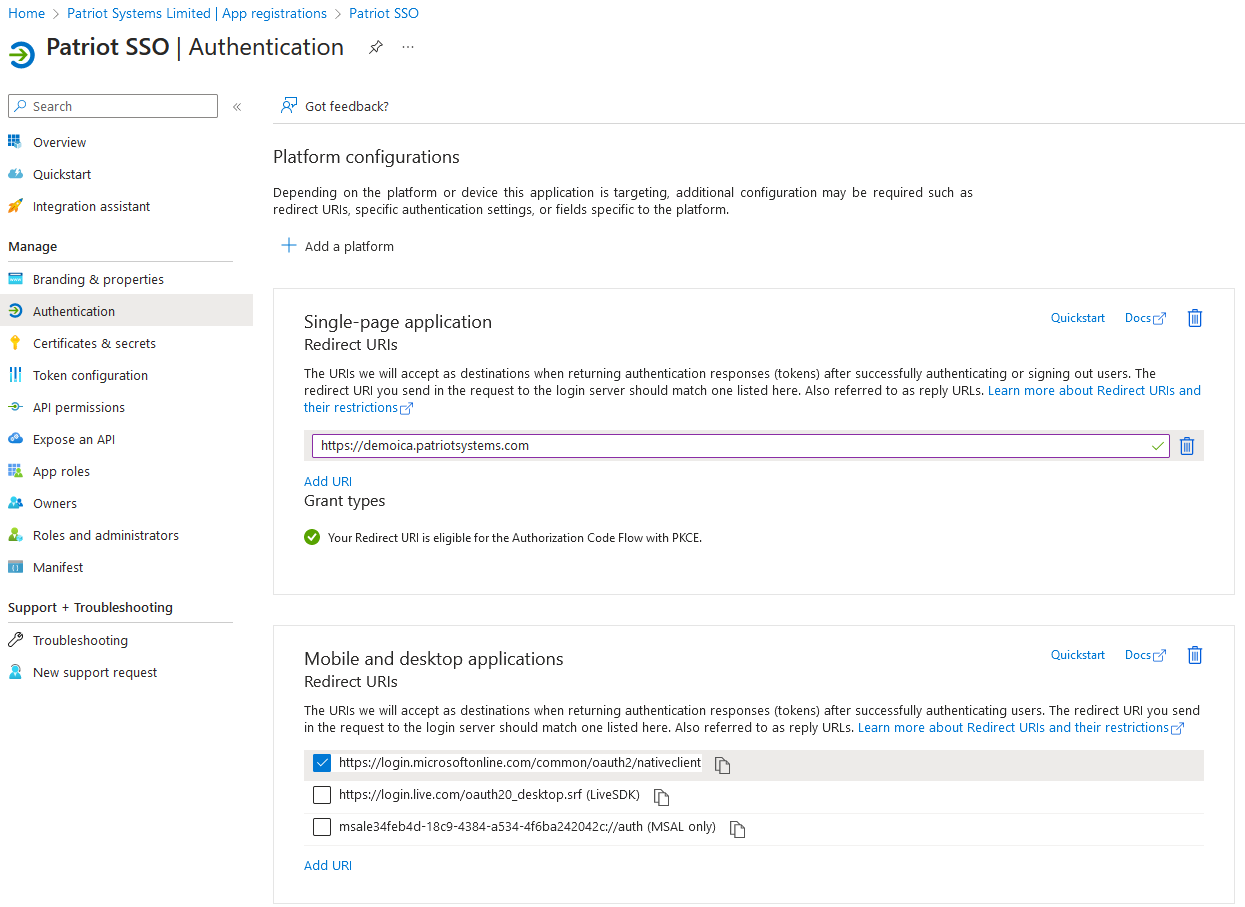
Authentication Tab
- Add the Desktop platform and enable the built-in redirect of
https://login.microsoftonline.com/common/oauth2/nativeclient - Add the Single-Page Application platform and enter your ICA address(es) as allowed redirect URIs.
- Ensure the Supported Account Types is set to Accounts in this organisational directory only.
Be sure to save your changes once the platforms have been added.
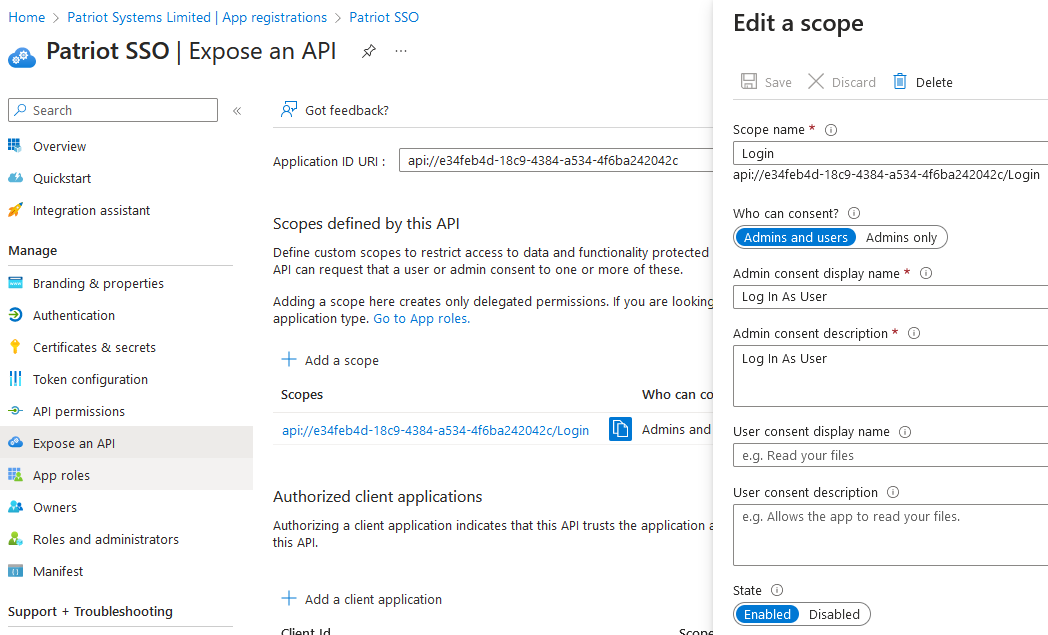
Expose an Api Tab
Add a scope, accepting the default Application ID URI if prompted. The new scope should be named Login. Add an appropriate description indicating that this is used to log in to Patriot.
Make a note of the full generated scope value, e.g. api://e34feb4d-18c9-4384-a534-4f6ba242042c/Login
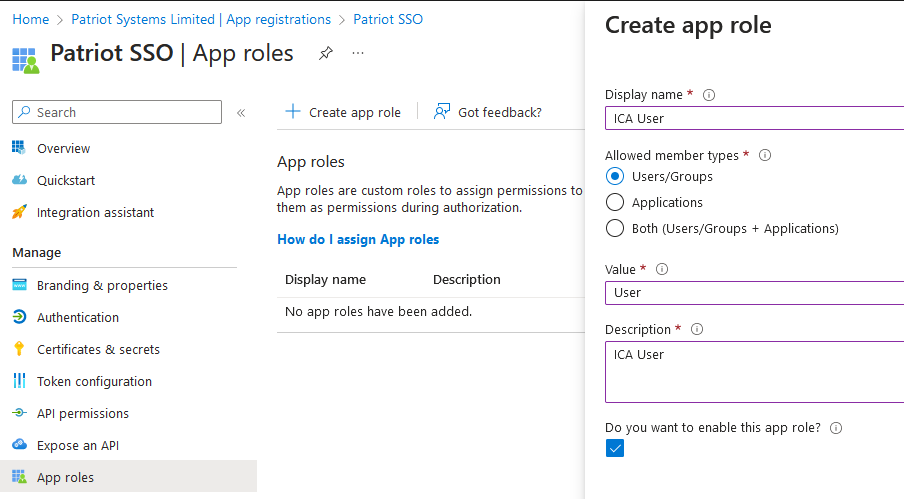
App Roles Tab
Create two roles:
User: Represents an ICA User.Operator: Represents a monitoring operator.
You may use any suitable Display Name and Description for these roles, but the values must be exactly User and Operator respectively. The member types should be Users/Groups for both roles.
Manifest Tab
Change the "accessTokenAcceptedVersion" value from null to 2:
{
	//... other settings ...
	"accessTokenAcceptedVersion": 2,
	//... other settings ...
}
Patriot Configuration
To create an Azure Authentication Provider in Patriot:
- Go to Security > Operators > Authentication Providers.
- This menu item is only visible if the AzureSSO module is registered.
- Click New to create a new Authentication Provider.
- Enter the following required fields:
-
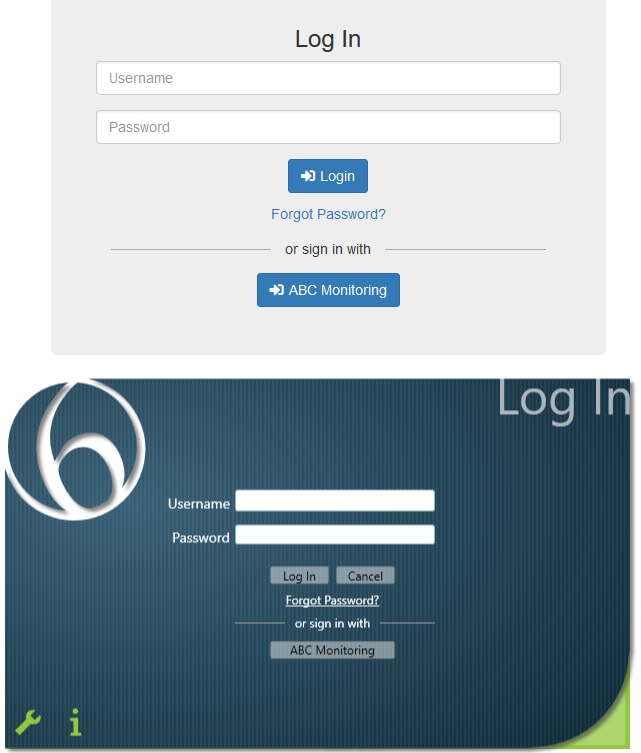
Display Name: the name users will see on the ICA and Desktop login screens , e.g.
ABC Monitoring -
Authority: use the Directory (tenant) ID value from the Overview, in this format:
https://login.microsoftonline.com/{tenant id}Example:
https://login.microsoftonline.com/2fdd84ff-cc9d-4d8c-972e-1112222333/ -
Client ID: use the Application (client) ID value from the Overview
-
Scopes: use the API Scope value from Expose An Api, as a space-separated list.
Example:
"openid profile api://c70c1833-9518-1234-1234-asdfghjk/Login"
- Save the provider record.
Automatic Provisioning
Generate the Provisioning Token
Once the Authentication Provider has been created and saved:
- Open the Authentication Providers maintenance menu again.
- Select the desired provider from the list.
- Click the Regenerate Token button.
- Confirm when asked. ⚠️ Warning: Regenerating the token will invalidate any previously issued tokens.
- Once the new token is created, a 'New authentication token generated' message will appear with a Copy button.
- Click Copy to save the new Provisioning Token to your clipboard.
Finally, go back to the Azure Portal, and open Microsoft Entra ID.
An administrator account is required to regenerate these tokens.
Creating Groups
On the Groups tab, create Entra groups to match the desired Operator Security Groups in Patriot. If you have existing groups that are suitable, these can be used, but it is recommended to create dedicated groups. For example, you may create Patriot Operator, Patriot Supervisor, and Patriot Technician groups. Add the desired users to each group.
Users may be assigned to multiple groups, but each group must be restricted to only a single type of user (User vs Operator). Additionally, nested groups (groups within groups) are not supported.
Assigning Groups to Application
Return to Microsoft Entra ID, select Enterprise Applications, then select your Patriot application in the list.
On the Users and Groups tab, assign the relevant groups to the application. Select either User or Operator roles for the group depending on which type of users are in each group.
It is recommended to first assign a single group containing a few test users, to test the provisioning is configured correctly. You can then assign additional groups to the application and assign additional users. These changes will be synchronised with the next provisioning cycle.
Configuring Provisioning
In the Enterprise Application registration, select the Provisioning tab, then Provisioning again. Change the Provisioning Mode to Automatic
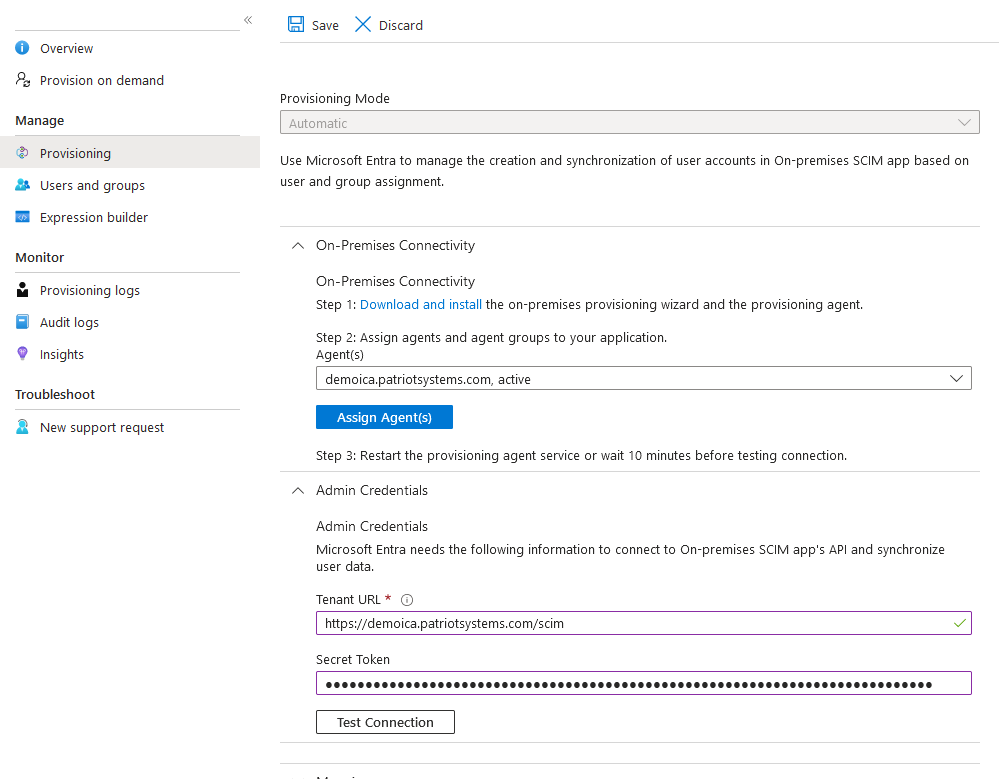
On-Premises Connectivity
Download the on-premises provisioning agent and install to a suitable server. Once installed, assign the agent to the application.
Admin Credentials
Enter the Tenant URL. This should be your ICA address, followed by /scim, for example https://demoica.patriotsystems.com/scim. Enter the Provisioning Token provided earlier for the Secret Token, and test the connection.
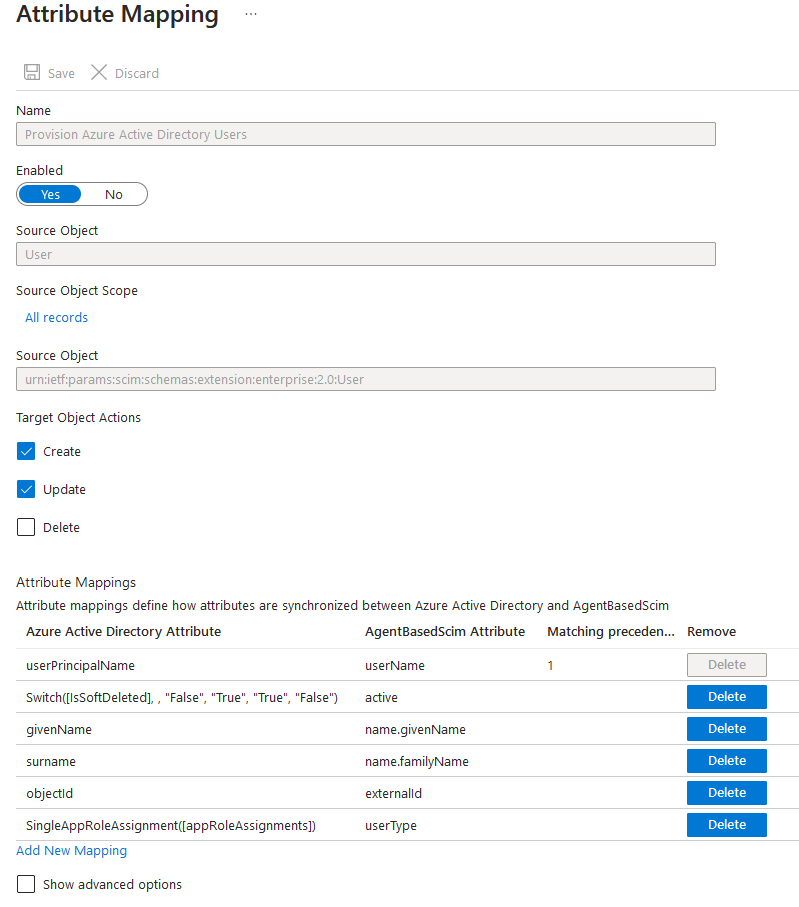
User Mapping
In Mappings, select the Users mapping.
Disable the Delete option, as deleting operators is not supported. Instead, Patriot operators will be soft-deleted (disabled) when removed / unassigned.
Patriot supports the following user SCIM attributes:
| SCIM Attribute | Description | Notes |
|---|---|---|
| userName | Patriot user name. | This must be unique. Patriot recommends using the userPrincipalName Azure attribute. This should be used as the matching attribute |
| active | Indicates if user is enabled/disabled. | For soft delete, use Switch([IsSoftDeleted], , "False", "True", "True", "False") as the Azure attribute |
| name.givenName | Users first name | Patriot recommends using the givenName Azure attribute |
| name.familyName | Users last name | Patriot recommends using the surname Azure attribute |
| externalId | User External Id | This must be set to the objectId Azure attribute |
| userType | Kind of user (User or Operator) | This must be set to SingleAppRoleAssignment([appRoleAssignments]) as the Azure attribute |
Configure user mappings to match, then save your changes.
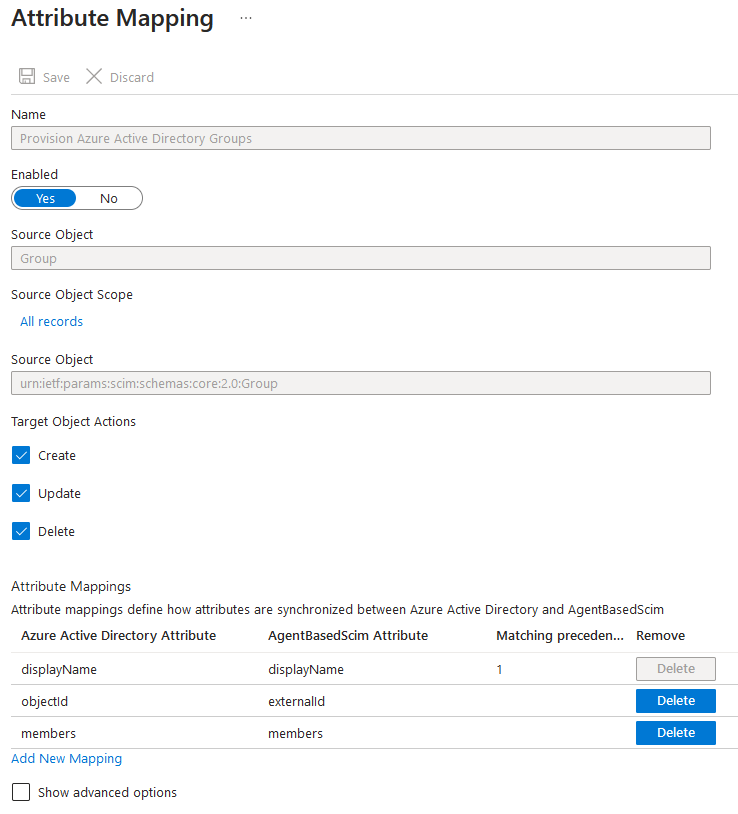
Group Mapping
In Mappings, select the Groups mapping.
Leave all target actions enabled, as creating / deleting groups is fully supported in Patriot.
Patriot supports the following group SCIM attributes:
| SCIM Attribute | Description | Notes |
|---|---|---|
| displayName | Name of the group | Patriot recommends the displayName Azure attribute. This should be used as the matching attribute |
| objectId | External group Id | Patriot recommends the objectId Azure attribute |
| members | Group members | This must be set to the members Azure attribute |
Configure group mappings to match, then save your changes.
Provisioning Settings
Ensure that Scope is set to Sync only assigned users and groups. Enable failure notifications if required.
Enabling Provisioning
Once all configuration is complete, enable provisioning. Return to the Provisioning Overview tab, and Start Provisioning if not already started. You can then monitor the provisioning cycle and review any errors.
When provisioning completes, some manual configuration is required within Patriot:
- Provisioning creates groups with no permissions. Edit the security groups to grant the desired permissions to each group.
- Provisioned ICA Users are provisioned as users with access to no clients. The generated users must be added to the desired clients to grant access.
Once this is done, provisioned users can now log in from ICA and/or the Desktop client using the dedicated button on the login page.
Provisioning will continue to synchronise users and groups periodically, meaning that any future changes will be synchronised to Patriot automatically.