Internal Patrols Configuration Tutorial
Overview
This document provides details on how to setup Dispatch for Internal Patrol Response Units so operators can quickly select the correct response unit for a dispatch job. This method of configuration is for when your operators need to select the specific response unit to send to the Job. The Patrol response units can be setup to use Plink Patrol app, Web Dispatch or Manual dispatch or a combination of these dispatch options.
Prerequisites
- The Dispatch module is required for the SELECT DISPATCH user features. If you want to link Plink Patrols to accounts without the Dispatch Module check out the Linking Patrols to Accounts Tutorial
- The Plink Patrol Response Module and ICA are required if the response units will be using the Plink Patrol App. This document assumes that the smartphone task and ICA are all setup ready for Plink Patrol App communication.
Contents
Create the Internal Patrol User and assign it to your Response Plans
Import the Plink Welfare Template and the Plink Patrol Template
Create and Configure the Patrol Welfare and Availability Accounts
Create and Configure the Patrol Users
Setup User Types
First setup two new User Types. One for the Internal Patrol User which will be the User that shows in response lists for operators to click on to begin the Patrol Response unit selection process. The second User Type will be for the Patrol Response units themselves. As with all user types that represent global users, the 'Protected' option should typically be checked to protect against unauthorised viewing/editing of your Patrol users by ICA users with access to client user listings.
Internal Patrol User Type
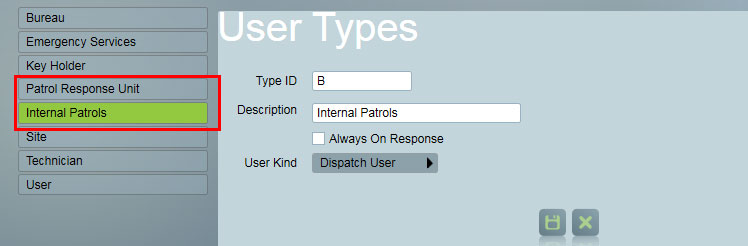
Go to Maintenance > Users > User Types
Create a new User Type and name it appropriately. In this example we will name it "Internal Patrols"
Select the 'User Kind' to be a Dispatch User (This is not necessary if you are only going to dispatch to internal Patrol Response Units however if your station will also dispatch through third party dispatch companies then this may be required for additional configuration)
Patrol Response Unit User Type
Create another new User Type for the Patrol Response Units and name it appropriately. In this example we will name it "Patrol Response Unit"
The 'User Kind' can be left as "User"
Setup Site Groupings
When you setup the different regions that your Patrol Response Units will be assigned to you will need to name these appropriately to your situation. Some stations will have Patrol Response Units allocated based on the Key Chain they have in their vehicle. Some stations will assign Patrol Response Units to groups of cities or suburbs. The naming of the Site Grouping items should reflect the different regions that your Patrol Response Units are assigned to.
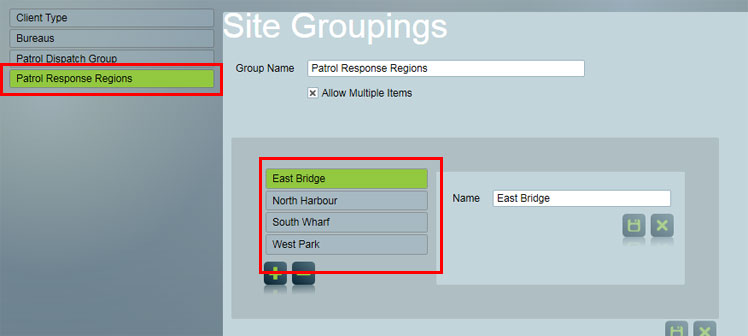
Go to Maintenance > Clients > Site Groupings
Create a new Site Grouping. In this example we will name it "Patrol Response Regions"
Now create the Site Grouping Items which will match the regions or key route names that your Patrol Response Units will be assigned to.
In this example we have created four regions, groups of suburbs, of a city that our Patrol Response Units will be assigned to.
Setting the Patrol Response Regions in the System Wide Settings
We now set this new Site Grouping as the "Patrol Run Group Grouping" so Patriot can match Patrol Response Units to the accounts based on the accounts selected Site Grouping.
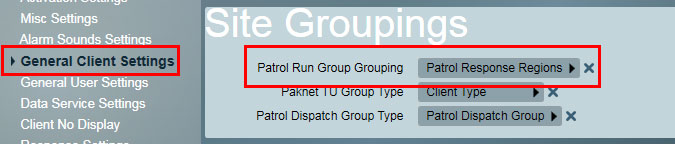
Go to the System > System Settings > System Wide Settings
Go to the General Client Settings and select the Site Grouping you just created as the "Patrol Run Group Grouping"
Create Internal Patrols User
We now need to create the Internal Patrols User and ensure it shows in the Response Lists for operators to use in the appropriate alarm activations
Go to Maintenance > Users > User Maintenance
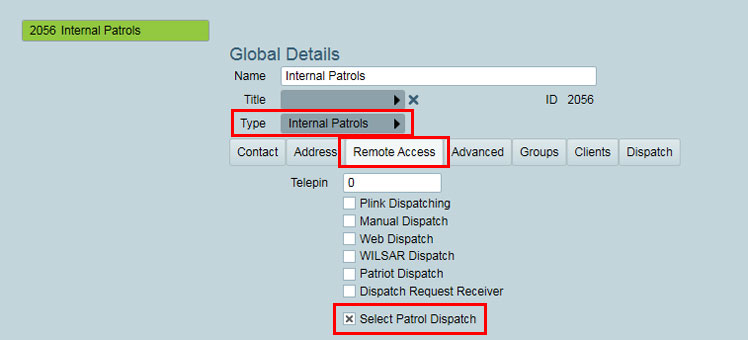
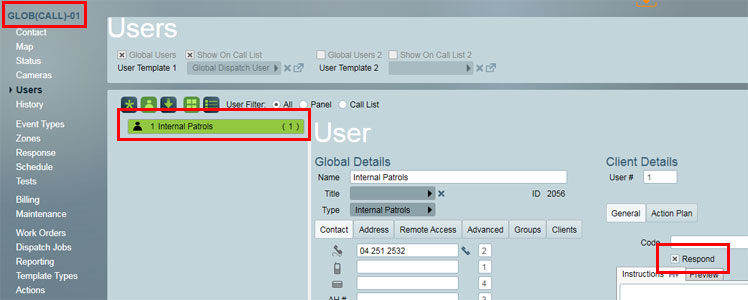
Create a new User and name it "Internal Patrols" or an appropriate name.
Select the 'Internal Patrols' User Type that we created previously.
Go to the Remote Access Tab and check the 'Select Patrol Dispatch' box. This will prompt Patriot to display the button for operators to pop up the Patrol Response Unit selection window. It will also allow you to assign Patrol Response Units to this User.
This Internal Patrol User now needs to be setup to show in the appropriate clients and activations.
How this will be configured will depend on which types of events the Internal Patrol Response Units will be sent out to Dispatch Jobs for and for which customers.
If you want the Internal Patrol User to show for all clients then you can follow the following steps
STEP 1: Create a 'Global Dispatch User' template.
Create the template and assign the 'Internal Patrol' user and check the 'respond' checkbox so it will show in the response list. Then in the System Wide Settings > Response settings > Global User Template select this new 'Global Dispatch User' template.
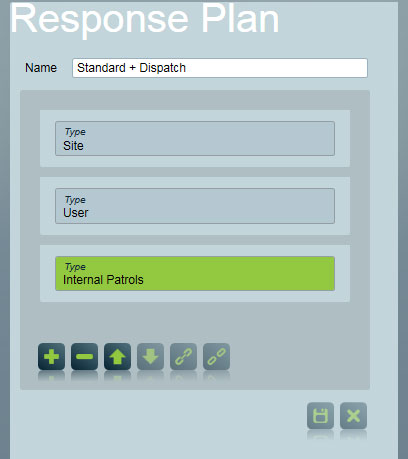
STEP 2: Assign the 'Internal Patrol' User to a new Response Plan
Create a new Response Plan and name it appropriately e.g. "Standard + Patrol Dispatch". Configure the same Users as your Standard Response Plan and then add the 'Internal Patrol' User Type in the right position
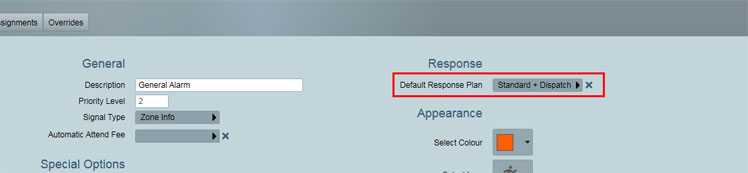
STEP 3: Assign the 'Standard + Dispatch' Response Plan to the appropriate Action Plans
Go to the Action Plans configuration and select the 'Standard + Dispatch' Response Plan on the Action Plans that may require Patrol Response Units to be dispatched.
If you want the 'Internal Patrols' User to show only on some accounts you can create an Internal Patrols template and add it as a User Template to the appropriate accounts or add in the 'Internal Patrols' user manually to the appropriate accounts.
You can also use Response Templates or Response Plan overrides at a client or Bureau/Dealer level to determine which events and for which accounts the 'Internal Patrols' user would show for.
Import the Plink Welfare & Plink Patrol Templates
( Only required for setting up Plink Patrol Response Units )
The 'Patriot Patrol Welfare Checks - Plink' and 'Patriot Patrol Dispatch Availability' Templates can be found in the library documentation here
Download them both and import them into Patriot using the import / merge function
When you are importing the templates choose to create the new Action Plans based on the template details
Create the Patrol Welfare & Availability Accounts
( Only required for setting up Plink Patrol Response Units )
Creating a welfare account will allow GPS locations of Patrols and Patrol Duress alarms to be logged against an account. This allows response actions to be setup and operators to receive any alarm events and follow through a standard alarm response process if the Patrol triggers a duress alarm or they are late to sign into their shift etc.
Creating a Patrol Dispatch Availability account allows Patriot to know when the Patrol is available and when they are unavailable.
These two accounts should be separate areas but with the same client id
e.g
-
Account: 1002 BASE will the Patrol Car 1 Availability account
-
Account: 1002 0001 will the Patrol Car 1 Welfare account
-
Account: 1003 BASE will the Patrol Car 2 Availability account
-
Account: 1003 0001 will the Patrol Car 2 Welfare account
The Availability account will only need to have the Patriot Patrol Dispatch Availability Event Type selected in the accounts Event Types tab. The Welfare account will need the Patriot Patrol Welfare Checks - Plink event type template selected in the Event Types tab of the account and there are additional settings detailed in the document below under the "Welfare Checks / Lone Worker" at the bottom of the document.
For more information on creating the 'Patrol Welfare' and 'Patrol Dispatch Client' accounts see the documentation below
Repeat this process to create all the Welfare and Dispatch accounts for the Internal Patrol Response Units as necessary. Each Patrol will need a separate Availability account and a Welfare account if welfare features are being used.
Create and Configure the Patrol Response Unit Users
We will now create the Patrol Response Units and configure them.
Go to Maintenance > Users > User Maintenance
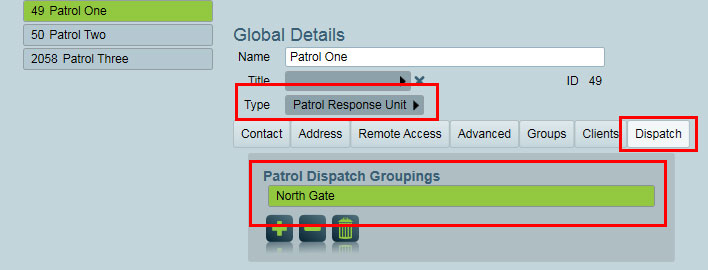
Create a new User and name it appropriately. This could be the name of the Patrol Response Vehicle. In our example we will name our Patrol Response Units "Patrol One", "Patrol Two" ...
Select the 'Patrol Response Unit' User Type that we created previously.
Go to the Remote Access Tab
Select the Type of Response Unit this user is. The options here are "Plink Dispatching", "Manual Dispatch" or "Web Dispatch". You must select one or more of these options.
For more information on these different Dispatch types and their configuration consult the documentation library.
Select the "Internal Patrol" User as the 'Select Patrol Dispatch' User.

If you are setting up the Patrol Response Unit as a Plink Patrol Response Unit follow the next two steps. If you are setting up Web or Manual dispatch Patrol Response Units these steps are not required.
Select the 'Patrol Dispatch Client' Account we created for this Patrol Response Unit
Select the 'Welfare Client' Account we created for this Patrol Response Unit

Go to the Dispatch Tab and select the Patrol Dispatch Groupings that this Patrol Response Unit will be assigned to. You may select one or more.
Repeat this process to create all the Internal Patrols as necessary
Setup Dispatch Categories and Feedback Forms
Now the Internal Patrols are configured you may need to create Feedback Forms (required details the Patrol must enter for differnet dispatch job types) and Dispatch Categories.
For more information on creating the feedback forms required for Dispatch Jobs check the documentation here
To create Dispatch Categories (Work Order Categories) and link them to the Feedback Forms check out the documentation here
Dispatch & Work Order Categories
More Information
For more information on creating the 'Patrol Welfare' and 'Patrol Dispatch Client' accounts see the documentation below
For more information on dispatch in general see the documentation below