Billing Batch
Patriot can be configured to launch an external program designed to perform custom billing calculations.
Process Overview
It is recommended that external billing integrations follow a two-step process for handling custom billing.
In the first step, data is queried from the Patriot system, and the desired invoices are calculated. These invoices are stored back into Patriot, but are not yet sent to the accounting package.
In the second step, the invoices generated in step one are sent to the accounting package.
Invoices are generated into Patriot as a single 'batch' containing all the invoices that were generated from that run of the billing program.
This two-step process has several benefits:
- Invoices can be reviewed after generation, before being sent on to the accounting system
- Failed invoices can be re-sent without being regenerated
- If an interruption occurs during the billing process, it can be easily resumed without generating duplicate invoices in Patriot or the accounting package.
Prerequisites
- Billing module registered in your Patriot license
- Patriot API enabled (if your external billing integration requires this)
- A custom billing program that can be run to generate invoices into Patriot
- A custom billing program that can be run to export invoices from Patriot into your accounting package (if using the two-step process recommended above)
Charges Setup
Follow the information in Billing Charges to configure your charges such as client charges, work order charges, and/or activation charges.
Task Setup
Open System > Tasks > Task Settings
See Task Settings for general information on setting up a task.
Add a new task, and select 'Billing External' from the drop-down menu. Click next to continue to the task settings.
Enter a Description of the task.
The Task No. will default to the next free task number.
Select the Computer that this task is to be run on. This will default to the computer you are currently on.
Enter a System Account No. The system account number is used to log error and system generated signals against. This should default to BILL000101, if it hasn't, enter this in now. If this account does not already exist you will need to set it up as a template.
Enter the path to the invoice batch generation command as Batch Generation Command. Any required arguments for the batch generation program can be entered in Batch Generation Arguments. Common / global arguments can be configured here, and batch-specific arguments can be entered in the batch definition settings (see below)
Enter the path to the invoice batch committing command as Batch Commit Command. Any required arguments for the batch commit program can be entered in Batch Commit Arguments
Batch Definition Setup
Open Billing > Billing > Batch Setup & Run
Add a new batch definition, and select 'External Billing' from the drop-down.
Manual Batches
Manual batches are only run when the 'Run Batch' command is used, and a start/end date are entered directly.
Automatic Batches
Automatic batches are run automatically at preset intervals. Enter in the start date and frequency, and the report will run automatically.
Authorised
If a batch is authorised, it will be committed automatically after being generated by the generator program. If a batch is not authorised, it will require manual authorisation from Billing > Billing > Billing Batch Runs after being generated, before it is committed to the accounting system.
Task
Select the configured external billing task above, which contains the command configuration.
Command Arguments
Additional batch-specific arguments to use when generating the batch. These arguments will be combined with the task arguments configured above when running the batch generator program.
Batch-specific arguments for committing a batch are not currently supported. It is recommended instead for the batch generator to store any required data inside the batch itself when it is created.
Command Argument Placeholders
When entering command arguments in the task settings or batch setup, placeholders can be entered which will be replaced with the appropriate values when running the program.
- Arguments should be entered within brackets, e.g.
{batchId}. - Formatting can be entered after the argument name by using a colon and then the format specifier, e.g.
{startDate:yyyy-MM-dd}. - To enter a literal open or close bracket, use two brackets instead, e.g.
{{ or }}
Batch Generation Arguments
- startDate - the DateTime that the batch period starts at (i.e. the earliest data to include)
- endDate - the DateTime that the batch period ends at (i.e. the latest data to include)
- batchDefinitionId - the ID of the batch definition that is generating this batch.
Batch Commit Arguments
- batchId - the numeric ID of the batch that is being committed.
Examples:
Generate Command: MyBatchGenerator.exe
Generate Arguments: --mode dealerBilling --begin-date {startDate:dd-MM-yyyy} --end-date {endDate:dd-MM-yyyy}
Commit Command: MyBatchCommitter.exe
Commit Arguments: --commit --batch {batchID}
Batch Runs
Once the setup is configured, batches can be run.
Automatic batches will be run at preset intervals automatically, and manual batches can be run on demand.
When a batch is run, the Patriot task will execute the configured billing command, using the arguments / placeholders configured above.
After the batch generation program saves the batch of invoices to Patriot, they can be viewed from Billing > Billing > Batch Runs.
If the batch was authorised, Patriot will automatically run the configured batch committing command, otherwise the batch can be authorised manually from the Batch Runs screen.
Any failed invoices or problems can also be viewed from this screen.
Batch Review
Once a billing batch run has been generated, you can easily review all transaction (invoice) data before (and after) it has been committed to your accounting package.
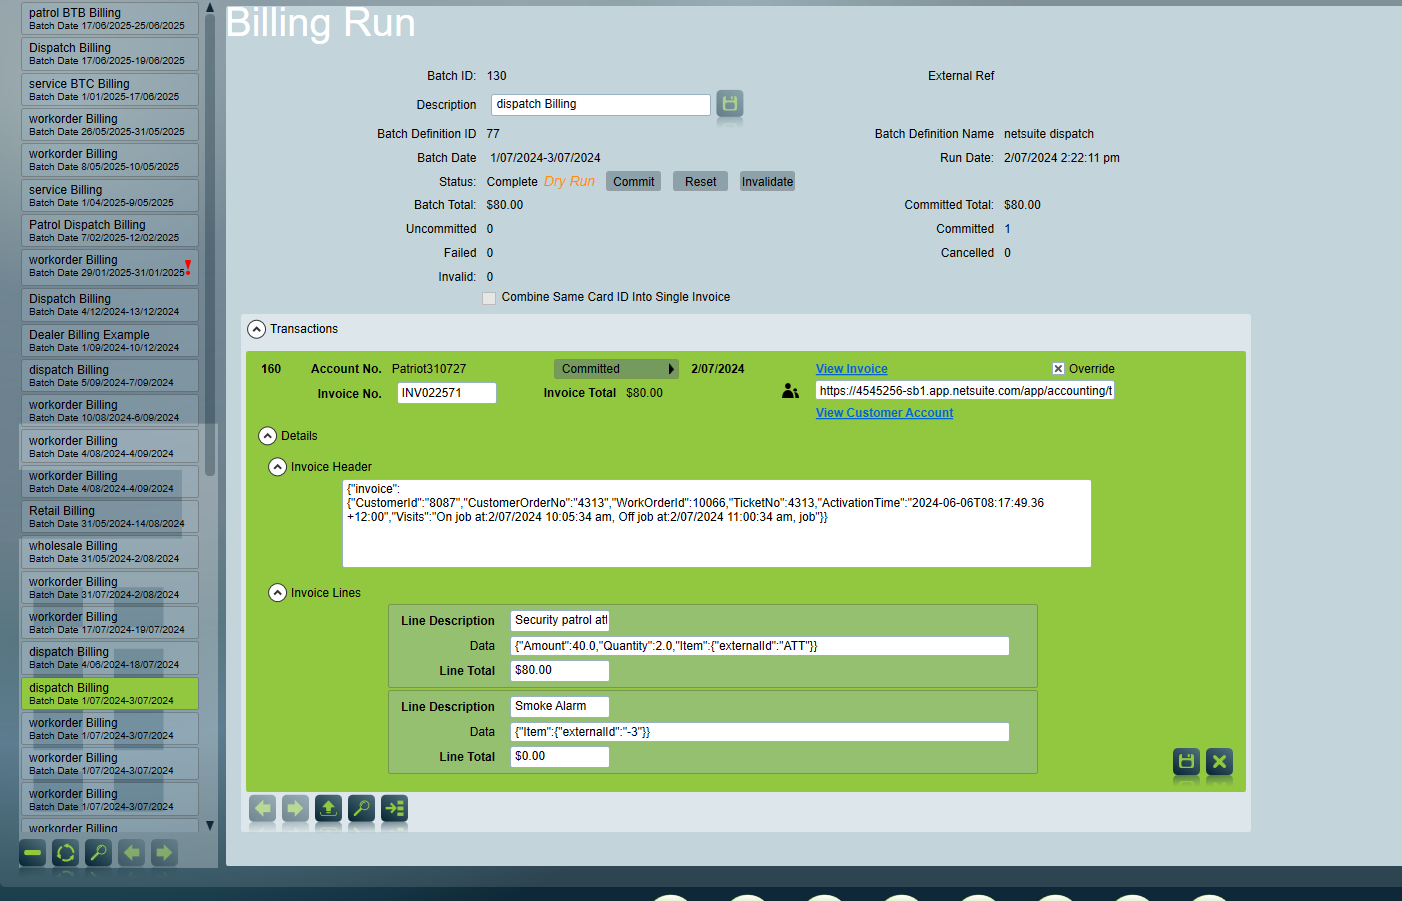
The batch status indicates whether the batch has been committed to your accounting package:
- Unauthorized the batch is awaiting authorization to commit to your accounting package. Press the Commit button when you're ready to send the batch to your accounting package. If you want your batches to commit automatically after generation, without requiring manual authorisation, then check the "Authorized" checkbox on the batch definition.
- Authorized the batch has been authorized and is awaiting pickup by the External Billing task. Once a batch is authorized it cannot be deleted. Press the Reset button to reset the status back to Unauthorized.
- Running the batch has been picked up and is in the process of being committed to your account package.
- Incomplete The batch isn't actively running, but hasn't been fully completed either. For example, it may have been interrupted or encountered an error while processing the batch. Review the batch transactions, the log of the External Billing task's system account and the Windows application event log for more information. Once you're ready to re-attempt to commit the batch press the Commit button. Note that any transactions that were already successfully committed will be skipped.
- Complete the batch has been completed - all transactions have been committed to your accounting package.
- Invalidated the batch has been invalidated, this state only occurs when the Invalidate button is pressed. Invalidating a batch has the same effect as deleting a batch (a new batch can now be created for the same service period, work orders etc.) but without data loss.
Edits can be made to transaction data prior to committing to your accounting package. But note that in some cases it may be more efficient to delete/invalidate a batch and re-generate.
The invoice data displayed includes the Invoice No. generated by your accounting software for each transaction in a batch once it has been successfully committed.